Caroline
-
Posts
1,248 -
Joined
-
Last visited
Content Type
Profiles
Forums
Events
Everything posted by Caroline
-
That's what I was thinking too, but I haven't yet created a good enough material to warrant trying that. My poor Jabberwock has been decalled, undecalled, rigged, unrigged, so much that he is very confused. Now he's thinking of having a real felt material jacket, with pure wool socks. Maybe baked too. So, Master Chief, go experiment. If you are very lucky (and young), then you will retain some of what you learn, unlike the old person (me) who has to lose a bit of memory (I was going to say bit of retention, but I'm not quite there yet) to learn something else.
-
No, Rodney you're the best That last image - that's a corker - I just dragged my current project (ever uncompleted image contest) into my library. So easy to find. My question - Those tabs along the library HTML Tutorials/Projects/Models etc, can you add a new tab? Like My Projects/My Images?
-
Yes - Smiley face, USofA flag with stars. Just amazing. Practically all with gradients - I stayed up all night after I watched the Burlap sack, with proper weave - warp under and over weft, etc, with transparency between the threads. I understand the concept, but he talks about 'pivot' a lot, and looks up the value for 'pivot'. I have to work out how to use that - his pivot values are usually totally different from mine.
-
OK, I give in, but it's really not elegant. wheel.prj It's probably missing the decal, but it should show the 4 keyframes and the post extrapolation. (Sorry to those people who downloaded it with hair - accident)
-
I needed a strong cup of coffee just to deal with that paragraph, John. Master Chief - to do materials, you should search the forum for "+material +tutorial" (without the quotes). Then do a lot of reading. These are a few tutorials that I have bookmarked: Jeff Paries' Pumpkin Yves' Wood Material And one from John that I just found: Warning though, having done all these it takes a lot of experimentation to get what you want. I am currently doing Anzonvin's Mastering Materials CD, which is just brilliant. I used to think that decals was a better way of doing it, but I may be persuaded otherwise.
-
T-Dogg - that's a good simple example, and a few less steps than mine.
-
This is the material effector tutorial by Jeff Paries that John mentioned: http://www.digitalproducer.com/pages/mater...n_animation.htm Quite complicated, and I'm not sure that I ever got it to work properly. It looks like John animated a material with Gradients, and animated where the gradients (one with transparency) started and ended. This is advanced stuff, and still makes me weep with frustration .
-
I'm probably missing something here, but is it necessary to use euler in this simple circumstance? Could you just not assign one bone to the wheel, set 4 keyframes for the rotation, then right click the last keyframe, and click Curve > Post-Extrapolation Method > Repeat. This movie is 1 rotation with 4 keyframes, and the 2nd repeated. wheel.mov
-

Godzilla X King Ghidorah: Vengeance Project
Caroline replied to Mikal's topic in Work In Progress / Sweatbox
Not quite sure what you mean by blending. Are you using decals or materials? Simple answer - decals - do the blending in Photoshop, materials, use gradients, I think - not too sure on that. And by Photoshop, I mean Gimp, Paint .Net, Photoshop Elements, PaintShopPro, whatever art program you have. -
Godzilla X King Ghidorah: Vengeance Project
Caroline replied to Mikal's topic in Work In Progress / Sweatbox
This is for Windows XP - I don't know how to do it on a Mac. 1. Locate your MirrorBone.hxt file 2. Right click it and left click Copy 3. Click Start Menu > My Computer 4. Click the Folders Icon on your top toolbar to show a list of folders on the left hand side (If you don't have this, you will have to double click your way down to get to the hxt folder, instead of doing the next step). 5. You need to click the plus signs next to My Computer Local Disk (C:) Program Files Hash Inc V15.0 6. Click the hxt folder on the left hand side, and you should be able to paste the MirrorBone.hxt file on the right hand side. 7. Restart Animation:Master There are several different ways to do the above, depending on how your Windows XP is configured. You can't get to the Plugins folder (the hxt folder) through the Control Panel, only Windows Explorer. And sorry, Mikal, I just realised we hijacked your post. -
Everything's in the choreography from the beginning, but if you look at each item's properties then there is a property Active. You can turn this OFF at the start of the chor, then when you want it, turn in ON.
-
Godzilla X King Ghidorah: Vengeance Project
Caroline replied to Mikal's topic in Work In Progress / Sweatbox
I have never used this plugin - I tend to do things the hard way. However, I believe that you download the mirrorbone.zip file. Then right click it and Extract All. This should give you a MirrorBone.hxt file. Copy and paste this into the A:M Plugins folder. Mine is C:\Program Files\Hash Inc\V15.0\hxt Restart A:M and it should come up as per the tutorial. I haven't done this section yet - I think I should. -
Godzilla X King Ghidorah: Vengeance Project
Caroline replied to Mikal's topic in Work In Progress / Sweatbox
Do you mean Basic_Rig_Training.zip? A .zip file is a compressed file, and the things inside it need to be unzipped before using. If you are using Windows, you can right click it, and click Extract All. If you have the same settings as me, the file Rig Training Robot (Tutorial).mdl will be in the folder Basic_Rig_Training\Basic_Rig_Training. This is .mdl is a model file that can be dragged into A:M or right click Objects in the PWS and Import it. -
That's pretty good with no reference. As to tutorials, it looks like you got the A:M side down, so you're just looking for general animation tutorials? The main crit I'd have with yours is that there is no up/down in the hip/body/head area, and most people do have some up/down motion. These are some of the sites I've bookmarked for walk cycles: A good all round walk page: http://www.rmit.edu.au/aim/a_notes/04_walkcycle_project.html Specifically walking (traditional 2d, but principles are the same): http://www.idleworm.com/how/anm/02w/walk1.shtml Examples: http://www.brianlemay.com/animationexample...ationindex.html And a clever walk reference: http://www.biomotionlab.ca/Demos/BMLwalker.html Preston Blair: http://www.rmit.edu.au/aim/a_notes/walk_reference_01.html Books - the best reference for animation of this kind is Richard Williams "The Animator's Survival Kit". I have this available in my local library, so you might check that too, although I will one day fork out for a copy, as it is well worth it.
-
I still don't understand. Maybe a drawing? Or some idea of what shape you are trying to end up with? If you snap the control points to a grid, it won't be a circle any more. How about if you select several points and drag them all at the same time? Or Extrude?
-
I feel a bit odd in this topic, because my pony is called Whiskey . And I'm happy to help if I can, but sometimes it can be difficult for people to help when they are using a newer version, as occasionally things work differently. About upgrading though, the best thing is getting my DVD drive back
-
The answer to this, and your other question about animated textures, is to do The Art Of Animation:Master exercises. Once you have done those, you will have an idea about the capabilities of A:M. The tutorial 11.5 Make a face will show you how to model a face - the whole body modelling is here: http://www.colins-loft.net/tutorials.html It is hard to make pictures for rotoscopes - I've tried with my family, but it takes a lot of photos and manipulation to get the xyz dimensions equal in several different photos. If you have downloaded the data.zip file from http://www.hash.com/ftp/pub/misc/, there are face rotoscopes for that exercise 11.5 in Data\Tutorials\MakeFace\maps, and the instructions to go with that are in TAOA:M.
-
The models etc. should still be accessible from your CD. Right click Models in the PWS, and Import. (Or copy the Data folder from the CD as below) If necessary, you can download data.zip from: http://www.hash.com/ftp/pub/misc/ This is 158mb, and contains models, materials etc, including Gala. Copy this new Data folder onto the Data folder at C:\Program Files\Hash Inc\V15.0, and then they will all magically appear in your Libraries. However, remember to make a copy before experimenting with them, as it is easy to overwrite the originals, when they are not on a CD. (Yes, I did manage to overwrite one )
-
To be able to see the picture it needs to be a jpg, not a bmp. A jpg is much much smaller than a bmp as well. Were you doing a screen capture? You can render to a jpg, or if you really want to screen capture, you can save as a jpeg in whatever screen capture program you used. It looks like your garbage can really works, with those bones. That's good.
-
Have you tried the Flower Power exercise in The Art of Animation:Master? That shows you how to make bones, which attach to each other. You could try this tutorial from Mechadelphia: http://mechadelphia.com/tutorials/rigging/...ing1/index.html with special reference to 5. Bone Hierarchy. Rigging is a complex art / science.
-
Small boolean tutorial by Vern(?) http://www.lowrestv.com/lowres/tutorials/b...s/booleans.html
-
Problem with hair - Five point patches are bald
Caroline replied to thefreshestever's topic in New Users
The 'normal' is the 'direction' of the patch. You may see hair growing inside the body on those 5 pointers. First turn off particles - Shift 8. To see the normals, click Tools Menu > Options. On the Modelling Tab, tick Display Normals. You will now see yellow lines coming out of the center of the patches. If the 5 pointers do not have a yellow line coming out, then they are turned inwards. Click the Patch Tool (Shift P), and click on the Patch. Press the F key to reverse the direction of the patch. The yellow line should now be coming out of the model. Turn off Display Normals through the Options, and turn on particles - Shift 8, and you should see hair. -
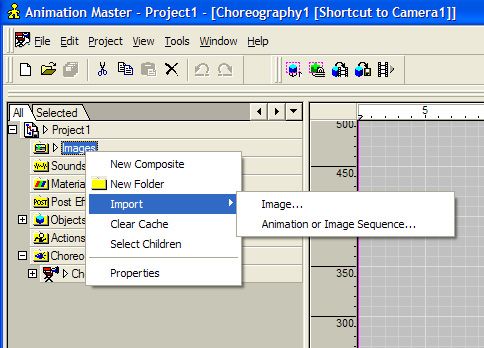
Right click Images in the PWS (Project Workspace). For Movies, or tga sequences, use Animation or Image Sequence.