MattWBradbury
-
Posts
1,410 -
Joined
-
Last visited
Content Type
Profiles
Forums
Events
Everything posted by MattWBradbury
-
You could use the same sprite emmiter to emmit the spalshes as the water hits the valley wall. From the animations I wouldn't think that the rocks would not have been jetted up in the air; rather, they would most likely want to be projected forward towards the camera like the wood debress.
-
How did you achieve this effect?
-

Earth with Hi-Res textures
MattWBradbury replied to MMZ_TimeLord's topic in Work In Progress / Sweatbox
You could put your earth in the star field from Julian. I don't know if it works in these newer versions. -
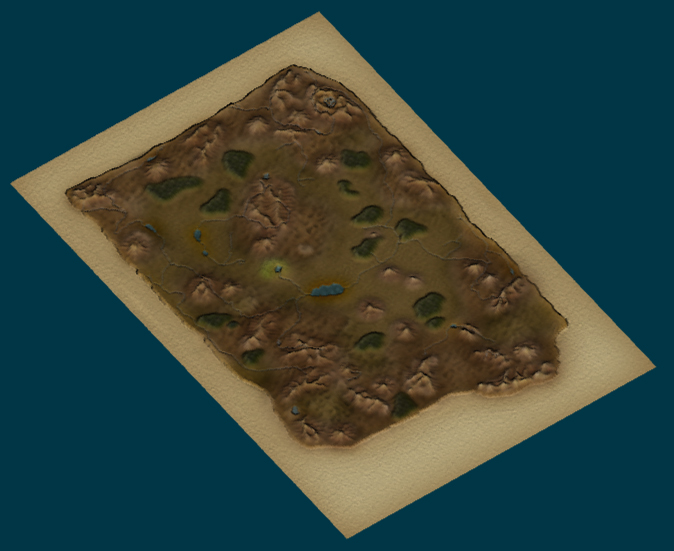
Oz Map -- Another v13 Displacement Fun Thread
MattWBradbury replied to Zaryin's topic in Work In Progress / Sweatbox
I couldn't find any greyscale topography maps; however, I did find many colored topography maps. In fact here's the site which has the entire earth as a colored topography map. Just click on the second of earth you want to see the topography of and click it again to get a really big image of it. I'm currently thinking of a way to use photoshop to convert these colors into greys so that they can become height maps. But like most colored topography maps, they felt that it was nessisary to add diffuse shading to the mixture. You can see what I'm talking about on the Atlantic Sea Wall in this image. This image is a smaller version. -
Oz Map -- Another v13 Displacement Fun Thread
MattWBradbury replied to Zaryin's topic in Work In Progress / Sweatbox
I made a change to my last post. Do not invert the X or Y, and you can use either Red Conversion or Average RGB. This techniquie is especially useful for rendering specular. These two images show the difference between using normal maps and not use normal maps with displacement maps. With Normal Maps: [attachmentid=13583] Without Normal Maps: [attachmentid=13584] These are for example purposes. I don't suggest making your topography super shiny. Though some specular adds to the shot. Some Shinny (100% Size 100% Intensity): [attachmentid=13585] Not Shinny: [attachmentid=13586]
-
Oz Map -- Another v13 Displacement Fun Thread
MattWBradbury replied to Zaryin's topic in Work In Progress / Sweatbox
I'm assuming that you already have the normal map plug-in in your photoshop plug-ins folder. Okay, open your height map. White is the top most part of your hieght map, and black is your bottom most. If it's backwards invert the colors (ctrl-i). Set the mode of the image to RGB: Image-> Mode-> RGP Color. Flatten the image if it isn't flattened already. Layer-> Flatten Image. Go to Filter->NVIDIA-> Normal Map Filter. nothing should be check in Height Generation. Select 4 samples for the filter type. Set the MinZ to 0 and the scale to 8. Select Average RGB in Height Source. Set the Alpha Field to Height and press OK. It should look something like this. [attachmentid=13582] Use the genereated normal map along with your displacement map to add correct shading to dispacement maps. If the normal map appears to be backwards, use negative values and tell me that they are backwards. Those are the hieght map conversions I've come up with. Remember that Normal maps appear inverted when rendered with quick rendering.
-
Oz Map -- Another v13 Displacement Fun Thread
MattWBradbury replied to Zaryin's topic in Work In Progress / Sweatbox
Really? The tests I did had high thumbs up for the use of normal maps. This is the normal map I came up with. Put this in the same decal as your displacement. Set your dispalcement to 0 and change the values on the normal map until they look like your mountains would. If their backwards, which sometimes happens, just use negative values for the normal map.
-
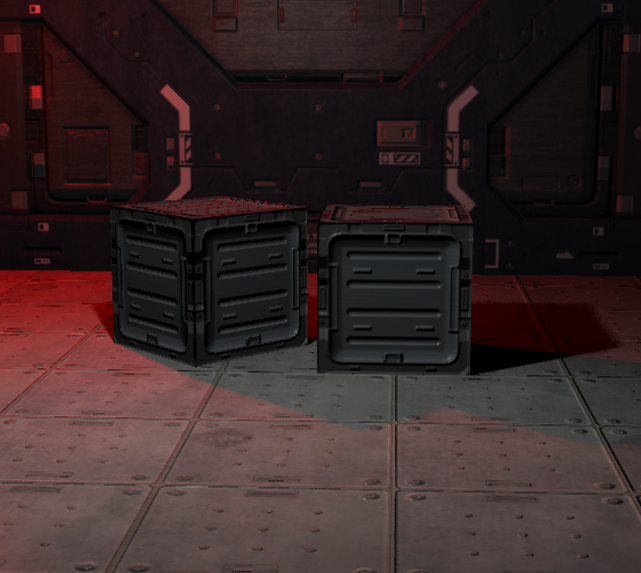
That's an awsome model. My first model was a cube.
-
He was able to make the model so fast because he used basic shapes. The box is made of three beveled cubes, and there's a lot of lathe going on for things like the microphone and the speaker. To make the cord he extruded a four point spline and just rotated the extrutions. The flat surface where you'd put a paper or something was the most time consuming of the tasks, and all he did was draw the form of it, extruded it and added another beveled cube for the holder at the bottom. He made a wall with molding too, but you can't see it in his render. Dan was trying to get AO to work, but it kept locking up. The only thing left to do is give the model surface properties and some texturing.
-
I was wondering why it was so skinny, and then I realized that the car has been cut in half by alien lazar beams sent from outer space from the beyond. Good work so far. I like the slipinage on your fender. Would you mind if I asked for a wireframe?
-
Oz Map -- Another v13 Displacement Fun Thread
MattWBradbury replied to Zaryin's topic in Work In Progress / Sweatbox
Yes. That was one of the first tests I did. The problems that I have noticed are regarding quiality. If you have really fine detail on a map and you're really far away with a camera, that fine detail is not even rendered. If you move the camera closer, those details come into view. I'd like to see it too! The task of doing that, I found, is quite tedious. I would have to move my camera about 15 times in order to get an acceptable shot. Sometimes the displacement maps would mess up because I was too close to them, or there would be noticable holes in the map. -
Oz Map -- Another v13 Displacement Fun Thread
MattWBradbury replied to Zaryin's topic in Work In Progress / Sweatbox
So you're using a skylight and ambient occlusion? It's designed so that you only have to use one or the other. Looking pretty good, though why did you make it a 200 patched model? -
Reminds me of something I see in myst every time I go to a new age. The camera flies around the island and shows where you are going to start. John, try using ambient occlusion to get your renders if your using the alpha version of v13. This should get you better lighting. You can set the occlusin smapling to 30% to get acceptable renders without texturing.
-
That's looking much better. You should try a render with the ambient occlusion rendering method to see if you can cut down on some of the rendering time.
-
v13Alpha Ambient Occlusion test
MattWBradbury replied to TacoBallZ's topic in Work In Progress / Sweatbox
There's a thread in the Lighting Forum that's talking about ambient occlusion. Here's the thread. Render times will be much faster than if you were to use a light rig, and because you can set the quality of your ambient occlusion it can go even faster than that. -
"Platelets: Lepidopteraphage" - the film is finished!
MattWBradbury replied to Dascurf's topic in Work In Progress / Sweatbox
-
Oz Map -- Another v13 Displacement Fun Thread
MattWBradbury replied to Zaryin's topic in Work In Progress / Sweatbox
Cronos, you're looking for more of a specular highlight. At least that's what I believe you're asking. To get proper shading and specular highlights, you are going to have to make a normal map of your hieght map. You can do this by downloading the NVIDIA normal map plug-in for photoshop and using the plug-in to transform your hight map into a normal map. A:M uses inverted X and inverted Y normal maps with a Red conversion. Look at the attached hight and normal map to see what I mean. One more thing. Set the Specular Intensity to around 1000% instead of 100%. I hope that answered your question.
-
Oz Map -- Another v13 Displacement Fun Thread
MattWBradbury replied to Zaryin's topic in Work In Progress / Sweatbox
Here's another render. The first one is a normal map render. The second is a displacement map and normal map render. I'm converting normal maps into height maps from Doom 3 and using both of them in the rendering. As of right now, I'm going to have to still stick with normal maps for one reason; they are much cleaner when rendered. Some changes need to be made to displacement mapping because I'm getting dots and a lot of messups with the displacement.
-
Ahh, thanks for the clariffication Yves.
-
I made an animated sequence with the displacment map. It's a movie of a white sphere moving accross the screen. You'll notice a slight jitter about half way through. That happend when I minimized A:M and came back to it and it mixed a bit of the first frame into one of the passes. I have no idea why it would do that. Moving_Ball.mov
-
I really like the displacement maps, but didn't find anything about a displacment projetion map. Here's the quick test animation. The render took 5:20 to render at 4X4 multipass. The color map is 10800X5400 and the hieght map is 4096X2048. The animation shows the displacment map changing from 500% to -500% over 1 second. Displacement_maps.mov
-
Looking quite awsome there. I'm sure you made the mountain 100 miles high to just exagurate the effect of the displacement projection map. If anyone wants to try out the displacment maps on other planets, look through this website to find hight maps and color maps of the nine planets and the sun.
-
Yves, now that I know how to use the exr files, I'll add that to my high dynamic range tutorial. I still have v12, so I'll have to write that the tutorial is only for version 12 if you've changed the way the version handels exr files. I'm doing a quick test. It's the standard 3 sphere test: 1 matte white, 1 black and 50% reflective, and 1 100% reflective sphere. I haven't taken any tests on timeing yet, but a 100X300 resolution image is going to take 17 minutes and 5 seconds to render. The only thing I was confused on was when you started talking about making the environment sphere 100% ambient. I simply used the exr file in the same way I used environment textures.
-
Most likely a light dome. The only thing I would cratique about the renderings is the shadows. Make sure to have muti-pass on (I like 4x4) and the lights have 2 ray casts with 100% darkness (Z-buffer shadows don't really decrease the render time with a skydome) and make sure that the car has all ambience set to 0. Yves's 25 light right seems to be good enough for the skydome, though the hight of the car could have causes those grainy shadows. Can solve that by using a skydome rig with more lights. Here's some examples from a thread talking about the effect. Very nice car. Did you use bump or normal maps on the pipes on the back?
-
Have you guys tried using multipass and more than 1 ray casts for each light? That might fix the problems. Not saying that it will, but it sure does clean up a bunch of my renders.