Tom
-
Posts
701 -
Joined
-
Last visited
-
Days Won
21
Content Type
Profiles
Forums
Events
Everything posted by Tom
-
Very cool John! ------------------------------------------------- I was thinking of seeing if the AM dynamics could create something where there is a lot of net action (see attached clip). If it could, I can see a lot of cool camera angles and maybe even creating it in slow motion. Thanks for the feedback... Tom Swish_1.wmv
-
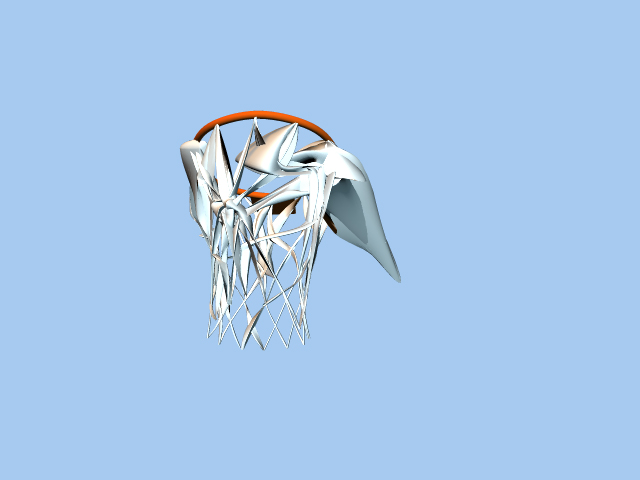
Hello All- I have been trying to make a basketball swish through a hoop with netting and do it in a dramatic way. Alas,..so far ..no success. I have embedded a project for anyone who wants to take a look. Basically I took a basketball backboard (from an old hash model library) and eliminated everything but the metal hoop and netting. Then I took a Basketball (also from an old model library) to use as the "deflector". Using Mark Weller's video tutorial on using the Sim cloth simulator I took his suggestion and used the very top row of cps in the netting as the "attached" part of the cloth so that the netting was stuck to the hoop. Before I even added the basketball to the scene I tested the "netting" to see if it would have any stretch during a "SimCloth Simulation" in Choreography. At first I received an error message that the cps were intersecting so I carefully went back to the "netting" model and moved the points around so that they were not overlapping so closely. I tried running a "SimCloth Simulation" again and got a deformed netting on frame 7 before the software sputtered out with another error message. (please look at attached image to see deformed netting). Anyway, I'm wondering if anyone has been able to successfully created a basketball swish using Newton. I'm guessing the software is robust enough but I'm just doing something wrong. Thanks to any insights you might have. Tom BasketballSwish.prj

-
No..unfortunately I saved the newer version over itself. That is a very good idea though.. Next time will do so. Thanks again for the help! Tom
-
I fiddled with the klieg light "fall off" distance and the black dotted ring went away..... There must have been some sort of calculation going on whereby the "fall off"was just in the wrong spot. I'll tuck that "fix" info away until the next time. Many thanks to everyone for their help! It is appreciated! Tom
-
It's one of the control rings that you normally see in shaded mode ? That's interesting. Tom, what happens if you nudge the light a few pixels in some direction?
-
Yes, It is a klieg light...do you know how to fix it? Tom
-
Thank you both for your suggestions! I tried increasing the line quality to 3000 (!) and it helped just a little. I tried using multi-pass and it seemed to only blur the line. My next strategy was to jiggle the light a little and see if it helped,and the line was still there. Hmmmmm.... Interesting.... Thanks again! Tom
-
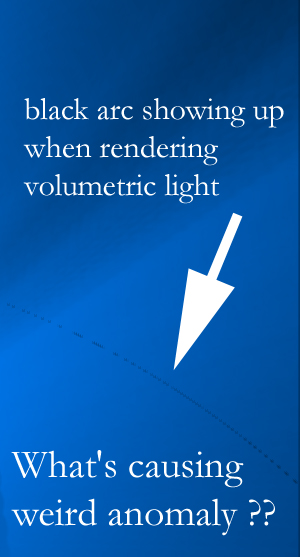
Hello all- Tried rendering some volumetric lighting and came across a weird anomaly in the rendering. An thin arc of black dots seems to be appearing in the rendered frames. Check out the image. Does anyone have an idea what might be causing this? Thanks! Tom
-
Excellent!! It worked!! Many thanks!! Tom A:M can only use TrueType-Fonts. The PSFONT-Folder is often filled with none-true-types and they will never show up in A:M. Pressuming you are using Windows, TrueTypes are stored in C:\Windows\Fonts. See you *Fuchur*
-
Hello all- Just downloaded a new font into my ProgramFiles/CommonFiles/Adobe/Font directory and the new font shows up in Photoshop but is not available for the Font Wizard in AM. Does anyone know where the fonts need to be stored for the AM Font Wizard to use them? Many Thanks! Tom
-
Hey John- That looks GREAT! Thanks for posting the files. It is appreciated! Tom
-
Yes- Fantastic...That really nailed it! Wow..If you could post the project it would be helpful to follow your description of the various steps you took. Thank you! Best, Tom
-
Many thanks for all the feedback and suggestions! I have downloaded the Bar And Sphere project and will study it. Thanks for what seems like a brilliant solution! Best, Tom
-
Hello All- Came across this fascinating little animation which I think was done in another program. I think the actual revolving of the bones/parts might be fairly simple or straightforward but I can't figure out how they get the skin to not crease as the parts fold in on themselves... Any ideas how not to crease the outer skin as the parts rotate? Thanks for any info! Tom CubeSpin.wmv
-
Nice work!! Tom
-
I studied Homeslice's tutorial and feel more comfortable with the AM particle hair. If your generous offer to share the method for creating the curly hair in the YouTube clip is still available, I would be interested in learning how to do that. Thanks for any help! Tom
-
That was a great tutorial which explained a lot!! Thank you!! Tom
-
Thank you!! I will definitely check out the tutorial! Best, Tom
-
To try and explore every possibility with hair I went back to experiment with AM's particle system for hair. I discovered that with most of my attempts the hair looked like yarn. I then noticed the render of the nice fur on the Hash orangutang (it was on the CD) and also this image from the the new Shrek movie. How are these hairs able to achieve the tapered, softer look? Is it a question of shaders or...? Thanks for any info. Tom
-
These are all good suggestions! I liked John's Dynamic Hair but I wanted to be able to more closely control the motion of the hair by having the hair be an actual object. I think applying a transparency map which tiles (or ties into into itself) will work best. I 'm not terribly happy with this first try but thought I would post it anyway. Thanks to everyone for the feedback. Tom
-
Hello - I know there is a "particle system /hair" that can simulate curls however for a variety of reasons I am attempting to create curly hair using a different method. If you look at the attached image you will see a "simple straight object" and then you will see a "twisted version" of that straight object. If I was just going to create hair using the straight model, I could easily assign a color to the object and then use a transparency map to simulate strands. I can't really apply a transparency map to the twisted version so I figure I will need to assign a Material to the twisted object. The only problem is my skills are weak at creating a material which will simulate strands while creating a transparency . Does anyone have suggestions regarding creating a material which can be applied to the twisted version of the object that will create strands and spaces between the strands to simulate hair? Attached is the strand object? Thanks for any suggestions! Tom HairStrand.mdl
-
Beautiful Job! The global lighting and modeling looks first rate... Are the clouds painted, rendered or photographs? Great work! Tom
-
Thanks for posting the project! Can't wait to play with it! Tom
-
That looks great!! I agree with Robcat....is there a Project file you can post? Best, Tom