jpappas
-
Posts
476 -
Joined
-
Last visited
Content Type
Profiles
Forums
Events
Everything posted by jpappas
-
Here is some information from it's creator, Yves Poissant. Note the warning about antialiasing, I think this means MultiPass should be used when trying this. The one time I tried this I was using A-buffer and indeed, the glow rendered as a solid. http://www.ypoart.com/Downloads/Planet-Glow.htm -Jim
-
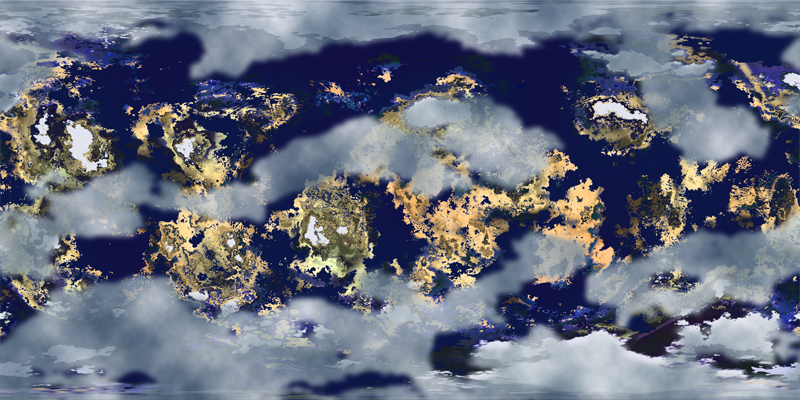
If you have Photoshop, an easy and fun way to generate planet textures is with Flaming Pear's "Lunar Cell" plugin, only $20. The default setting makes a picture of a planet, but change the output to Image Map and it generates Spherical Maps for use in A:M, including color, bump and cloud mask maps. -Jim

-
Hi, This is great! I've seen many of these nice A:M cars but this will be the first car modelling tutorial I can recall. I can't wait to see it. I got confused by your Poll, I was trying to pick a car from the pictures you showed -- but then realized you're showing examples of cars you already made. Can you post photos of the cars you'd like us to choose from in the Poll? thx! -Jim
-
Eric, I made a Bug Report for this on V13.0r in March, where this scenario was causing an exception. That bug was fixed quickly but in the report Noel indicates while they fixed the crash it still renders incorrectly (this is the render anomaly you are seeing). http://www.hash.com/reports/view.php?id=4324 A new bug was created for the render problem, it's not yet resolved. I guess your bug report is a duplicate of this one. I just tested again in the latest V14 to verify and I still see it. I'm not sure why my bug is still open and yours is listed as Resolved. BTW, John's recommendation is a pretty good workaround if all you want to do is apply a bump or displacement map. He's suggesting to use Patch images as opposed to manually decalling, and this is also a quick, one-step way of covering an object. With Patch Images there also is no positioning, flattening, poses, etc... If anyone wants the steps, you need a Group for your object, then you right-click the Group, select Add Image, select your grayscale image, then change the new Decal that appears to Bump or Displacement. This is working fine and doesn't have the issues we see right now with BitMapPlus. Using Patch Images, the image is applied to each and every Patch in the Group automatically, saving you the work of applying decals. There are a few drawbacks. One is you don't get all the advanced mixing options of BitMapPlus. The second is that Patch images resize the decal to perfectly fit each Patch, so if you have large and small patches in the same Group, your decals will be all different sizes, and the result will look very non-uniform. Here's that open report about BitMapPlus: http://www.hash.com/reports/view.php?id=4333 -Jim
-
Hey Stian, Thanks for the info! I have to investigate using these HDR images. But I'm pretty sure I see the reflection of the wing on the plane too, did you use both an Env. map and also standard Reflection? If so I've never seen that done before either! -Jim
-
Hi Stian, Very nice job! There's so much to look at, your attention to detail is incredible. I'm really impressed by the chrome look. What image type do you use for this Environment map, a regular 24-bit TGA or a hi-dynamic range OpenEXR (of which I'm still learning)? Any advice for using Env. maps? -Jim
-
Paul, Nice work! Looking at the animations, I think "B" looks the best. A: looks a bit too springy when she twists in the beginning B: looks very natural overall C: fans out in the back too much as she walks, like something's holding the back up D: also fans out in the back like C E: unlike C or D, it seems to wrap around the back of her legs as she walks F: fans out a bit too much in the back like C and D Thank you for posting your settings. I've never used cloth but I appreciate your hard work and I'm eager to give it a first try now. -Jim
-
Even if I had not read your post, I would never have thought the animatic was the final version. If visitors to this site are not knowledgable about the computer animation workflow, you could overlay a banner in the top left of the whole animatic that says "preproduction" or "storyboard" or even "animatic" to make it obvious. That said, I think you shoud not show the whole story in animatic form. Although I really enjoyed it, I think part of the fun of viewing your project is the mystery about what it will finally be. Instead, you could show a few clips of the animatic to whet everyone's appetite. I personally think the subtitles are fine, but I bet if you took a poll, my guess is most people prefer a direct english translation so they can keep their eyes on the beautiful renders. -Jim
-
I love it! That's not the type of character model you see everyday. When rigging something made of separate stones like this, do you plan to keep the shape of the stones intact around the bendy parts, or will you make it so the stones themselves bend and flex? I faced the same question when I wanted to rig my voltron model, which still sits un-rigged. -Jim
-
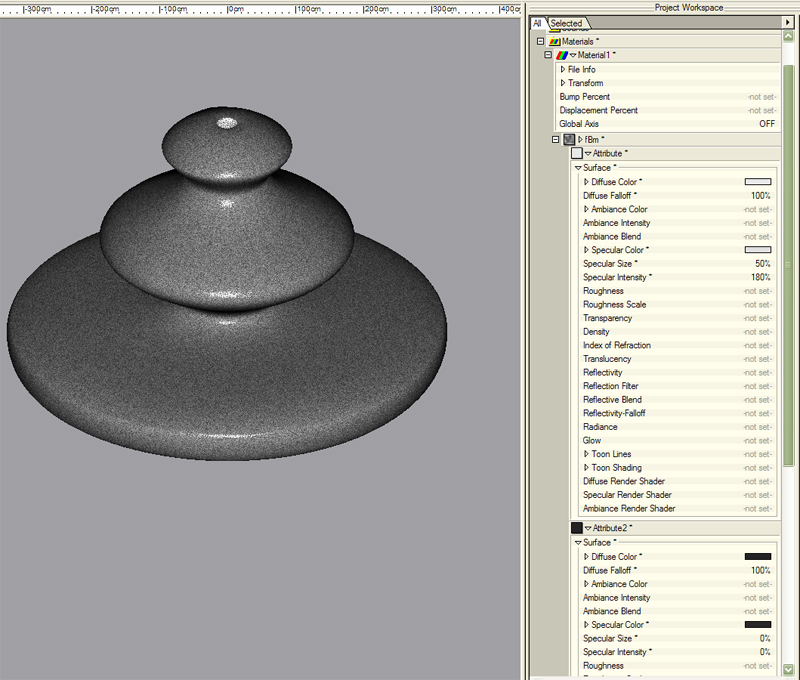
Vern, Thanks for the explanation, I really need to play with materials more! Once that sunk into my head I made a very simple example using fBM Turbulence to drive both Diffuse and Specular, notice how the specular is broken up. -Jim
-
I think what Rob is asking is if we use a Material and change it's type to Turbulence with Perlin, or fBM, etc... which can be used to create a complex grayscale for the Diffuse Color (if one attribute is white, the other black), we then have the options to use this to drive Bump or Displacement in the Material properties, but can we use this Turbulence grayscale for other map types like Specular Size, Intensity? I know more about Decals than Materials so I'm not sure, but I think I remember Marcel Bricman in the BitMapPlus thread saying his GradientZ plugin could do this, take any Material as input and output it to any other type. Can anyone verify? -Jim
-
Hi, Another option is customizing Snap to Grid spacing. In the Tools menu, select Options, then the Modelling tab. Here you can change your Grid spacing to whatever suits your needs. If you want each Grid to be 13.5 cm, you've got it! -Jim
-
Al, I reread your post and can't quite tell if you mention this, but the most important thing about when you replace blank.tga with the new larger one, is that the aspect ratio remain the same. To make this even easier in your workflow just double or quadruple the size, don't go to a new arbritrary size. So if your blank.tga was 800x400, replace that with 1600x800, or 2400x1200. Or work backwards, if you know ahead of time you want the final decal to be 2000x1000, then start with a blank.tga that's 1000x500, or 500x250. Yardie, I see where you are coming from, but, I don't think this is that complicated a method, after all, I've been using it for a year now and I'm not the brightest bulb in the bunch. The cylindrical method is easier to apply at first since you don't have to flatten and prepare the stamps, but harder in the end if you need to quickly add specific details to the decal in specific areas, and you want to do this by hand in a paint program with predictable results. -Jim
-
hi, There's a great follow along tutorial by Shaun Freeman on how to do a magnifying glass, I didn't find it in the Useful Links section of the Tutorials forum so I've attached it here (Rodney, can we add a link there for this?). After you unZip it, just click on the .html file to watch it. I think you'll need Macromedia Flash (free download) to watch it. The Image Contests are for fun and to improve your skills, and there's also cool prizes for the winner, runner-ups, and another set of prizes for all who enter. These have included training tutorial DVDs, A:M books, etc... Here are the contests coming up: Topic: "x-mas" Deadline: December 1st Topic: "heroes" Deadline: January 1st. Topic: "architectural" Deadline: February 1st. Topic: "hairy" Deadline: March 1st. If you want to enter, send your image via e-mail to Steve Sappington (steve@hash.com), and specify which contest it is for. He will send you an e-mail confirmation that he received it. The rules are that all the major work must be done using Animation:Master, but paint programs can be used for Texture map creation, and slight adjustments to the image. -Jim Magnifying_Glass.zip
-
Yes, that's a nice improvement! It looks heavier and like something that must be very large in size. You got that body and heady movement going nicely. :-) The only thing I can say now is you may want to tweak the feet as they lift off the ground. They look like they're still flat as they come up but they probably should rotate a bit like a human foot, with heal up and toe down as they lift, and then swing back to normal in the air as they get ready to come down again. -Jim
-
Al, I didn't compare the .mov to your still image until just now, but the difference is that in the still image your camera background is blue, and in your animation the camera background is black. The black background color is giving you the higher contrast in the animation but otherwise the scene is exactly the same. My guess is when you render the animation you have something additional turned on in the render settings, like the Alpha channel? -Jim
-
Al, That looks really good! I would say, you might want to add more movement in the body and head as each leg moves, to try and convey how big and heavy each leg is. You did a nice job in making each leg look mechanical like how I remember them in the movie. For the low contrast render, we were having a discussion on the "low contrast blues" a few weeks back. Check out the four steps here to see if it helps: http://www.hash.com/forums/index.php?s=&am...st&p=197637 -Jim
-
Hi, I'm not sure why the other options are not showing, but try clicking the Advanced checkbox, which I leave on all the time. Advanced simply shows you all the options as a list without the icons. -Jim
-
Hey Rodney, You're absolutely right, my original idea was to have a box on the table, a poster on the wall, maybe even some extra lions on the table behind him, to setup a little fight scene, but alas, I ran out of time! I was finishing the Voltron model right up until the very last moment. Literally, kids were coming up for Trick or Treat, and there I am handing out candies with the laptop and Voltron on the side! The face itself was the most difficult part since it's the most organic. I followed the Cooper tutorial for the first time but applied it to Voltron's type of face. The result works for this toy model but you would never want to use it for facial animation! Now that I've modelled him I'm thinking of ways to use him, maybe an attack on the floating city from the SciFi contest! Here's a larger quick render which shows more of the detail. -Jim
-
Hey hashers, Like the announcer in the show says "Voltron was needed once more..." so I had to model him. I learned so much about mechanical modelling by tackling this. Now I've got to learn organic modelling and I'll feel like I know what I'm doing. I had to keep it quiet for the last few weeks since he was in the Image Contest. I think it took me about 20 hours or so, working a little bit each night over a week. Each Lion has separate models for their own legs so the lions can easily come apart and stand on their own. Also, I've never rigged anything complicated so I gave it the most basic skeleton -- just so I can move it around, it's so basic it's pathetic, just a few bones on each limb and one for his hip, but its workable. -Jim
-
Xtaz, There's something unusual with how the AM:Stills Showcase page is showing this, it won't display but also seems to cause the webpage to constantly prompt for a username and password. Is anyone else seeing this? I'm using the Firefox browser on WinXP if that makes a difference. I'm not sure why, but it seems to only happening when I'm looking at a gallery page that contains either of these images, but the most recent one isn't displaying, it's just showing the name, peugeot~0.jpg. BTW, this is an awesome model and a great render. I was trying to look at it while browsing the Stills gallery when I ran across the web page problem. -Jim
-
T-Dogg, Holy seamless animations Batman, you've got it looping perfectly! To do that, the buildings must be on a circlular model that you're rotating right? -Jim
-
hi, I've been changing some of the shortcut keys so I can work on my laptop which doesn't have the numeric keypad. One key I want to remap but can't seem to find in Tools/Customize/Keyboard tab is the "*" key, which Expands/Collapses the PWS. Is it not exposed or am I missing it? -Jim EDIT: sorry for posting this here and not New Users. I was here looking at the existing Keyboard shortcut list!
-
Al, He looks shy, like maybe he doesn't want to go crush the alliance just yet. The movement looks like you'll be able to do a good walk with it. -Jim
-
Al, This looks awesome! Can't wait to see more! -Jim