jpappas
-
Posts
476 -
Joined
-
Last visited
jpappas's Achievements
Craftsman (5/10)
0
Reputation
-
For A:M versions that need the CD, it only checks the CD when the program first starts up, once started you can remove the CD. It shouldn't be running slower in anyway, unless you possibly have a slower CD drive and you access the CD for the Data folder (containing the included models, materials, etc..) If this is the case you can easily copy the data folder to your hard drive. You could also upgrade to A:M version 15, only costs $50. This version runs without the CD and is only runable on the computer you install it to. -Jim
-
phatso, I always thought the advantage of adding Lights directly into a model were more evident in cases where the light was an intrinsic part of the model, like a car's headlights, or the beam from a flashlight, or a large spaceship with lights around it's hull. In these cases it seems easier to add those lights right in the Model window. I mean, you can do these type of lights in a Chor and use Constraints to tie them to the model, but it seems like an extra complication. Otherwise I totally agree with you, that if you're aim is to actually light a model then stick with using Lights in the Chor only. -Jim
-
2 issues, need some insight (Odd colors and Glow)
jpappas replied to Rampage0007's topic in New Users
To even take a guess we'll need much more information, such as: 1. are there any keyframes on anything for those frames? (maybe the Spec. intensity got keyed, or a Light, etc..) 2. is the camera moving in these two examples or is it still? 3. are you rendering with MultiPass? 4. can you save a copy of the scene and start removing things one at a time and see if you can break it down to a simple example where it still happens? 5. does it only happen when you render to file or also when you Quick Render? -Jim -
Largento, I didn't realize Barry's tutorials didn't cover weighting - but do they cover fan bones? That's another area that I don't seem to find many tutorials on. Colin talks about them a little in the Cooper tutorial and there's some basic tutorials that show a fan bone applied to a simple cylinder, but I haven't seen a tutorial that sets up a fan bone on something like a shoulder or hip, and goes one step at a time. thanks! -Jim
-
Iron Butterfly and the Lorentz Attractor
jpappas replied to DeeJayEss's topic in Work In Progress / Sweatbox
DeeJayEss, I really like this, nice job! I loved that dynamic camera view when it tracks behind the butterfly, and also the way you've built banking into the turns (by the way, did you use an expression for that too?) The change in smoke color and showing the x/y/z grid - very cool! I'm curious to see what additions you'll make in the next version. -Jim -
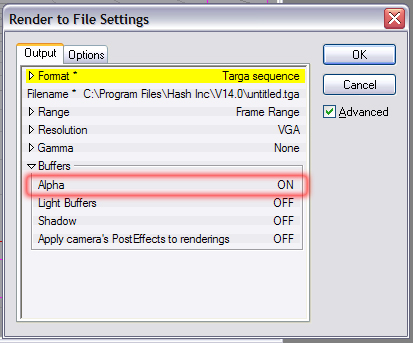
Hi, TGA files support Alpha channels and usually in A:M that option is on by default, so that may be the reason, make sure to turn this option off in the Render to File Settings. -Jim

-
Hi, This is one of the better sites for free-to-use texture maps. There's a limit to how many you can download each day. http://www.cgtextures.com/ -Jim
-
Luuk, Could you describe the current payment system? It looks like we give you our email, then a day later you email back an invoice? How is payment made with this invoice? thanks! -Jim
-
Stian, Holy cow! I figured you used some automated method, like some magical use of the Duplicator wizard, or Sweeper. To stitch all those in by hand - that's amazing. -Jim
-
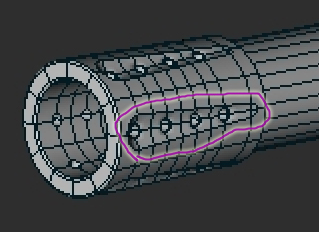
Hi Stian, I was going to suggest resevoir, but Wikipedia has a diagram and says it's the hopper. BTW, I enjoy watching the progress and seeing the updates, very nice! Could we ask questions just about one area? I'm curious about how you did the oval indentations on the muzzle. I think if I were modelling this I would have been lazy and used a displacement map. If I were to guess, I'd say you created the oval indentation shape first, then added the little screw heads, then arranged and copied six of these into a circle, but I'm not sure what method you used to merge these into the cylinder that makes up the muzzle, other than doing it all by hand. I would love to hear how you did this part. -Jim
-
Hi Camillo, There's two ways to do this, it's a bit tricky at first since each method thinks outside the box. But both methods are in the forum here somewhere too, try to search for 'chain'. I'll just do a real quick summary below because I'm sure to get some steps wrong without reviewing step by step. Method #1 - the distorted circle: In general, the idea is you make a model that's a perfect circle shape with the chain pieces arranged along the edge of the circle. You add two bones in the middle, one just for rotating, the other attached to all the CPs in the chain, one bone has to be a parent of the other, I forget which. Then you create an Action, and a distortion object, and you distort this circle into your chain shape. Now in the Chor you add the circle chain model, drop the Action on it to distort it into a chain shape, then just rotate the rotate bone, it will rotate like a simple circle but constrain itself to the distorted chain shape. This method is the easiest, but has the problem that your chain links will get slightly distorted as they go around corners, so it works better for belts than chains. Method #2 - the double path: Have each chain link follow a path in the shape of the chain. The trick here is you need to have the path twice as long as normal, so if your path is a circle, have the path wrap itself around the circle shape twice, I separate them by a pixel or two so you can zoom in and see each section of spline as needed. This way, each chain link you contrain to the path can complete the path using only 50% Ease in an Action instead of 100%. This gives you the room to add all the chain links without bunching up at the end (which is what happens when you have to use 100% Ease to get to the end of the chain). Again, this is just an overview! Try digging into each discussion on the forum and if you are stuck, I'll try to help further. -Jim
-
Ramon, Looks like you're on your way! Nancy, Using this for clouds, what a great idea! With some transparency it could work. -Jim
-
heyVern, We must both be geniuses! Because when I was learning about subframe techniques it was your thread (and that other MUFOOF one) that got me to finally understand it. And wow! What a powerful feature, it adds a whole new dimension to A:M. -Jim
-
heyVern, Ramon, I've only been skimming through this so forgive me if this is on the wrong track, but if you want to blur just an otherwise normal object, the method that pops into my mind would be a subframe motion blur applied with an Action, like the airplane propellar method described awhile back somewhere in the forum. You make an Action of however many frames where you move the object back and forth, then when you apply the Action to the object, set it's Cycle Length to a subframe amount, like 0.1. Then you have to use MultiPass and Motion Blur when you render. This allows you to render normally without compositing and for the object in question, every frame rendered will have the complete motion of that Actoin, and with Motion Blur, will show it blurred. -Jim
-
bighop, Think of Rigs like food at a buffet table, there are many choices and you can use whichever you like and whichever works for you. The Squetch rig is like a new tasty entre that many top chefs have worked on and lot's of folks love it, but there's still some who like the 2001, or the TSM and still many who make their own rig from scratch (like bringing their own food to the table, Ok, enough with the food analogy, I think you probably get the idea!) Any time spent on any rig is time well spent, the basic concepts are used from rig to rig. There's plenty of information about Squetch in the Rig subforum including what versions of A:M it can be used on. Hope this makes some sense! -Jim