-
Posts
4,676 -
Joined
-
Last visited
Content Type
Profiles
Forums
Events
Everything posted by HomeSlice
-
Thanks for explaining how to use the Ease property of an Action shortcut. I often wondered what the Ease property was for. Been using this program for 10 years and I'm still learning things about it ...
-
Sure Spleen! I'll find a place for it. You can zip it up and either post it or email it to project.scarecrow@gmail.com Make sure you include the image maps. They are not embedded in the project. You have to include the actual folder that contains the images.
-
ernesttx you should put the url to your website in your signature. I had a heck of a time finding it.
-
That's pretty funny. It would be interesting to have a real mouse with an odometer on it!
-
It seems maybe he *is* looking for a way to repeat a cropped action multiple times. Just select the action shortcut in the chor and set the value for "Repeat" to however many times you want it to repeat. This works for cropped actions as well as actions that are not cropped. However, in most cases, the frame that a cropped action ends on will probably not line up well with the first frame of the action, so the action may "pop" when it loops. If you want to repeat an action many times in a chor, it is usually a good idea to make the action in the Action window so the last frame and the first frame are the same, so it loops seamlessly.
-
Great to see you doing these again Largento. It might be nice to include the topic somewhere on the page. This one appears to be about about control point weighting.
-
I think it is only for previewing lens flares. Those are the only things that seem to show up in the light window.
-
You may want to first experiment with a plain white ball. Then, when you are comfortable with the process and all the available options, use more complex models with reflections and textures and stuff.
-
To move up and down in a Choreography, Action or Model window, you can also hold down the [2] key on the keyboard (not the numerical keypad) while you drag the selection. You have to hold the [2] key before you start dragging ... You can also switch to front view [2] on the Numerical Keypad, right view [4] on the Numerical Keypad or left view [6] on the Numerical Keypad and just drag the object up or down.
-
That's a beautiful model. Thanks.
-
wow awesome models. Thank you.
-
I'm not sure why its neon either, but it looks good so far What color is set in the Hair material?
-

Crown Moulding Installation Animation
HomeSlice replied to flashawd's topic in Work In Progress / Sweatbox
Way to go 12 minutes is a LOT of animation! -
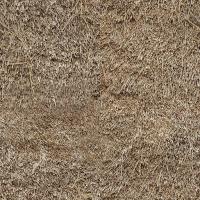
Hi Spleen, If you want to have a thatched roof, you can use these. You don't have to decal them unless you just want to. You can apply the images as "patch images" to the thatched parts. Hair probably wouldn't be such a good idea unless its absolutely necessary because there might be quite a bit of hair in some the the scenes already.
-
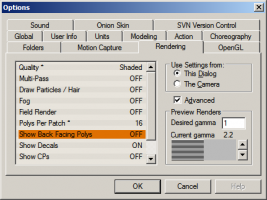
It is easier for me to see which way the normals on a patch are pointing if I turn off "show back facing polys" in the options window. Then, when you are looking at the Front of the patch, it will appear ... ahem ... normal. But when you are looking at the back of the patch, it will appear transparent and you will see whatever is behind it. Another easy way to flip normals (in addition to the suggestions already given) is to: Hit [shift p] to enter patch-select-mode. Then click on a patch that has its normal facing the wrong direction. EDIT (You don't need to do this step) - Then right-click Inside the yellow selection box - to exit patch-select-mode. Then hit [f] to flip the normal. EDIT: You don't have to exit patch select mode. Just select a patch and hit [f].
-
Hi Spleen, The building is coming along nicely! I guess this building can be a lookout post for balloons coming and going. PLEASE check the direction of all your normals. I just spent three days flipping normals from some old props I brought over from TWO. It is much easier if you flip them correctly while you are modeling. Now its time to start texturing. I know you though it was textured, but it isn't really. I hope Nancy gives you some advice on some possible colors, materials etc. If she does, listen to her. Nobody knows better how to take a fanciful building over the top.
-
glad you're back!
-
Looks great Spleen! As Nancy said, a few windows would be nice.
-
Great image. Congratulations!
-
Hey Photoman, that is a really nice looking scene! Unless you are using AO or SSS or some other fancy feature, you don't need to render with multipass. You will get really nice looking renders in half the time using the A:M's default (non-multipass) renderer - sometimes referred to as the A-Buffer renderer. Mark, thanks for the clarification. It is nice to have the ability to import one chor into another. Unfortunately, the imported chor loses any relationship to the original. So you still have to open up all scenes that use the chor if you need to make any changes.
-
Sorry Photoman for hijacking your thread Mark would you please elucidate on this please? Are you saying there is some way to save out an entire chor (set) as an action?
-
Thanks Spleen. Give yourself a little breathing room while you are learning the rig. Just play with it for a while. Learning A:M, the mechanics of animating AND a new rig can be a little overwhelming. But I think you are doing an excellent job so far.
-

The Unfortunate End of the C27...
HomeSlice replied to Kelley's topic in Work In Progress / Sweatbox
Beautiful images Robert! -
that's insane. You are very talented. I know this is a tall order .... but you may develop quite a devoted following if you: allow A:M model import via AS or JS show the color maps that have already been applied to the model in AM show either bump or normal maps that been applied to the model in AM icing on the cake would be to allow import of AM actions via AS or JS


