robcat2075
-
Posts
28,280 -
Joined
-
Last visited
-
Days Won
407
Content Type
Profiles
Forums
Events
Everything posted by robcat2075
-
I'm still curious about the black caterpillars. Did you solve that? Was that something that only showed up with DOF on?
-
Steffen Gross's Transfer AW plugin will try to re apportion weights from one mesh to another. That might do what you are trying to do in #2 if you used it on a copy of the old mesh and a copy of the changed mesh. However it is not documented. It is a replacement for the old Anzovin Weightmover app and I haven't really investigated it much. You would have to experiment with it.
-
and "orient like" You still have to be careful to not pull the arms farther than they would be able to reach anyway. Make the pose look right within the real limits of the arm. Don't go past that. An alternative to making the ball jostle a bit, would be to have his hands slip a bit on as he pulls them. That's a bit more complicated to keyframe, but it's another way showing that force is happening.
-
If you constrain the IK hands to the ball they shouldn't jitter so much. My advice on that move would be that when he yanks on the ball, have it move a tiny smidgen( and fall back). That will suggest that he's actually putting some force on it.
-
I took a quick look. One way to diagnose these things is to turn all the lights' Active properties OFF and then turn them on individually to see what they are doing. Keylight (4) seems to be causing the unwanted shadow. Turn that one OFF and see if the result is more like what you wanted. I'd have to look at it longer to figure out WHY it is doing that since it is a "sun" light and is aimed the same as the other sun lights. But turning off #4 solves the problem I think. If not, post a new picture and say what is still not right. Sun lights cast parallel rays over an infinitely wide area so their position shouldn't matter much, only their angle. You really should only need one sun light rather than 4 aimed in the same direction.
-
Thank you all, for your good wishes. I'm still not crazy about being 50. There's just no way to spin that to my advantage. Pineapple upside-down cake, mostly.
-
1- in the PWS you can drag-select all the keyframes and stretch them out to any length of time or 2- if you've dropped the action on a model in the chor you can set its "Cycle Length" property to any number of frames
-
Welcome to the forum! I'm not a mac guru, but this sounds familiar. I don't think your mac is inadequate. I guess closing and reopening that window didn't help. Is it just the library window? Are your graphic card drivers the up to date?
-
I'm sure there's a simple reason, but without knowing how everything is arranged in the chor and what's in front of what and what's not in front of what... it's hard to diagnose.
-
With 1 ray, shadows are automatically diminished as they stretch away from the object With > 1 ray they do not diminish but can have more accurate penumbras in their shadows. many light settings may play into your results, such as width, falloff, "darkness" and position and it's hard to judge those from the two images.
-
hmmm... I'll give that a try when I reconstruct my stuff for this. These little experiments are among the things lost with my hard drive.
-
How does he get into that? I don't see any zippers.
-
I recall that EXR renders include a separate AO buffer, but if your compositing app doesn't handle separate EXR buffers that won't do. A:M's "build composite" can do quite a bit with EXR renders but I haven't done much with it. Shadow buffers in EXR are a bit different than the TGA shadow buffer. TGA captures the whole shadow, even the part covered by the object, but only on surfaces set to "Shadow only" so I'm not sure how self shadowing is handled. An EXR shadow buffer has all the shadows cast by a light, but only the portion visible to the camera. These shadows are not convenient to blur in post like the TGA shadows are.. in TGAs, occlusion or Ambiant occlusion would be captured by doing an all-white render. All objects (and sky) white so that they are darkened only because of the lighting. In the Birn book he talks about how it is often necessary to capture different shadows on different surfaces in separate passes. It gets complicated when a shadow is falling on something that is also casting a shadow or casting a shadow on itself. You would need to analyze your scene to determine which shadows need to be captured separately from others, if at all.
-
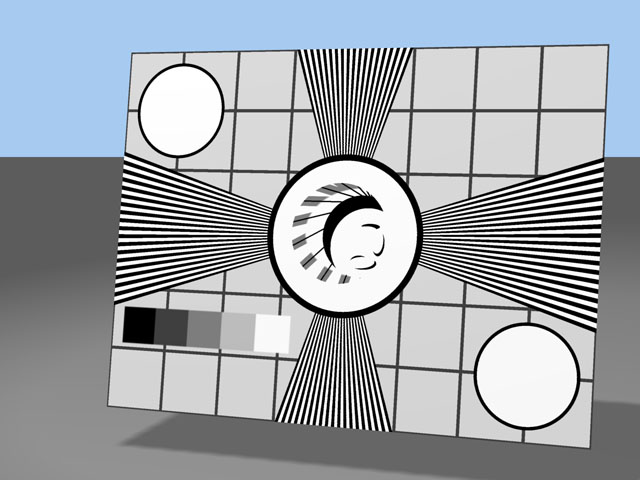
Testing... Testing... Here's a TV test pattern made entirely from procedural materials. The Indian head is one material, the grayscale bar is one and everything else is another material. These are all made from spherical, grid and gradient combiners It would be possible to combine them all into one material but the graybar complicates that quite a bit.

-
As far as I am concerned A:M's depth of field has never been worth the render hit. You need so many passes and even then it never looks right. I agree A:M's DOF is quite time consuming. If you are using a compositing app like Aftereffects, creating DOF via a depth map and appropriate blur filter will be much more flexible and quicker.
-
Ding, ding, ding! That's exactly right. Or at least it's my distilled version of him. Just wanted to make sure I wasn't fooling myself about whether it looked like anything.
-
Render the first frame of this PRJ with "use settings from > The Camera". This renders a black frame with the vase's shadow in the alpha buffer. ShadowBufferTest.prj EDIT: This sample PRJ doesn't give the expected result in v19
-
This is a procedural material I made today. What does it look like?
-
Black caterpillars aside, that all looks uniformly blurred rather than blurred depending on distance. I have done a test somewhere here showing both DOFs working in their own way, but I don't know what your settings are. Is the caterpillar a one frame thing? on every frame? Same spot in the frame every time? On the same spot in a model every the time? Moving on a spline in a model? If I saw it in motion more would be known, possibly.
-
I'll guess the "Dan" was Dan Tiedy. Current whereabouts unknown. If you can make something that exports a "standard" that can be used with programs like Vue or Particle Illusion (or terragen) that would be great.
-
is that multipass or regular DOF blur?
-
Actually, I see I misunderstood Malo's reference to "Resurface". I was thinking of another program discussed elsewhere, probably not even called "Resurface" that attempted to make splines over polygon model. So basically, I initially misunderstood everything in Malo's first post.
-
Unfortunately, no. You have to judge it manually. When the prop is in shaded mode you can't see the splines over it at all, so it's not a perfect solution, but possibly useful.
-
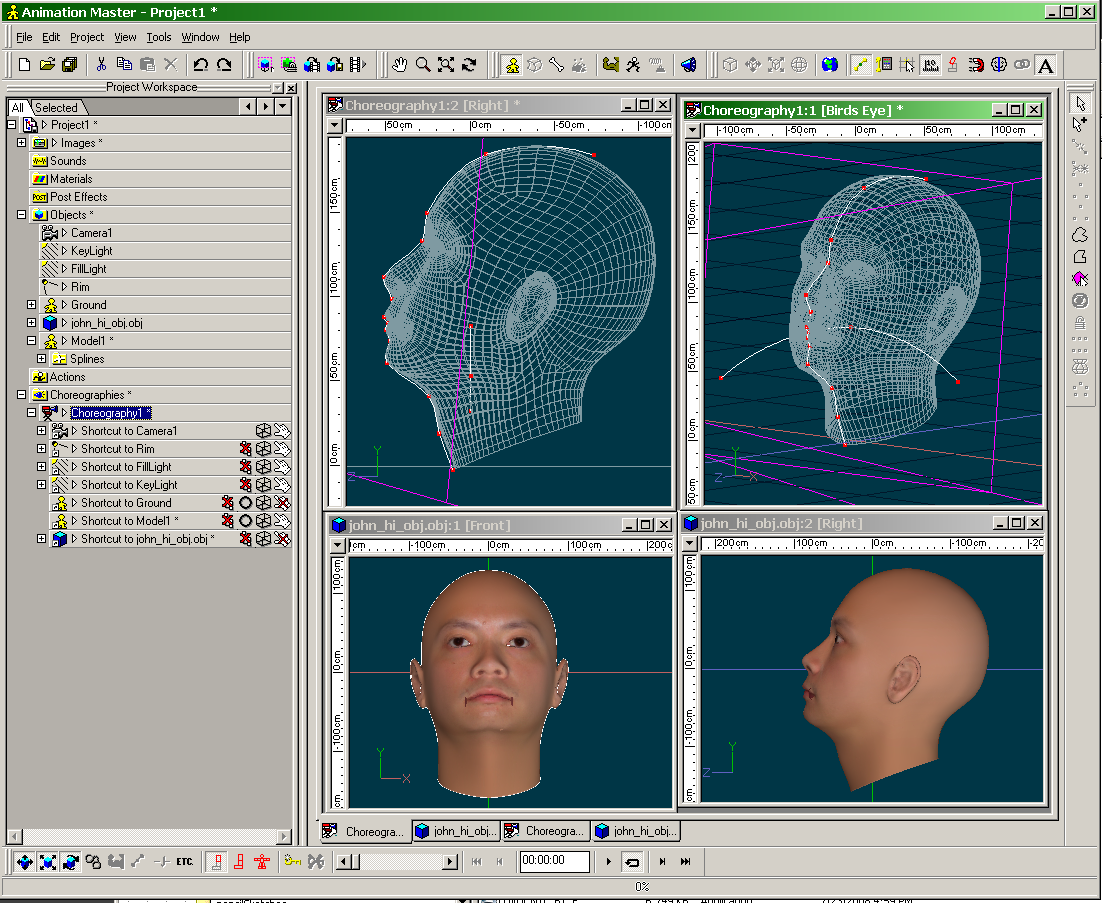
Here... Is this what you are thinking... The head is an OBJ imported as a prop and placed in the chor. Model 1 started as just a spline to make a model that could also be placed in the chor. In the chor I selected Model 1 and then hit the Modeling Mode button to enable editing Model 1 with new splines and drew the new spline that is on the profile of the head. Doesn't work well in shaded mode, but this is what you were thinking except it's in the chor window, right?