-
Posts
1,182 -
Joined
-
Last visited
-
Days Won
1
mouseman last won the day on January 7 2018
mouseman had the most liked content!
Profile Information
-
Name
Chris Dailey
-
Location
Alberta, CA
Previous Fields
-
A:M version
v18
-
Hardware Platform
Windows
-
System Description
Win 8 64 bit Home 16GB RAM AMD A10-7850K Radeon R7 (4CPU+8GPU) 3.7GHz
-
Self Assessment: Animation Skill
Advanced
-
Self Assessment: Modeling Skill
Familiar
-
Self Assessment: Rigging Skill
Familiar
mouseman's Achievements

Prolific (6/10)
4
Reputation
-
Hi, Chris, an impressive effort! Interesting character design, and a nice creepy/eerie feel to it, and an interesting twist with the definite "Twilight Zone" feel. My first suggestion would be to put a little more furniture in the first room. I think that would give it a little more homey and lived-in feel. The second suggestion is to try not to get the feet sliding on the walks. No one else mentioned it, so maybe it's just me, but that kind of pulls me out of the world. Getting it right is really hard unless you have inverse kinematics on your feet. Even then, it's still hard. Getting the scene of the battery installation and the final scene where she is one of many other robots to read better would help. For the battery, maybe a bit more of a close-up on the battery so it's clear what it is would help. For the end, maybe it needs more time to read. It would be nice to have him set up one of the other robots for another scene, but I don't think you could squeeze it in given the song length. I look forward to seeing more!
-
Wow, I think you've produced more seconds of animation than I have in total! It's looking great so far! I'm impressed that you have all the elements to make a whole concept. For the first video (dietly confused), I think the guy at the table lip syncing to "confused, confused, I'm dietly confused" would work well, as would lip syncing when the list of diets is read off. The caveman could have sung his part, too; maybe slightly more of a close-up for him. There are a couple of scenes where the nutritionists' faces and bodies are stiff that could use a little loosening up. For the second video (happy vegans singing), the only thing I could think of was if the woman playing the "guitar" had actions that more closely mimicked the left and right hands of the actual guitar player. Maybe adding a back-yard visible outside the kitchen window. I don't have any particular technical suggestions. You highlighted a lot of the areas you wanted to improve, and I think those are right on. It takes a lot of practice, especially learning to smooth out action without having hundreds of keyframes. Keep it up!
-
Wikified, and linked from the Plugins page.
-
Code-wise, having more than one option show up should be quite easy - a single property that takes 10 seconds to change. Did you report a bug?
-
Wow, what a set of fixes! Thanks especially for 6571: Net Render slaves cannot load camera from Technocrane! I'm sure Jason Hampton will appreciate it, as well.
- 6 replies
-
- Download
- Software Update
-
(and 2 more)
Tagged with:
-

Poll What Windows Operating System are you using?
mouseman replied to Jason Simonds's topic in Animation:Master
The license system will work indefinitely for older versions, right? So XP users could still use 18.x but no later. -
I see where you're coming from with exporting a bunch of the same object as a single model (i.e. a single mesh). However, as a programmer, having multiple copies of the mesh seems kind of wrong. There are heuristics/guidelines that say "Don't repeat yourself" and "once and only once". We were thinking that the pose action approach would allow us to easily turn on the set for rendering the background and then turn on the characters for foreground. But we'd need to come up with a new way of doing that once we come up with a new idea for composing the sets. The characters will need to interact with parts of the set and with props (e.g. with the coffee machine, the fridge under the counter, coffee cups, the milk pitcher, etc.), so thought will have to go into what is part of the fixed/umovable set and what is a prop that the actors interact with. That sounds like a promising idea. We'll give that a go and let you know how it works. Thanks, Robert!
-
Steve and I have been using poses in models to compose larger models -- even whole sets -- from smaller models. This is very useful to avoid creating multiple copies of mesh, as well as allowing an easy way of turning on and off various parts of the model. Here are the requirements that we had when the pose idea came up: Avoid having multiple copies of the same mesh. If there are 18 chairs in the set, there should not be 18 copies of the mesh in some model. Ideally, they need to be configurable for different situations. For example, we don't want a separate set for the coffee shop before it opens (less clutter) and after (more supplies, etc. laying around and on shelves). You need to be able to turn things on and off. The sets and large models need to be reusable. That is, you can create a new choreography, drag in a model, maybe change a couple of pose values, and be ready to animation. However, we have run into two show stoppers for this technique, which we outlined in this post. Because of that, we may need to resort to a plan B. Which we don't have! So I wanted to ask everyone: How do you create large sets or large models? Agep mentioned he did the Nidaros Cathedral by doing it "in an action (action objects), so when in the chor I simply drag and drop the action onto the basemodel", and "I sometimes merges two or more models when they are finished, so they are total ends at 30-60K". John Bigboote said of his SOCCER STADIUM: "it is assembled in an action... many parts are reused dozens of times- [ ... ]. I keep my splining real minimal, I keep expecting A:M to 'hit a wall' and be unable to accept any more, but it keeps allowing more and more models to be added via the action." However, on his MANHATTAN post, he said: "No duplicator wizard used, just good old copy and paste and heavy usage of action objects." Any other ideas, or clarifications on those existing ideas? Or problems you've run into? Thanks! Chris
-

Tutorial: Composing Models from other models
mouseman replied to mouseman's topic in Design Dynamics presents
I just wanted to let everyone know that there are currently two major problems with this technique. 1. NetRender does not pick up all of the contained action objects. Things will render as expected in the main application, but not in NetRender. This is ticket 6617. 2. Multiple levels of poses don't work. By this, I mean if you have a car model with only the body, and create a pose that adds 4 wheels, then you include that model in a set that is a race track, the wheels will appear in the wrong position. This is ticket 6620. These are show-stopper bugs. Until these issues are fixed, this technique will be more of a hindrance than a help. -
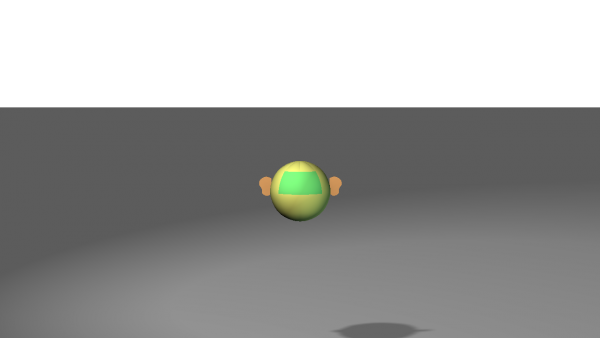
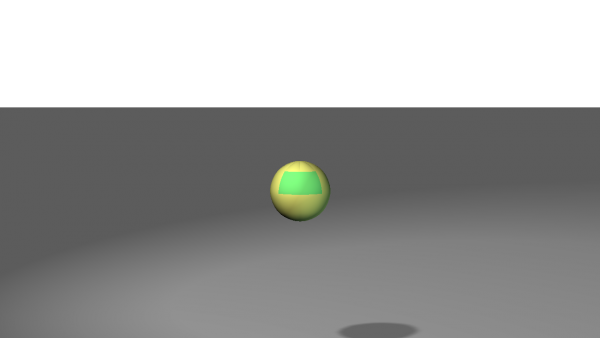
This is now ticket #6617. I created a simple project and attached it to that ticket. Here is the sample project rendered from within A:M and from within NR. The ears are attached as action objects within a pose; they are inactive in the pose=OFF setting, and active in the pose=ON setting, as I was doing in the tutorial video I'd posted previously here. In A:M: In NetRender:
-
zandoriastudios started following mouseman
-
mouseman started following zandoriastudios
-
mouseman started following Mechadelphia
-
Mechadelphia started following mouseman
-
Hey, jakerupert, The rig was made in v18. I'm not sure how much the file format has changed since v15, but I think the rig is just straight bones and constraints and maybe a few expressions which I suspect haven't changed since then. It wouldn't hurt to load in the rig (or a sample rigged character) and see what you get.
-
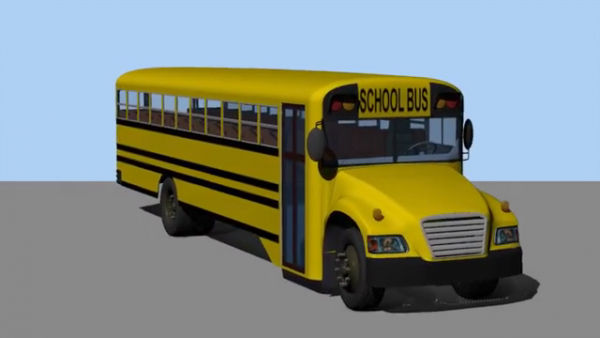
It's been a while since I've visited this thread, as I've been working with Steve on the Cupid project. However, we were looking for things to put in the scene, and Steve suggested the school bus. So I put a bit of work into it with the grille and the headlights as well as fixing some structural things you can't see here. I also wanted to make the seats use a model embedded multiple times via poses, but there were issues when I tried to make constraints (they always added to the first or last action object in the pose). Work remaining: I want to add the special mirrors on the front, which will require moving the turn signals back. Possibly "dirty" it up a bit. At that point it may be good enough for what we'd need it for in Cupid. There's also a quick animation. SchoolBus1.mp4
-
But is there a way to accumulate small changes based on the distance? Or just have it automatically accumulate based on a velocity that you can set based on the distance away? I'm sure that the existing Flocking feature does this internally, but there's not enough control over the particulars to get the kind of effect Rodney is looking for.
-

Tutorial: Composing Models from other models
mouseman replied to mouseman's topic in Design Dynamics presents
To expand a bit on Gerald's answer, part of the reason is that if you position and rotate everything in the OFF position, you have only one key frame for both OFF, and the hold after is inherited in the ON pose. It's in the same position regardless of whether the pose is ON or off, and if you add a bone or something else later on, it will be where the object is by default, not at 0,0,0. But if you positioned it in the ON position, then you'd have a keyframe of 0,0,0 in the OFF position created by default, and whatever you set it to in the ON position. If you forgot to hide the bones, you'd have all of these bones at 0,0,0 when the pose was inactive, instead of where they would be when the pose is ON. The Active and Hidden properties for the bones (not shown) must have different values in each pose. The position and rotation and scaling only need one, and setting the value in the OFF pose setting achieves that. It's a slightly picky thing, and probably wouldn't hurt if you had different keyframes in both ON and OFF settings. All else being equal, I'd consider 1 keyframe better than 2. -

Tutorial: Composing Models from other models
mouseman replied to mouseman's topic in Design Dynamics presents
I'm glad you guys found this useful! It feels almost like a game-changer for both modelling and animating. For example, for the school bus I worked on a couple of years ago, I copied the passenger seats multiple times to fill out the bus. I could have just created one passenger seat, and then included it 22 times in a pose. Why stop there? I could have had poses that stretched the bus, and at 1% had one row of seats, 2% 2 rows of seats, etc. Maybe this technique could be combined with the DressMe plugin and pose sliders to change what the person is wearing. Or using the hair cap method that John Bigboote, have different hair styles in different models active only for specific pose values for different looks. (e.g. Clothing style 4=gym suit, hair style 3=tied back in a ponytail.) Workflow-wise, I used to create a choreography with the set objects, and then animate multiple scenes on the same choreography to avoid having to re-create the entire set for every choreography. I switched to using action objects for a while, but it was still kind of klunky. Now with one model for the set, I can create a new choreography, drag in the set and the 3 or 4 characters I need, turn on and off a couple of poses, and start animating! That's a game changer, at least for me. I'm sure some of the studios have stumbled across this idea, but I think it will greatly increase the re-usability of models and scene/shot start-up. We're kicking around other ideas for how we could use variations of this technique for other purposes ... we'll let you know if we come up with anything else cool.


