pixelmech
-
Posts
1,323 -
Joined
-
Last visited
Content Type
Profiles
Forums
Events
Everything posted by pixelmech
-
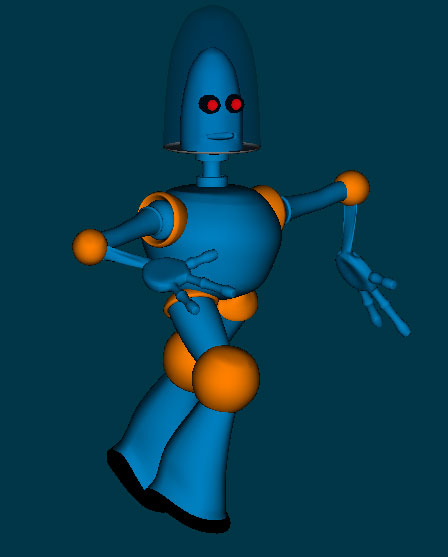
I took the "ball" idea for the joints (which I had wanted to do anyway but wasn't sure how to) and added them. I like both the look of it and how it makes the joints look, here's a shot. Interesting how with even a basic rig that isn't complete you can get a somewhat decent pose ...

-
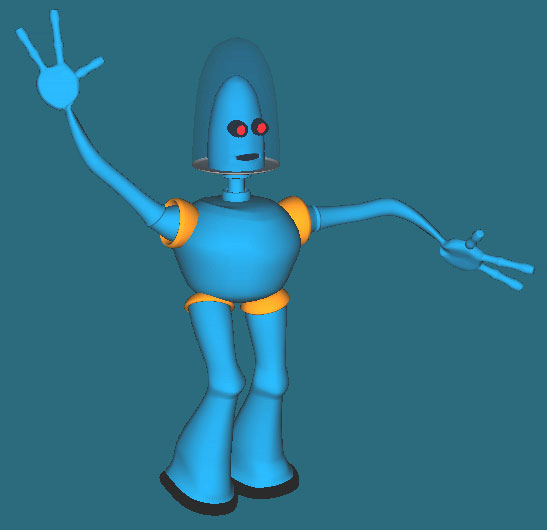
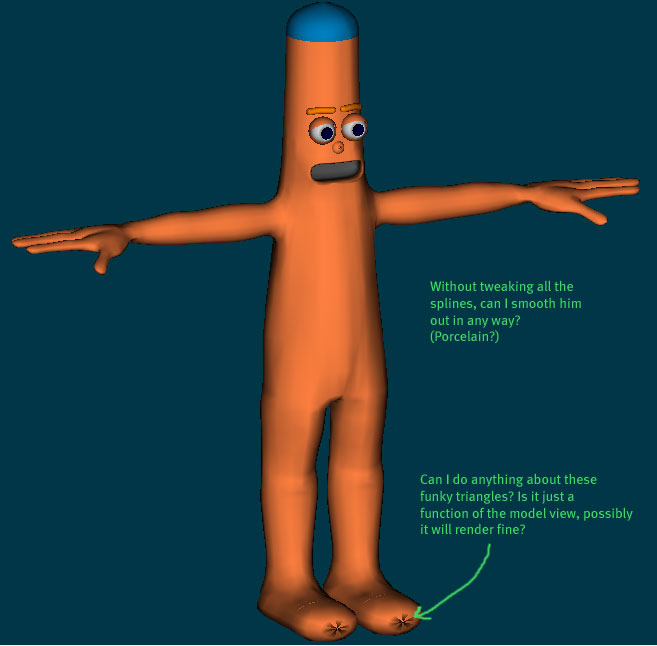
Thanks both of you guys, I will try that - attached to parent sounds more like what I want. Attached a picture with the mouth added in. There is some slight creasing on it I may have to work on. Not boned yet. Thickened up arms too. Starting to think about redoing the hands, they are looking like they don't belong...darn.
-
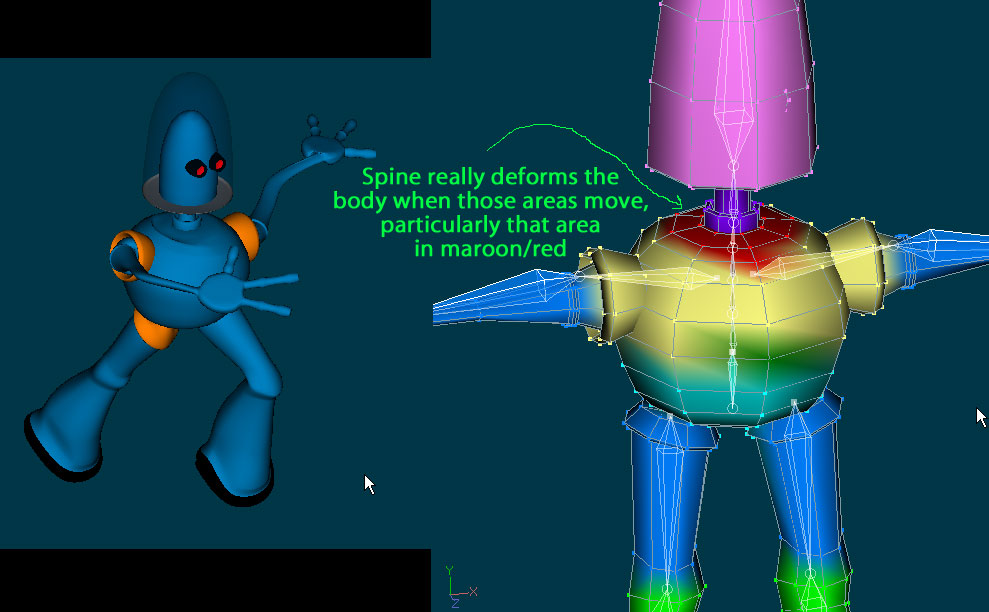
Ok, here's an update. Detaching the neck definitely helps. The head can rotate freely along the X axis no problem. The problem comes in when the head tilts in the Y or Z axis though. Since my head is attached to a neck bone, which is attached to the spine - a tilt of the head ends up deforming the body via the neck/spine chain. Really all his body should do is rotate in the X axis or tilt forward back a bit. The pelvis seems to work that way mostly... Do I need to decouple the head bone out of the spine heirarchy? Look at the CPs in the red/maroon section - these seem to be particularly troublesome, yet I don't know what to do there. Setting them to the shoulders doesn't seem right...
-
Nice model! Yeah, I think I will do what you've done, disconnect the neck and let the head rotate, that is really what I want. I almost put the spheres in for the joints...I'll have to think about this some more
-
Thanks Jess Well the thing is, I wasn't sure how to make him "less bendable"! LOL. I kind of would like to - especially around the neck/shoulders/torso. I'm just not sure how to do it. I did kind of what him to have some bendability. Think of some kind of synthetic skin over the machined parts that are quite flexible. Now, the arms are NOT connected to the model, nor are the orange rings. I'm wondering if I should break off the neck? Any suggestions I'll definitely consider. I'm not adverse to reworking parts of the model if necessary. I have to do something about the mouth anyway. Tom
-
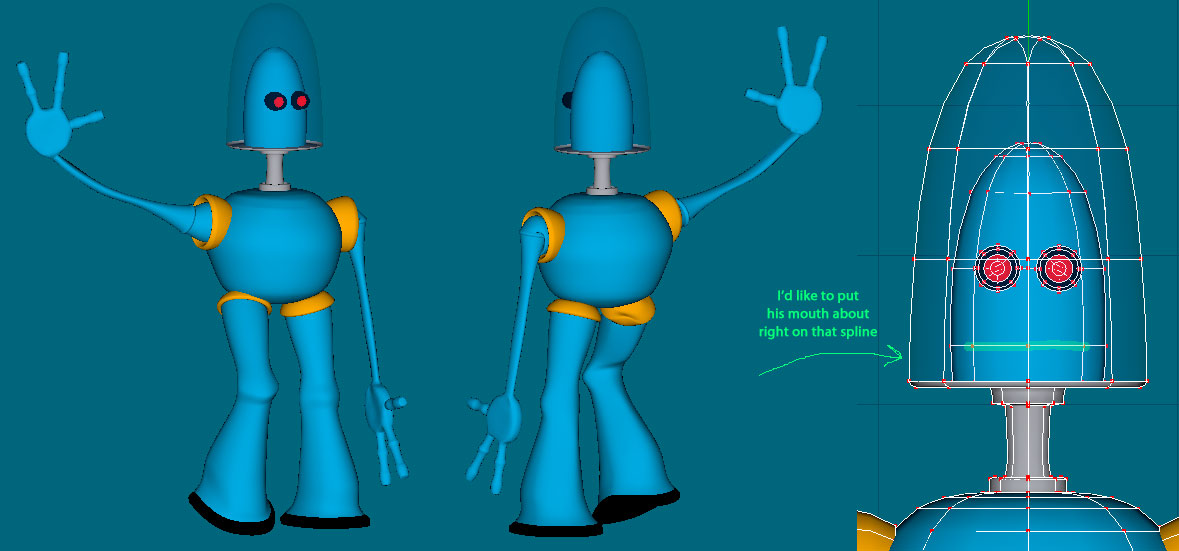
Here's the CP assignments around the neck and a photo of the deformation. Also, is it common to have a spine bone not assigned to anything? I ended up with that, should I remove it?
-
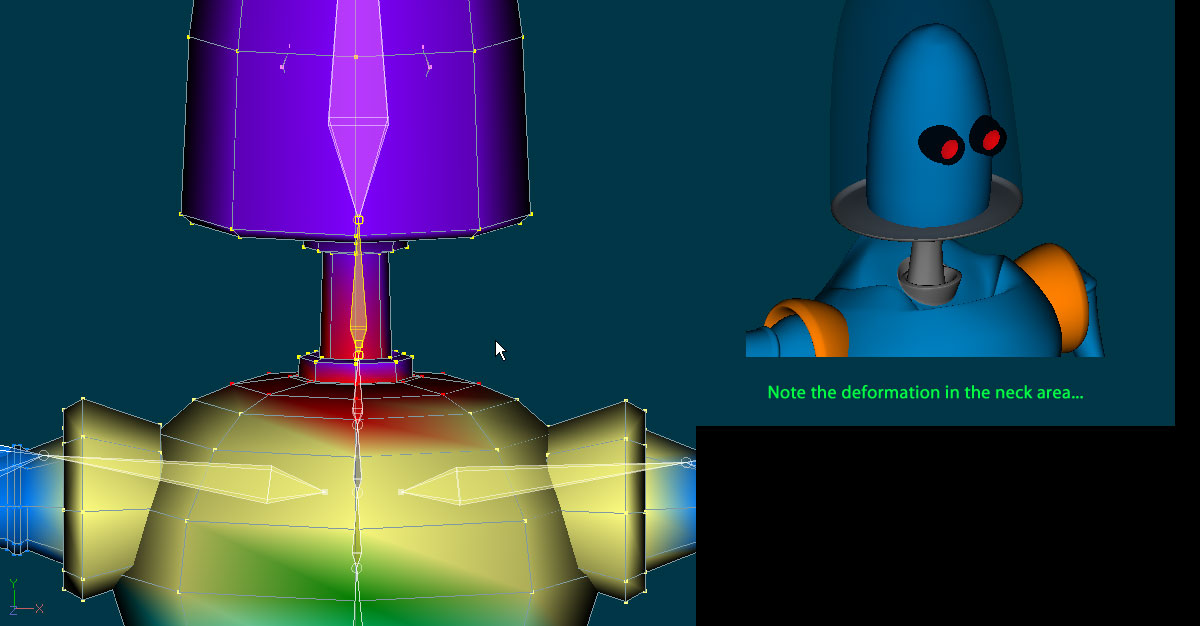
Well, no thanks to the Rant's and Rave's forum I'm making some progress on my second model. I kind of scrapped that first one because he really wasn't constructed very well. Anyway, I'm somewhat happy with the way he is coming along but I have a few problems maybe you can all help me with. 1. I originally had a 'toon mouth but it didn't look right. I kind of want to put a straight line mouth where the light green line in the picture is indicated. I'm not sure how to break into the head and make this so that the mouth will actually work - do I need to remodel the whole head? (The eyes are not attached). 2. I actually have TSM2, but I'm working on rigging him myself. I really feel like I need to understand the process well even with TSM. So I am using David Rogers book and going through. I've only done the basic rig, no finger bones or fan bones, smartskin or anything yet. One issue I'm having is movement of the neck *severely* deforms the top of his body. In my next post I'll post a capture of the control points to the bones so you can see how I have them set. I'm kind of lost on how to set up the CPs so this won't happen. Maybe this is an issue for contraints? I get the same problem with the head movement too. The head pushes down the neck and I get bad looking stuff. He is indeed a robot, but I want him to be semi-organic moving. It's ultimately a character for children, not a serious robot. But certainly his metal body should twist up like it does. Appreciate any and all comments, good or bad. Thanks! EDIT: Forgot to say, if you notice my avatar, that is the drawing I started with. There's some detail and tweaking aside from the mouth that I have not gotten to yet. And the feet just might be tricky too...
-
I too think the mouth is bang on. Good job!
-
Would sonofpats "Skinbones" be the same thing as fanbones? His arm tut looks awesome, I think I'm going to try to learn his system. I also bought TSM2, but it seems that you need to know a certain amount of rigging to really use it effectively, and I am not there yet. I've run my first model through the rigger a few times and gotten subpar results. Tom
-
I've a mind to give you the "Snoopy boot" for being so darn good! I think Rodney is right - the handle seems backwards...
-
Great Job! I'd like to see a bigger pic. The red color is dead on. I'll make a few suggestions: - The tires are round, not like real tires. Look at the profile of a real truck tire, it's near flat. That would make it look more real. A blackwall would help on the tires too, or lettering. - How about some diamondplate on that silver...yeah that would be sweet! - Mix in some blue lights in with the red lights - I believe they usually have blue and red - as well as white even too. - How about a badge on the side man! Really nice work. Tom
-
Looks good - show us some more! Got a body on that thing?
-
Looks really good - the 2nd version is better - the 1st had that "hair plugs" look but you added the little peak which really helps. I'd push that just a bit more, but awesome.
-
Stuff looks great!
-
I just watched the first tutorial and all I can say is: WOW I've had AM a month, I've been through the AM book and into a few tutorials and I have Rogers book as well, but NOTHING has taught me as much as watching this! Honestly John, this is awesome. I can't wait to watch the next one, then I am going to my current model, scrapping it and starting all over again! (Note: John disregard my e-mail on the location of these tuts, obviously). A couple questions maybe some of you more advanced guys can answer: 1. At one point he "grays out" the canopy to use as a guide - how did he do that? 2. He noted that he locked a point in the rim of the cockpit so he wouldn't select it, but it went by so fast I didn't quite get why he did it. Tom
-
Gah - what happened to your website - tis down! Was really wanting to look at it, and heard you have some Osprey tut that might be helpful to me? Tom
-
Just wanted to chime in and say really nice work, keep it up. I too think she really needs some weight to her walk, it is a bit floaty. Anyway, this is a lip synch test - and the lip synch is cracking (to quote Wallace) Tom
-
Ever have that feeling you are being followed....?
-
First model nearly complete, need some tips
pixelmech replied to pixelmech's topic in Work In Progress / Sweatbox
The creases look odd in this view, they look fairly decent otherwise... -
Hello, Here is an update of my 'Mumby" guy. Again this guy is simple a model for me to work on rigging with TSM2 and begin animation practice, so I'm not concerned about getting him perfect. Is there any way I can smooth him up a bit without tweaking splines? Also, with the rounded parts (front of feet, front of nose) I've got these funky triangles where it closes. Will it render like that, can I fix it some way? Also, does anyone know of a tutorial where I can make the surface look like plastic, or clay, or cartoonish in some manner? Something simple perhaps...
-
Yep looks better, keep it up. One thing I notice is the cigarette is sticking up at an odd angle. I know it's early and you are probably concentrating on other things - or maybe it's supposed to be that way because he is looking up and clenching down on it? At any rate, train yourself early to pay attention to every little detail, and things you do will be that much better! Tom
-
Boy that is....good.... <me goes back to woodshed>
-
That is excellent work. I particularly think the flip was wondefully executed and I too wonder if it was done by hand. I like the way the halo bounces too, it really adds to the loose feeling of the scene. Looking forward to seeing more. Tom
-
'Mechanical Contest Entry'
pixelmech replied to guernseyfreak's topic in Work In Progress / Sweatbox
Also, it is very dark - dark scenes can be cool but you have to make sure that it doesn't become too muddy. Probably an item of interest will help