pixelmech
-
Posts
1,323 -
Joined
-
Last visited
Content Type
Profiles
Forums
Events
Everything posted by pixelmech
-
Man, Colin - looking at the wire just makes me realize how wrong so many things are on my car. I'd be curious to know what parts are attached and what parts aren't (looks like wheel trim isn't? What about the doors, windshield (I'm really stuck on that right now), and windshield posts?). Some you can tell but I'm not so sure on others. My patch count must be at least 3x yours, if not more. Also are the windows one flat patch? Would you mind giving a quick overview of the process? Where you started and so forth? I had a rough time getting the wheelwell transition into the body - I think I tore my hair out on that more than anything. The headlights are awesome. Really awesome job. Sorry for all the questions! I must now go back to my PC and feel shame Tom
-
Dandy DNA! Really big version...
pixelmech replied to heyvern's topic in Work In Progress / Sweatbox
Just wonderful stuff, Vern. I voted for yours as one of my choices - it just blew me away. And seeing it close up just makes me more appreciative. I wish I had a 5th of your talent! How in the world did you get the liquid inside the bag to conform to the bag itself? Is it all manually tweaked? -
I haven't messed with materials yet, the model window is already slow with all the patches so I have been waiting. I just planned on having the "nice paint job" look with nice rims and bright police lights. Of course, I have no idea how to do any of that LOL
-
I think it looks better too. And thanks for the wires! I notice you didn't connect the arms to the torso - curious why. From your animating skills though - it doesn't seem to matter!
-
Well, ok - a mechanical modeler I AM NOT! This has begun to look WAY more cartoony than I wanted it to. I played around with decals for the first time. At least I see how they work. Looks like the trick is getting things smooth and lined up. The moment I added the tires to the model, it became completely unmanageable. I removed them and made them a second model. How do you figure out patch count? I'd be interested to see where I am at. I'm going to try and put simple windows in (dark so the interior is hidden), make some rims and last pieces (rear lights, tailpipes, mirrors, siren and cop lights) and decal it and be done with it (I hope!).

-
Fleebag Studios Presents "Skeeters"
pixelmech replied to fleebag's topic in Work In Progress / Sweatbox
Worked perfectly Nice job - very entertaining! Curious how you made the wings beat - did you just move them at a really fast rate? (like every frame or something?) -
Fleebag Studios Presents "Skeeters"
pixelmech replied to fleebag's topic in Work In Progress / Sweatbox
Nope - no dice. At first the QT dowloaded at about 30/kb sec (slow). I minimized it and suddenly got a msg that it was done. Started viewing it, and right during the intro I got a buzz sound and that was it - the whole movie is the intro card saying "by Bob Freeman" - never get's past that. Unless you really expect a huge bump on this, I'd just put it on your own server, this doesn't appear to be working too well. Tried the WMV too with no luck. HTH Tom -
Good point Mike, and I have been leaning that way too. I had originally hoped to have opening doors and hood, but now even that seems like a real chore to do, so I'm skipping that. I didn't mean to get consumed in this model (you know all the animation problems I was having - I'm supposed to be working on that) but somehow it happened. :/ I just bought the 3dartz rigging tut - looking forward to getting that and hopefully making some progress in that area too.
-
Fleebag Studios Presents "Skeeters"
pixelmech replied to fleebag's topic in Work In Progress / Sweatbox
I've been trying to download the files unsuccessfully (at work on a big honking pipe). If I right click and save, it times out (and says file might have moved, etc blah blah). Simply clicking on the QT link gives me the qt movie in a page but it never loads - or is loading soooo slow you can't tell (after waiting some time I get like 3 seconds of the beginning music, that is all). -
I really enjoy watching that clip! I do have to agree with Josh, something about his coloring is definitely not working. In this latest clip he is this pale green (or seems to be with the lighting) and he doesn't seem to fit somehow. The lighting does look great though. I'm not sure what color adjustment so suggest, but the complimentary color suggestion is probably a good area to tweak in. Just my .02 Really looking forward to seeing some more! Would you mind posting a wireframe of your character?
-
Speaking as someone whos is working on a car (and not one totally real) - yeah welcome to tweaksville! Also, be careful about saving and versioning, your patch count is going to get HIGH. Tweaking in the manner of just getting smooth surfaces, making normals flip the right way, fixing bad CP intersections... Looks good so far though, I'll be interested to see how it progresses. I had a lot of consternation around the wheelwells myself. Tom
-
Made some progress on the body. Put in a rough windshield. Forming the front posts is gonna be tough, no idea how to do it since no spot to attach them. Even with the whole top, I wonder if a single layer of patches is good enough? Or do I need to make more "solid"? It's very thin with one layer of patch. I wish I knew how these guys made cars like this - the Cooper in the contest is awesome. I put porcelain on the base model and I'm gettin some funky stuff - especially on the grille. I flipped all the normals so no idea what is goin on. Got funky stuff at different angles too. No idea how to use materials so sure that has a big part to do with it. Extruding from the side worked better on the back, so they look better. Oh well.
-
Funny thing is I JUST saw it (10 mins ago) LOL, so now I get it. Not as great as advertised but some funny moments. Pretty pointless movie though, glad I didn't pay full price but rented it.
-
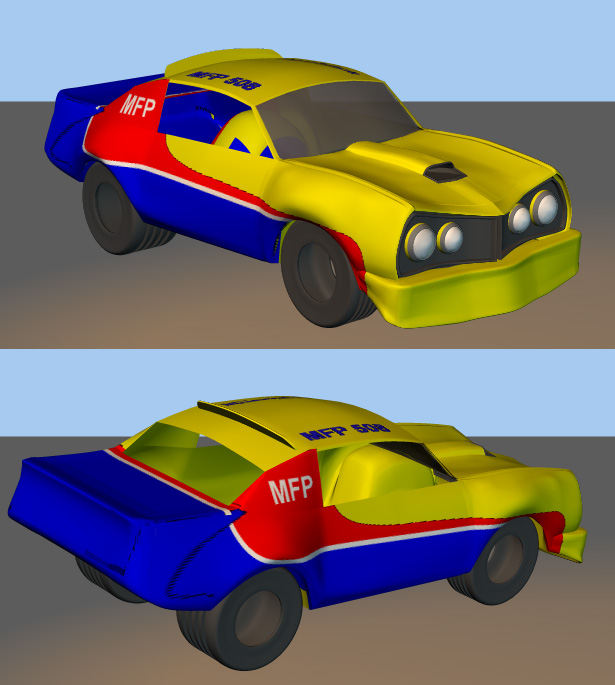
Update time... so I started in on the body. I tried a different technique for the rear wheelwell. I started from the left side view and extruded that shape. I think it went better, and I was able to shape the rear fin and curved rear nicely I think. Note this is the ROUGH version, I just did the basic shape but didn't do a lot of smoothing yet, and I'm missing a chunk on the flip. I have to shape the trunk and fix the irregularities. I also have to figure out how to attach it to the front and whether or not the roof is a separate piece or attached...no idea yet. If you have seen Mad Max (the first movie) I think I am going to make this an Interceptor car, which I have always loved
-
Semi-realistic cloth movement for a cartoon cloak
pixelmech replied to luckbat's topic in Work In Progress / Sweatbox
That looks really good. Care to show a shot of the rig? Are those umbrella's over her shoulder? -
Arrgh dude! There's a trick where you open up the file in a text editor. You remove certain amount of the top lines in brackets - I'm not exactly sure which ones, I am at work and cannot look at a model file right now. Maybe someone else knows. It works maybe 50% of the time, at least a shot. I was gonna say it looked great, and that I would like to see the webbing under the arms thinner and translucent. Hope you get the model back. BTW - Are you saving the model out as a separate file? I've noticed that keeping my model separate from a project has really cut down on my problems. I only import models into projects when I need to do something with them. HTH TOm
-
Let me just say that, that is...AWESOME. Dude, when I first glanced at the thumbnail, I thought that was the PHOTO you took of yourself as a reference before I read the post! Very nice, and I agree with the eyes closed comment. Makes total sense.
-
LOL, there will be NO dingleberries, 20 inch rims or chopped suspension on this vehicle!
-
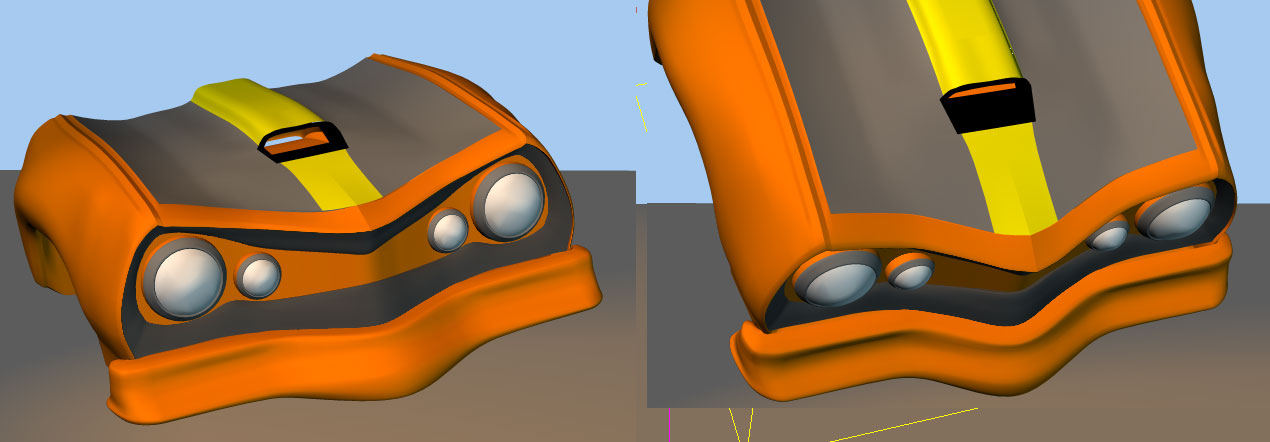
Thanks Kyle. Here's an update. I think the scoop works. I adjusted the back of the hood for the curve of the windshield. I have some gaps where the hood meets the body I need to fix, and some tweaking of splines to the hood and fenders, but basically I'm ready to start on the body. I did a quick extrude trying to keep splines down but it came out badly, will try more later. The missing piece on the grille is some funky 5-point patches. You'll notice I changed it (I finally got the idea I want). I think I may have to remake the whole thing now, but you get the idea. If anyone can give me some basic settings on how to make a basic metal material, I could get an idea of what the surface looks like.
-
The wires...
-
Ok, here's my test run at a scoop. I basically made the hole then fitted a moulding piece over it. It seems to render much better in the Chor window than in preview mode in the model window. In the model window I get slight creasing where the hole is, where the splines end. I can definitely model the moulding to fit nicely around the hole. What do you think? I'll post the wires in the next post.
-
That's the spirit!
-
Hmmm...I was afraid of that. Well I'm not 100% married to the shape of the scoop. I guess I'll try and work with the existing splines to build a scoop and see what happens...there has to be a creative way to get it done...
-
I moved over one of the splines on the fender, I still have some tweaking to do but its fine for now. Redid the hood and it matches better. You can see I made a scoop...but... then I became lost on how to add it in! I tried stitching it in with bad results. I'm wondering if I should use the top 3 splines of the hood to start extruding it and fill it in from there? Any suggestions?
-
Really good use of splines! My musclecar has a lot more than that. I think I am going for more detail but still. It looks kind of like a caprice. Do you mind giving the readers digest version of how you modeled it? I'd be interested to compare it with how I am going about my car.