-
Posts
3,868 -
Joined
-
Last visited
-
Days Won
1
Content Type
Profiles
Forums
Events
Everything posted by zandoriastudios
-
I did the heat distortion in this clip: http://www.hash.com/amfilms/search/entry.php?entry=907 by using a selection drawn with the pen tool in AfterEffects and running a ripple distortion filter over the clip.
-
I have a patch modeling video tutorial available. Just click the banner in my signature
-
what you are looking to do is called a Relationship. They can be on/off or percentage. Relationships are a part of the model, and are always there from project to project. a relationships on/off or % property can be setup as a default--this is how you setup your rig. It will be an on/off pose that is set to be "on" by default. when you choose new>relationship>on/off, you will open a relationship window. It is similar to an action window, but everything that you do here should only be something that you want to be enforced when the pose is set to "on". usually you will use a number of separate relationships to control your "rig" (you may want different constraints enforced in different circumstances...)
-
Cool! there ya go!
-
Jeez--they could at least offer to SELL you a copy!
-
email support@hash.com and I'm sure they can help you...It was just being sent with upgrades, instead of the TAOAM manual. But they might be able to send you a copy....
-
the new 2007 technical reference covers all that older stuff+ the new. It comes with this years upgrade.
-
that is a modified version of the 2001 rig that I've been working on for a client project.
-
I don't use it either.... The problem is that you have bones in your rig that aren't ones you want to have geometry assigned to, but this feature assigns influence based on proximity. This is fine if you are using something like the setup machine, which only has the geometry bones at first... I'm currently using a rig called "2007biped_rig.mdl" Which already has fanbones at the shoulders and hips (as described on my CP Weights/smartskin CD), eye target,etc. all of the relationships setup and ready. I just Import>Model when I'm ready for the rigging, and the skeleton and relationships all come in [this is simpler than the "Show some backbone" tutorial]. Then I switch to bones mode and scale and move hierarchies to fit the model (assigning as I go). I open an action where I weight and smartskin as I test out the movement until I'm happy with it.
-
The default lighting has colored lights (rim light is orange)-- I recommend replacing these.
-
So you've tried increasing the Relationships fall-off radius, as described in the technical reference? Could you post what your settings are, what they were, and a comparison of the "popping" for both settings?
-
sigh....I pointed you to the answer.
-
Genocell, while It is TRUE that it is easier to smartskin after weighting the joints. There is no rule that says you MUST! Remember that smartskin is MUCH MORE POWERFUL than just shaping the mesh based on the bone rotation. You can control ANYTHING with the smartskin: Bumpmaps, surface attributes, Other bones, etc... If you are having problems with your smartskin keys being jumpy, look at increasing the relationship's falloff radius, as described in the TECHNICAL REFERENCE (p.73-p.75)
-
Really nice work!!!
-
Sounds like you are just going into "muscle-mode" which is NOT creating smartskin, just CP keyframes.... Pose the bone, then right-click it>new>smartskin This will appear to switch your mode to muscle--but you will notice the define relationship button is toggled. Adjust the mesh, then untoggle the Relationship button, then switch back to bones mode. Now when you move the arm, you will see that its rotation drives the shape of the mesh. It you have my Smartskin/CP Weighting CD, then re-watch it--pay attention to the relationship button.
-
Might be in the settings on the lower-right. You have options for how the projection is applied--check there first
-
Look at it in the Decal View: Right-click the decal>edit. Did you use Auto UVs in 3DPainter? Could the orange patch actually be picking up color from an area of the map intended to be orange? Do you have an orange surface color-- that patch being accidentally undecalled?
-
...it is described in the "Show some backbone" tutorial in the manual.
-
to add it to your LIBRARY, drag-and-drop the file from windows explorer into your Library window. Be sure that your Library window is tabbed to the proper location
-
Lee, How about a military camo pattern painted onto the armor or parts of it... composite with a background photo of the "highway of death" from the first gulf war...
-
switch to a side view. then continue the centerline spline down, drawing the profile of the frogs head. After you have that, stitch the horizontal spline for the mouth into it. Then it will be easy to see how to finish off.
-
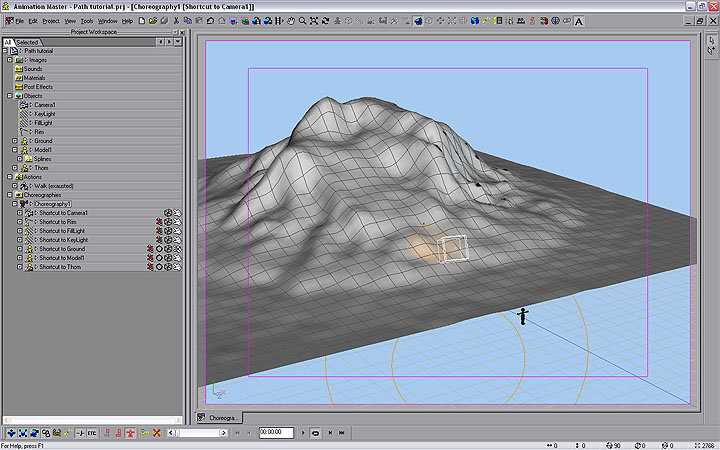
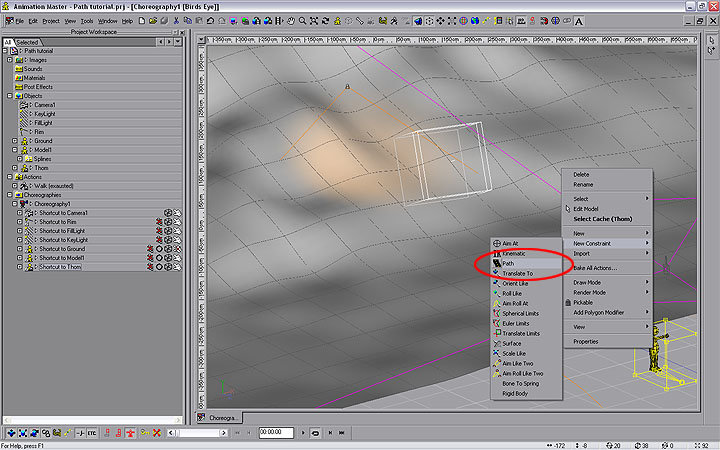
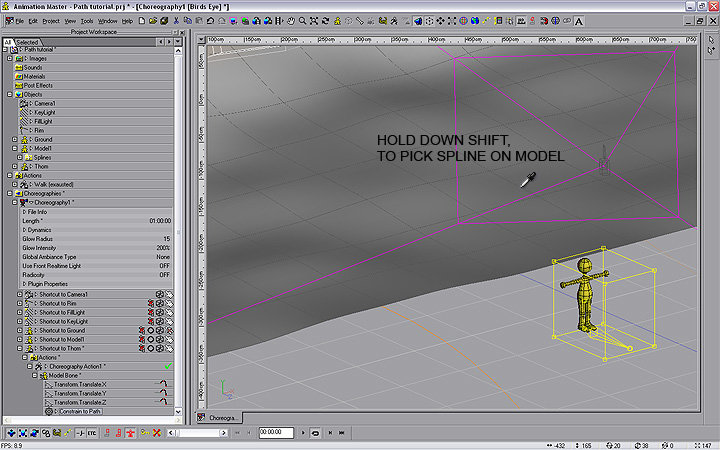
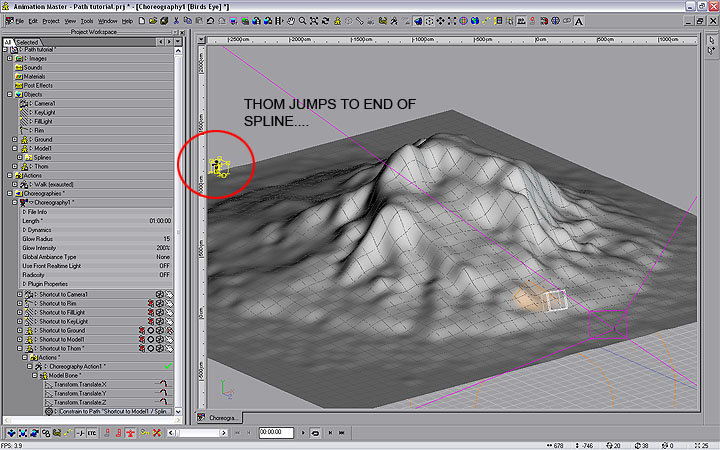
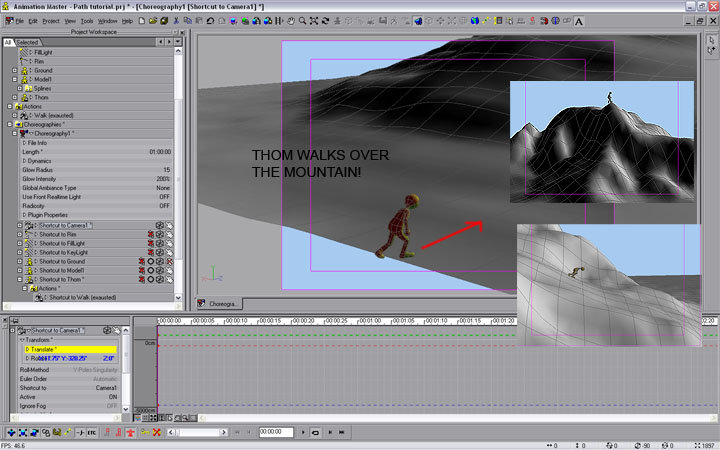
PATH TUTORIAL Here is a little tutorial for anyone following the discussion Here is a little mountain terrain that we want Thom to walk over. We select Thom. Right-click>New Constraint > Path. The eyedropper will have a circle with a slash through it, indicating that the mountain is not an option... Hold down SHIFT, and the indicator changes, allowing us to click on a spline that is part of the terrain. Notice that Thom has jumped to the end-point of the spline. I could use the EASE property of the constraint to set his starting and ending points for this animation, but I will just go with this for now. Drag-and-drop your walking action on Thom. Thom will now walk over the mountain over the LENGTH of the choreography. Set the length long enough for the time it should take him, or Use Ease to set his starting and stopping point (recommended). Here is a quicktime file showing the animation. Notice that there needs some secondary animation when the path is steep! The walk action will always be perpendicular to the path, so if the path is steep your character will look like he's walking up a wall... path_example.mov
-
Ah! thanks for that tip!
-
Paul, you SHOULD be able to do that...but right now A:M is only recognizing a path drawn directly in the choreography. Even if you make a single spline model and bring that into the choreography, A:M isn't letting you pick it as a path
-
Look at this link: http://www.mossor.org/Desktop/Tutorials/Sp...rite/index.html there is an example project, which works. unfortunately, I just tested in V14 and this seems to be broken--you cannot select the path with the picker or by drop-down list....


