fae_alba
-
Posts
1,122 -
Joined
-
Last visited
-
Days Won
22
Content Type
Profiles
Forums
Events
Everything posted by fae_alba
-
Absolutely effing fantastic!
-
"I have tiny arms and a big head, I don't think this plan was well thought out!" Merry Christmas to all, and to all I'll see you at work tomorrow.....
-
I will have to try that out....just as soon as I finish my Nemo seagull...my room spanning monkeys in a Barrell...and...and..and
-
I've been using cookie cutters to provide the palm fronds for my palm trees. The only downside is that the surface of the frond has to be facing the camera or it gets lost. Works ok for stills, but I can see it potentially being problematic in an animation.
-

Prehistoric! Image Contest! Deadline December 20!
fae_alba replied to robcat2075's topic in Animation:Master
I'm in! -
Yeah, looks like it needs to be higher up with a more pronounced curve to the neck...
-
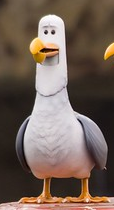
I've always wondered if a:m could be used to drive an anamatronics rig. I'm working on building a finding Nemo seagull now in am and 3d printing it. I figured I would have to build my one controller and interface in either raspberry pi or arduino. But using am...now that gets me wondering what the workflow would look like.
-
Prehistoric! Image Contest! Deadline December 20!
fae_alba replied to robcat2075's topic in Animation:Master
First case of road kill! -
Will it fit a bear?! Of course I'd like to see it.
-
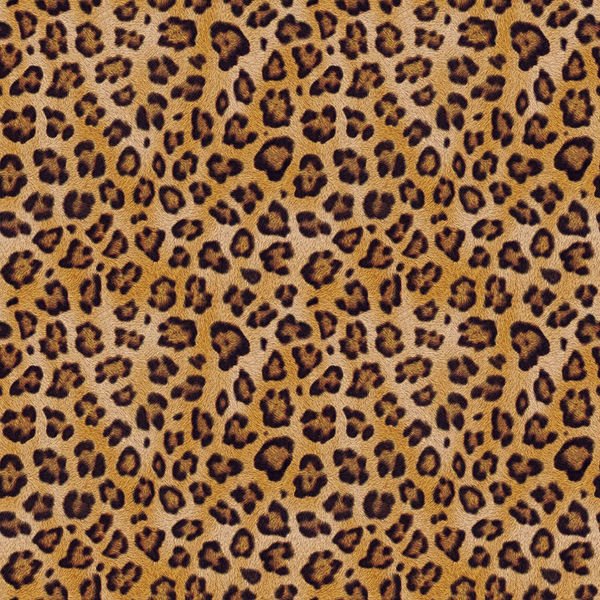
Yes, another fur/hair question. For each of these contests of ours I endeavor to learn/try something new. This time it's hair. I am at the point of trying to create an animal skin (what caveman would be caught out in public without his high fashion cave fur?). I'm trying to get the pattern of a decal to color the hair. I've followed the steps, but all I'm getting is a solid brown, not the spotting I'm looking for. my fur decal the result the test project ProjectTest.prj

-
Ok how about this....shadowing on the sign letters has the sun to the left, but the shadowing on the gate and pillars has the sun coming from the right.
-
Palm tree trunk in front...fronds in back.
-
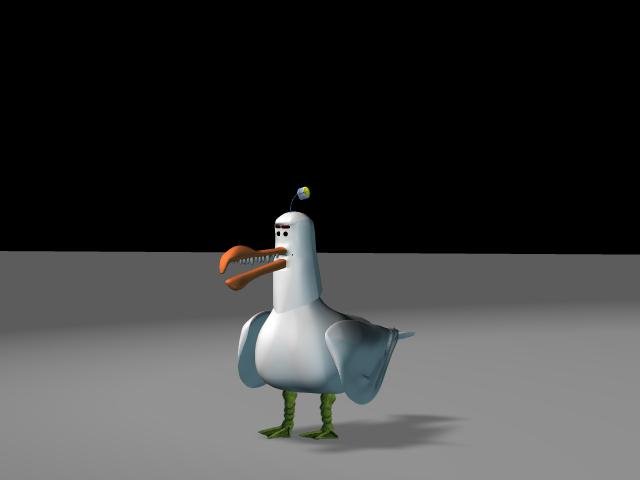
In the spirit of the next image contest, I've (at the suggestion of a few) given the seagull a prehistoric makeover! I've got to come up with a scene of some sort...but I might still get it done on time!
-
Prehistoric! Image Contest! Deadline December 20!
fae_alba replied to robcat2075's topic in Animation:Master
Yes indeed https://blog.everythingdinosaur.co.uk/blog/_archives/2017/04/19/prehistoric-seagull-from-the-outback.html -
Prehistoric! Image Contest! Deadline December 20!
fae_alba replied to robcat2075's topic in Animation:Master
you may have something there! -
Prehistoric! Image Contest! Deadline December 20!
fae_alba replied to robcat2075's topic in Animation:Master
I'm trying! But these damn seagulls keep sucking my free time away from me. -
I've toyed with the idea of hacking my monoprice to increase the print size. I'd have to switch the drive belts with worm drives. But the real problem is finding a large enough heated print bed.
-
The nice thing about most printers out there now, they are all based on open source tech. So if you wanted a room sized 3d printer, and could build a gantry system stable enough to move the print head, you could build it with "off the shelf" parts.
-
I use a monoprice lllp. It can print a 7x7x7 print with no problem. Technically speaking, you print a large print on any printer, you just have to be creative in breaking it up into smaller models. I always see it as a challenge, almost like making the testors plastic models we grew up with....some assembly required. I shudder at the thought of how expensive it would be to print something as large as my seagull by a service. Check out the YouTube channel titled 3dnprimting nerd. He just did a print of thanos' sword. It stood something like 7 feet tall.
-
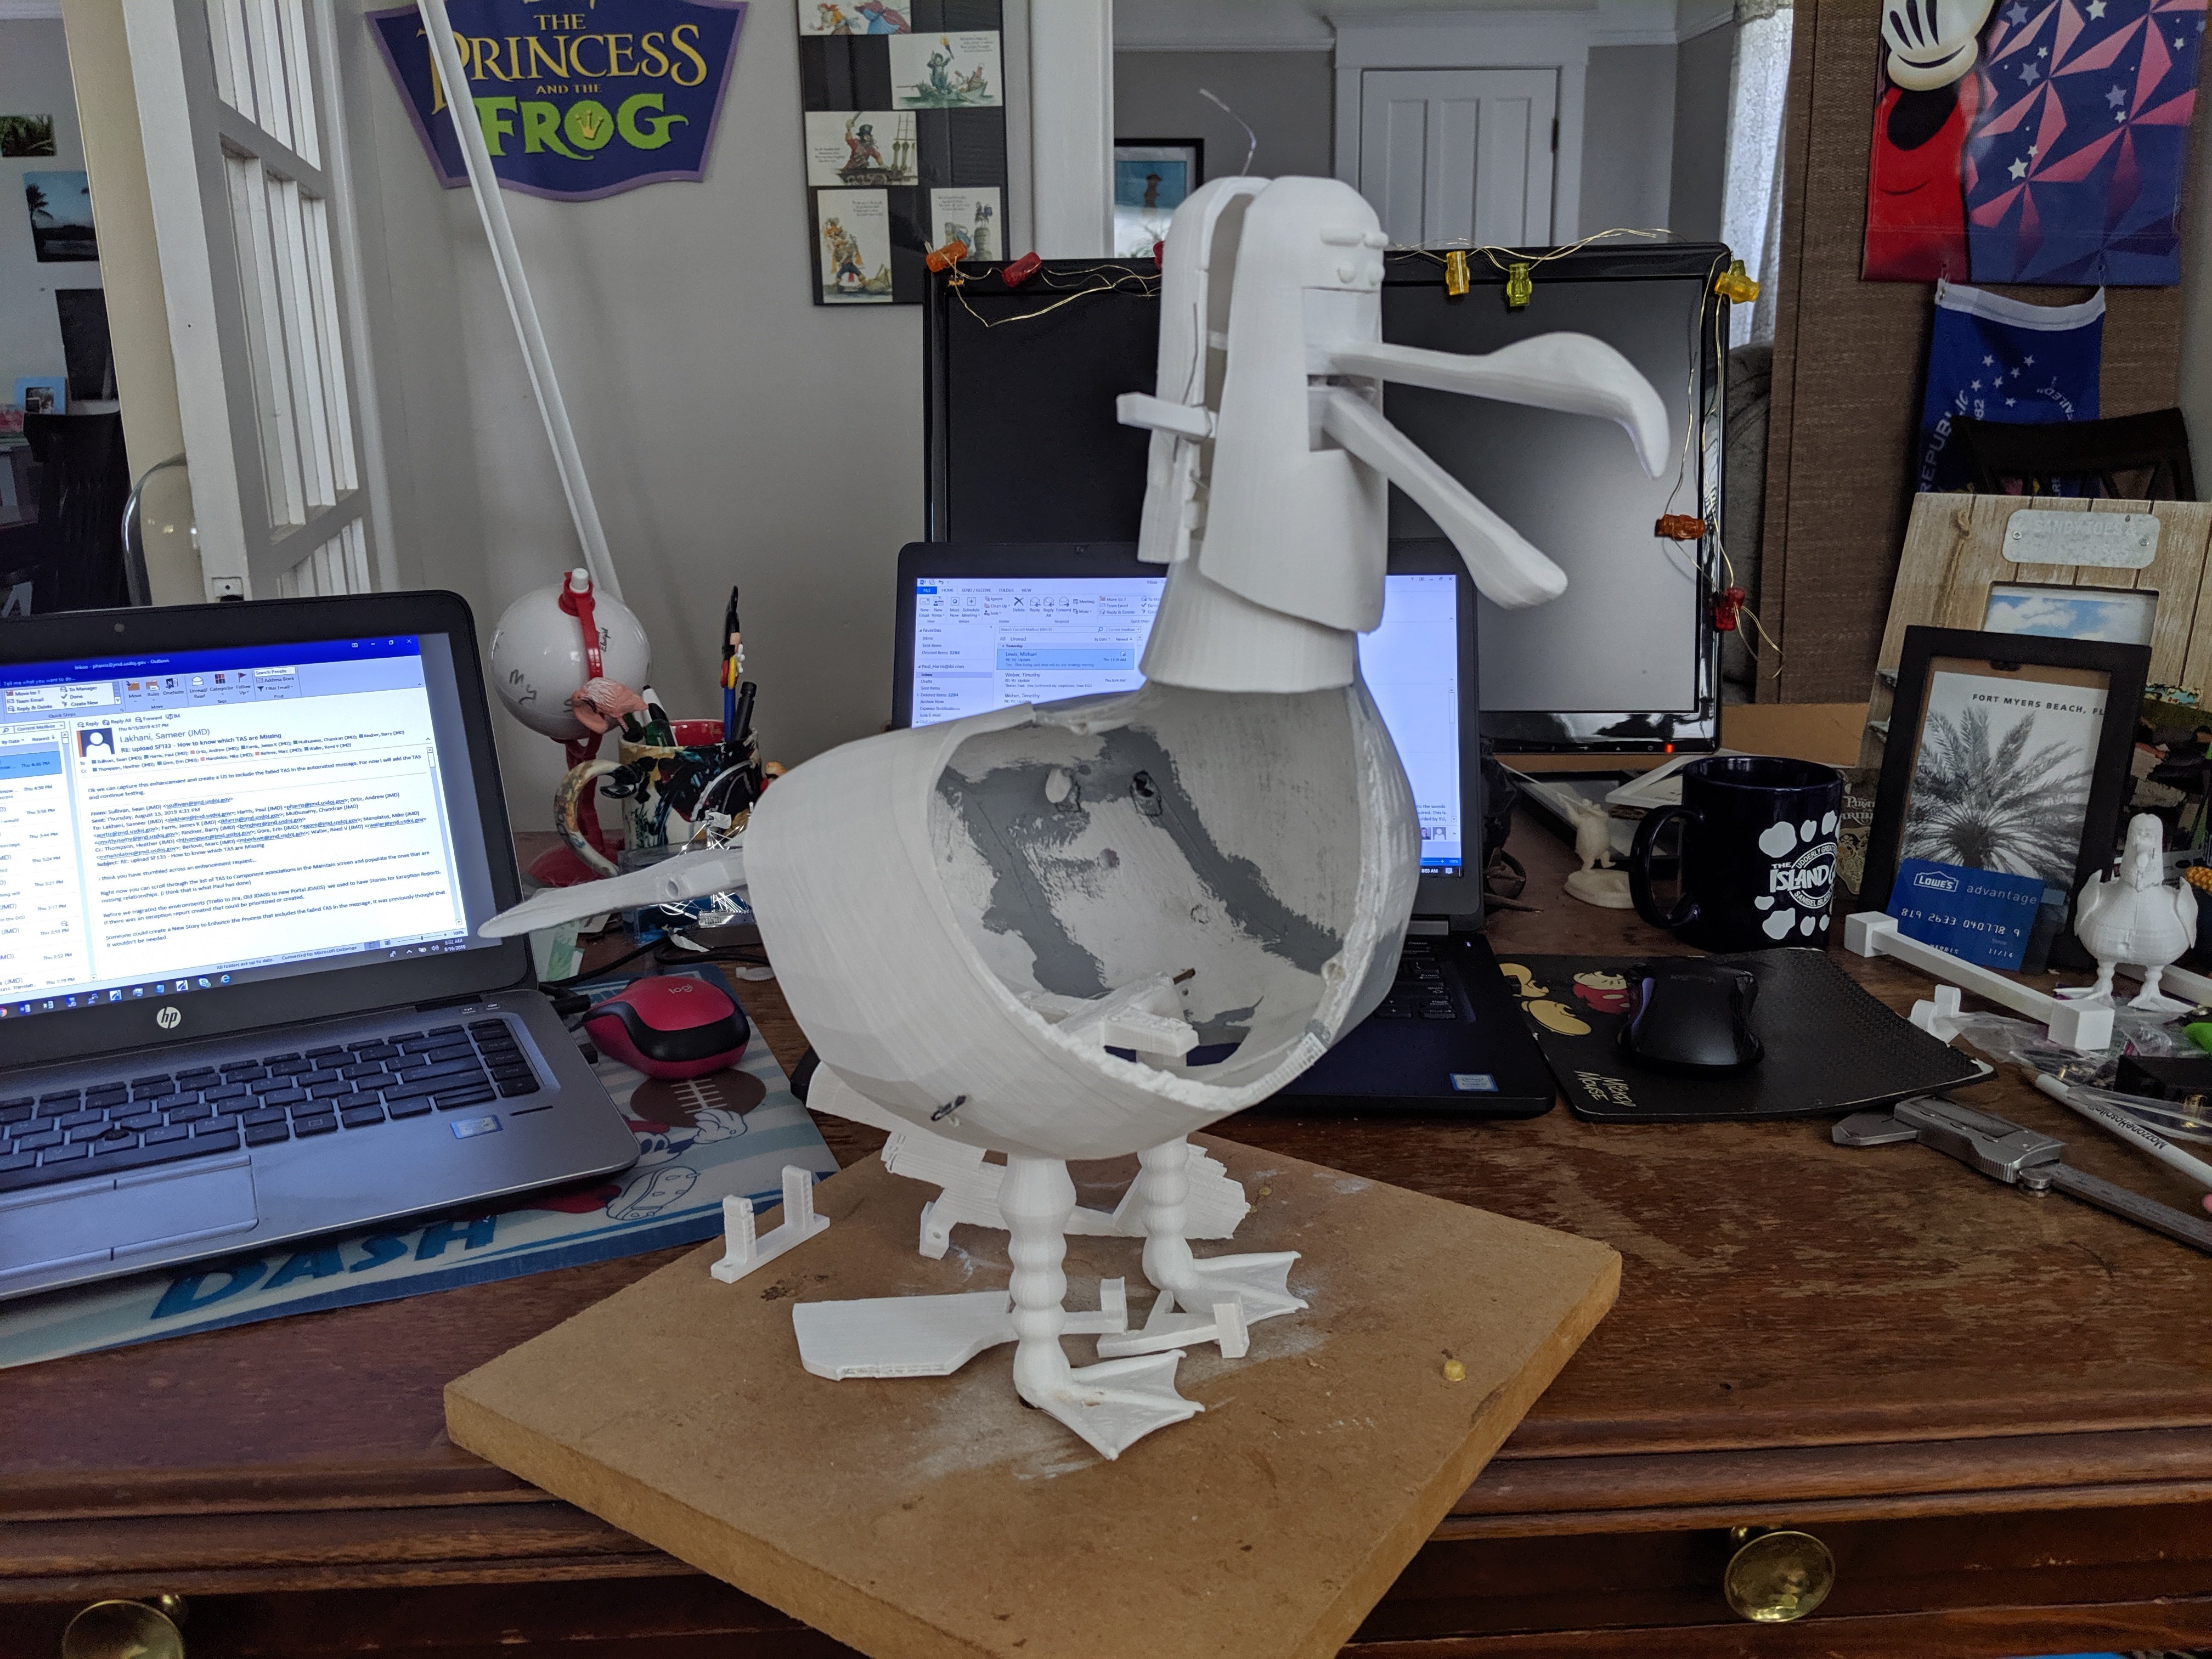
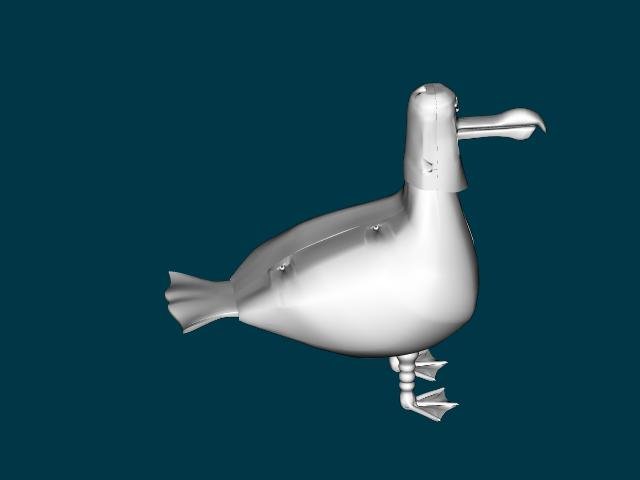
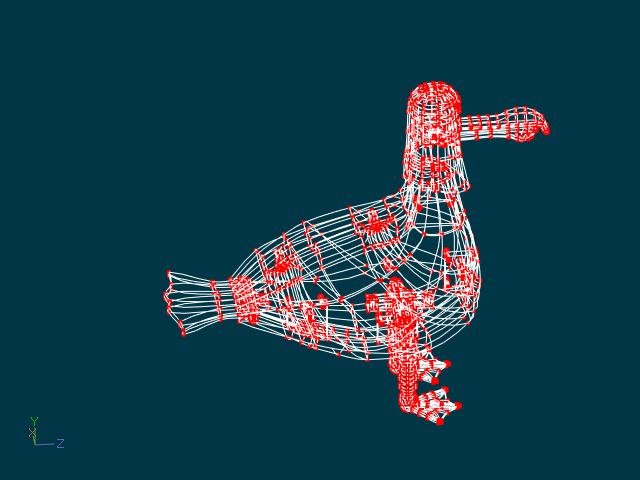
Thought I would give an update on this project. I has been a magical mystery learning tour for sure. I've learnt a bunch on modeling in a:m and how that translates to the 3d printing world. At some point I will out a tutorial together, but for now I've got to plow forward with the seagull. The biggest challenge with this is it's shear size. Standing over 11 inches tall this guy is big. Add to that I need to model it hollow so I can fit the servos inside and this rapidly turns into a mechanical engineering project. At first I thought I could just model the body in halves and assemble from there. But that meant modeling in screw mounts and then breaking the body up into four pieces, making 8 prints total for the body alone. As a test I did one half and assembled to try and figure out servo locations. The result is this It quickly became clear that breaking up a model in am, then trying to reassemble I. The physical world wasn't an easy process. The solution is what I am embarking on now. Model the body as one piece, but model in trap doors on the side under the wings and the back. While I still have to work in screw holes, I'm not going to worry about threading since I will use brass gnurls that I can heat set into the pla plastic. For a little stress release I printed off a whole model of the seagull in tiny size. Here he is in all is plastic glory...
-
Prehistoric! Image Contest! Deadline December 20!
fae_alba replied to robcat2075's topic in Animation:Master
wait, what? you're planning and doing sketches?!?! Next thing you're going to tell me that you read the instruction manual too! -
Yeah, my desk is a bit of a clutter. Basically my office is an homage to disney. The shelves and walls are covered in disney parks and movie props (spent way too much time and money in auctions!). As far as my seagull project, I've spent the week printing one half of the body. Each half had to be broken down into 3 pieces in order to fit on the printer. Each chunk is taking a full day to print, and gobbling up filament like it is going out of style. I've gone thru a whole spool already and just order two more to make sure I can get the body printed. I figure I will put the one half together, then dry fit servo mounts and build a basic arduino controller to make sure everything is copacetic before moving on. Also added the wings in to the model, and figured what the hell, I'll animate those as well. That makes movement on the head, beak, legs, wings, and tail to rig and program. Might get all that done before the snow flies!
-
a quick look at some of the 3d printed sea gull parts. Like I mentioned earlier, the head is currently made of four pieces, the head halves (front and back) and the upper and lower beak. The lower beak hinges inside the head, and the upper beak screws onto mounts in the head. Currently it is being held together with a rubber band (ninja style!). The legs and rocker arm assembly are separate models. They, I realized this morning still need work; I completely forgot to model into the leg a open channel down the center to create a hollow core for wiring to be passed thru. Ah well, what's ten hours printing time among friends, right?
-
Robert I have big plans. I see in the future multiple sea hills, all animated, all controlled by a controller that will give each one random motions ( head rotation, tail up n down, body pivot forward and back, and of course saying " mine"! Over and over. I even have plans for different personalities down the road. I've always loved Disney's animatronic magic, and attractions like these sea gulls and the tiki room have been on my do list for some time.
-
It's been quite a while since I've been on the forums. I've been heads down on my latest 3D printing project. This one is actually the one that got me into 3D printing to begin with. If any of you have been to Disney World, Epcot in Orlando you might remember the Finding Nemo ride, and the animatronic seagulls outside the entrance. I have been wanting to build one of these for the longest times, and this project was the reason for buying the 3D printer I did, since it was the best I could afford that would print the largest model. So a few months ago I started modeling one in A:M and this is where I'm at so far. I've been able to print the head and beaks, which is broken up into four separate parts. The legs are in three parts. The body is too large to even print on my printer and will have to be broken up into at least four separate parts. On the animatronic front, it will have animated beak, head, tail, and legs. It will be a challenge for sure. The head alone I spent over two weeks on and printed at least five versions before I was satisfied to move on. The legs I got better on, and have only needed to do two copies. The body needs to have mounts perfectly aligned for all of the servos to add the movement to, and I'm sure I'm going to go through a spool of filament before I get it right. Once all that is done, I move onto the electronics where I need to design and build a controller and program that. It will be based on an arduino, we'll see how many a fry in the process!