KenH
-
Posts
13,816 -
Joined
-
Last visited
-
Days Won
1
Content Type
Profiles
Forums
Events
Everything posted by KenH
-
Looks an interesting project! I can't get to see the animation as it's too large and I'd say others find that too. Maybe you can edit it or put it in a compressed format? Good luck with it anyway!
-
Good stuff!
-
Looks great indeed! I'm not sure if they want a realistic or a caricature oc though. You might want to ask to increase your chances.
-
Does just weighting do it? No intermediate bones? Do you use the fall-off capsules? Doesn't the joint shrink if turned too much? Can you give an idea of the weighting values you use in a joint?
-
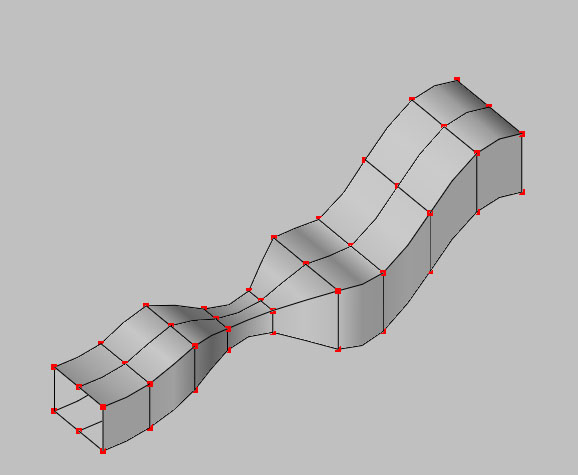
I just noticed this post....amazing image! I can't even imagine how you made it. Maybe a wireframe? Especially great for a first post!
-
They're really developing personalities there!
-
Good work! I don't get how that competition works...what if you aren't in when the email comes?
-
Hey Frank....if you're ever over at CGTalk, post your images. I would say you would get "highlighted" on the front page and it would be great publicity for AM.
-
Not just you. He's probably taken them off his site by now.
-
Really excellent. I love the lighting...it really makes a difference. I'm going to have to learn how to use it Which skylighting rig do you use? Regarding the extra patch to block the Wheel well, it will need to be double sided(is this doable?) or else the normal fliped to face the engine.
-
Mighty fine work! Was all that modeled in AM?
-
Excellent....only crit...his thumb looks funny. Good stuff otherwise!
-
You mean when the brows go back?.....yeah I over-extended them to show the movement. But in truth, I could probably reduce the brow bone weighting on the back cps abit.
-
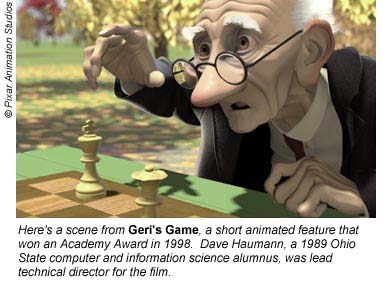
Thanks dudes! Here's the Bones n Splines version.....500kb http://homepage.eircom.net/~kenheslip/Ger.mpg
-
And the animation....300kb http://homepage.eircom.net/~kenheslip/ger1.avi
-
I have him moving! I'll post a short animation of him shortly. I rigged his face using constrained bones and weights. So when I move the corner of his mouth, the rest of the mouth goes with it and his joules move pushing up his cheeks. All automated! AM rocks! I'm not too happy with the look of the hair though....it needs more shadow within it. And an animation will have to be half this size as this frame took 5 minutes to render! Oh! And thanks go to Jeff for the teeth!

-
LOL
-
Oooo! Very cool! If that's your first 3d model, either AM is easier than I thought or you're a genius! Can't wait till he's textured!
-
Cool! Can't wait to see the animation!
-
Some of my A:M-Images from 2001 to now
KenH replied to JackMcRip's topic in Work In Progress / Sweatbox
Some pretty cool stuff there! -
More people will see it if you save it as a jpeg or other Browser Friendly Formats. It looks good! And will animate quite well. I'd advise you to bring the hooks down to the mouth though. Keep us posted!
-
Yeah good luck with the meetings and the Op!
-
Frank: Yes I'm considering it Bernd: No, no zbrush in this one. I wanted to test the posibilities just using AM. Modeling in AM might be abit slower, but it's quite thereputic .....although I do miss the 3D painting aspect of Z2. (Image stored for a thread in the AM secton)
-
He's modeled after this guy....in it he doesn't have any teeth at the start. But do think it he would look better with them. I might do that. Thanks
-
Lookin good! Maybe she's a closet vampire? You should test to see if it's the model/material by trying it in a brand new project with a new mirror material. If you still get the same, send that cut down project to support....with everything embedded of course. But not images. Because you can't