Scottj3d
-
Posts
485 -
Joined
-
Last visited
Content Type
Profiles
Forums
Events
Everything posted by Scottj3d
-

Have attached arm and hand, let me know what you think...
Scottj3d replied to Roger's topic in Work In Progress / Sweatbox
That should work very well. Look's much cleaner and should extrude well. You might round out those 3 cp's (o key) at the bottom of that hole at the 5,6,and 7 oclock position though. Good job! -
Have attached arm and hand, let me know what you think...
Scottj3d replied to Roger's topic in Work In Progress / Sweatbox
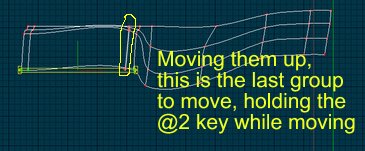
Roger, try hiding most of the arm so that you can see the body and part of the arm say just past the bicep area. Looking straight at it from the side add a continuous spline to create a solid ring all the way around the area I have marked in yellow. Unhide the rest and break the splines between where I have marked in yellow and blue or for that matter cut the arm at the outside of the yellow and delete the rest of the arm then extrude the arm out from the new (yellow) spline ring and you should get a nice smooth transition. You could cut it as I was saying and connect the old arm to the new geometry but I think you'll find it easier just to extrude the arm as I have said. Save the hand and reconnect it to the extruded arm. Also the two poorly drawn arrows in red show two splines that appear to intersect three splines causing a crease. A good rule of thumb is not to intersect more than two splines. You can hook one of those in before you extrude. so that you don't have both of them running down the arm. If it gives you trouble I'd be happy to respline it to demonstrate what I have explained. I think (if you want to) you can zip the model and post it and I can download it and re-post the fix. Once you get the hang of the technique it will be something you can use alot later. Also try saving just before trying to fill those 5 pointer's sometimes this helps. And occaisionally I have to click the 1st cp once to select it then while holding shift (PC) click it again to show the bounding box and then work my way around to get the 5 point patch tool to highlight. Good luck.
-
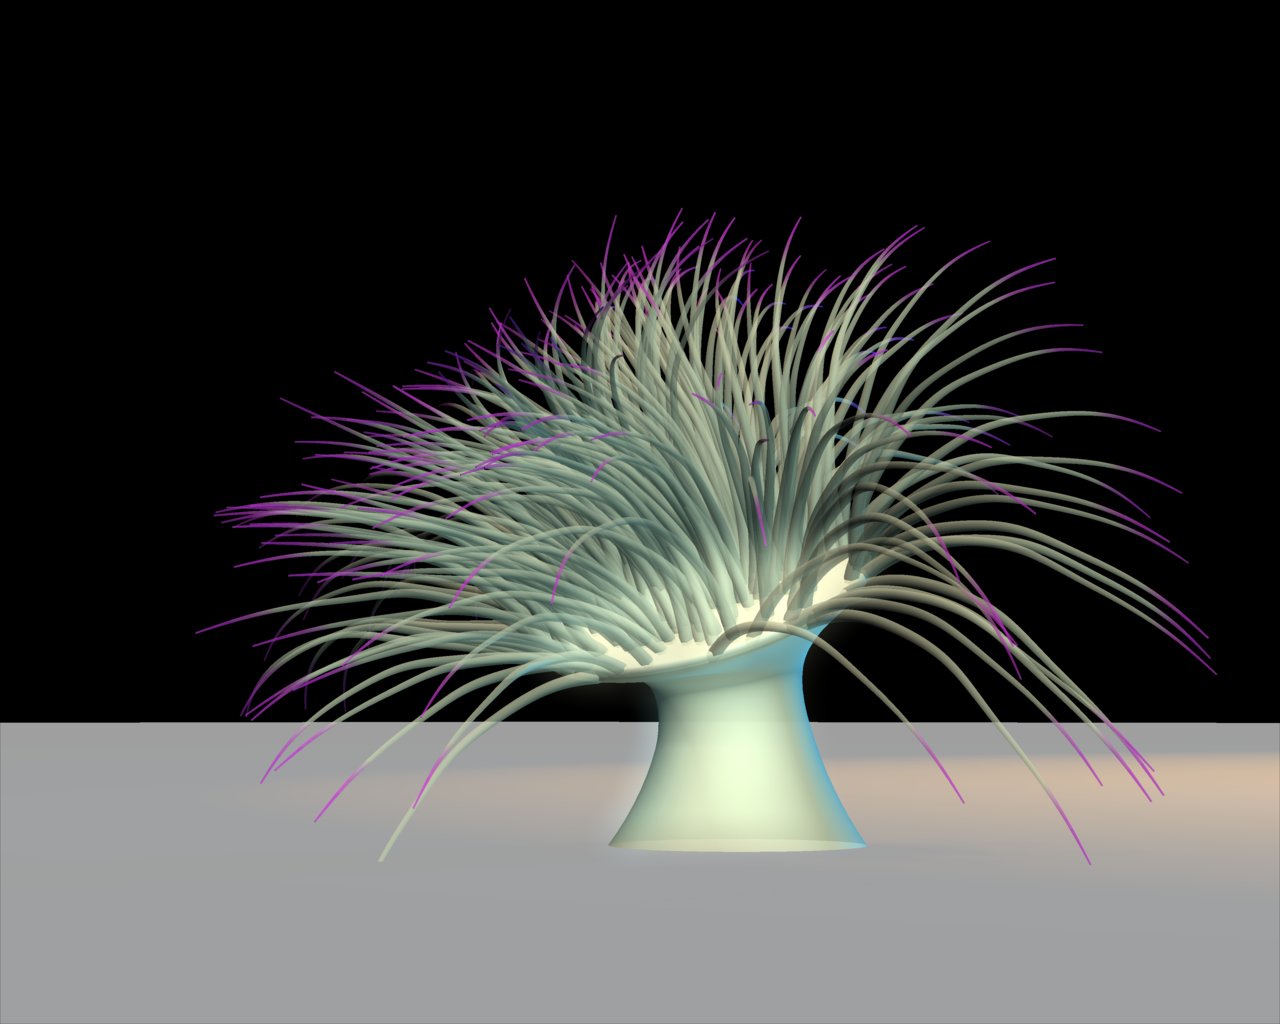
Thank's Rob! And they do exhist, (the one on the right is a trigger fish and nice economy on those splines) In the middle is an angel and on the left could be a sponge or coral depending on how you decal it (pun intended). Actually I have revamped the PC I have been running AM on and have my 6800gt back in action. Just built an SLI based system with two vidcard's but am having the "you know what problem with you know who's chips and driver's" I have an email out to them and am awaiting an answer. I'm interested in your offer. I'll PM you my email but I believe it's also in my profile. Thanks Roger. The tentacles on the anemone are hair with an image file so I am still tweaking it. It looks more like the tentaclles of a tube anemone than a condylactus but I might be able to add a cp to the "hair's" to better adjust the taper to be more towards the tips. The lion is a volitans but is still very much a WIP and will have plenty of changes by the time I finish it. I can duplicate better with pen and paper than with splines but it'll get there.
-
Are we talking modelers without TAOM certification? About all I am good at is modeling and decaling but I'd be up for some props or something static that need's not be too difficult to rig. I can do some fairly creative splining but when we start talking rigging and smart skinning,poses etc I start feeling intimidated. Are there any illustrations available to work from? Point me in the right direction and I'll give it my best effort.
-
Nancy, I went back and tried the timeline adjustment as you suggested. This is more like it. I'm just bouncing around playing with my projects. Thanks for the tip!
-
Thanks Viper, It's called a Pro-Street which basically is a street legal racecar. I'll have to check with the owner as to the HP although I think he has only determined the HP using a desktop dyno program on his PC. I still have alot of details to go on this one but I was going for realism. Hopefully I'll get back on it soon. Thanks Dhar. I dont know anybody who doesn't have something similar in thier shop so I thought it would give it a more realistic "garage" appeal. Now to figure out how to "grease" the place up and get some clutter of tool's and maybe some flourescent light's and tool clutter. I'm also working on a chopper to look like it's in the building stage but that's a future post. And Charlie, hopefully I'll see you there! Thank's guy's.
-
Thank's Eric. Heres the settings. This is for the lenses as that was what gave me the best result. Mainly the index of refraction was what gave me the look I wanted. There is also a bumpmap for the grid and I believe the percentage is set at 200% but I'll go into the project in V12 and double check it as I had to make adjustments for V12 since most of it was done in 10.5. I kinda bounce between them depending on what I'm doing. I like to model in 10.5 but rendering and lighting (for me) comes out better in 12. I too tend to let project's rest a while and come back to tweak them and each time it seem's my skill's have improved. You pick up alot just reading op's stuff here.
-
Trying to assemble my dragon, but I have a dilemma:
Scottj3d replied to Roger's topic in Work In Progress / Sweatbox
If you have seperate models or projects containing the different parts you need to save the models from within the project workspace by right clicking the model in the pws and save as. After doing so with all the models you wish to bring together you can start a new project and open all the models from within the new project and then start a new model leaving it empty. Then copy all the parts by selecting them in the seperate models one part at a time and pasting them into the new model. I believe this is what you are trying to do, hope it helps. -
Well it's been a while... I was hoping to have it ready for the image contest but life just got in the way. Still got alot to learn about lighting and dont have much time to work on it as the time I have is being used on some other commitment's but for anyone who was watching here's where I was ,er, am. The yellow one is going to be stripped down to the firewall to look like a second vehicle in the restoration process. I made two wall's and put a couple patches up with decals on them to make the poster's and the plan is to clutter it up with oil bottles and cans of automotive product's etc and them some more tool's etc.
-
Adding a spline (as I have faked here) should flatten that out and give you a bit better control. With the splines running parallel in close proximity you can pretty much use them to tweak the bias by eye. I've never used bias handles but on this type of curve I would add another on the opposite side of the one nearest to your text for more control where you want it to flatten out. I know you're trying to keep the splinage down but I think it worth adding for the clean line it give's. Oakey I did this on my hood on a less dramatic hood line as well as some body lines and on my project and was pleased with the result's in my render's. Still, just offering a suggestion.
-
This is an interesting project. I think CFA or a manual CFA will give you a more even hood. More like CFA plus some splining to get the scoop right. Can't wait to see this car evolve.
-
You're right, I went back and looked at the reference pic's you sent after I posted it and they do not glow and I thought "oh well I already posted it. It'll be easy enough to turn off. I also will round the naselles out a bit as one reference looks round and the other looks more squarish but I have them too square. It will look much better the next time I post. I actually added the glow to see if it would show up in the render as I have had problems with glow not showing up from time to time. I just got carried away with my 1st Star-Trek ship.
-
Here's the early incarnation of the Cheyenne class I was assigned to. I had a few hour's to play with roughing it out today. I'm still working with half the ship and it shouldn't really be out of spacedock yet...but I couldn't resist. That's Julian's starfield in the background. I've been looking for an excuse to use it. Lot's to do still.
-
That's right Mike. Now that I think about it 1st contact was after Picard had been rescued from the collective. I'd still like to contribute with the ships though. I'm fairly familiar with the ship designs of the federation so I can adapt.
-
I wouldn't mind helping with some of the ships. Has anybody got the Defiant yet? How soon would you need the model's? I was an avid fan of TNG,Voyager and DS9. Didn't dress up like a Klingon or anything but couldn't stand to miss an episode. If I'm not mistaken that is the same battle as the one from 1st contact and a few episodes of DS9 referencing Sisco's loss of his wife and why he didn't like Picard too much. I would like to help if you think I can. I can model pretty well but that's my only strength as far as any talent is involved.
-
Keep it going! I'm still waiting to see that motor. On those light lenses if you haven't already, try messing with the index of refraction at different values until you see what you like. With those bumpmaps it will give the lenses that slight distortion you would see in what's behind them. I had trouble with that on my recent car build. Nice work so far!
-
Learning the tools and how splines work is key. Practice adding, detaching, reconnecting and cutting splines and practice with the lathe and extrusion tools. It does take time but the more you practice the techniques for modelling you will start "knowing" how to make and connect the part's you need to make a clean model. Colin's tutorials will help alot if you take the time to study them.
-
This model is looking great Zaryin! I've always been a spidey fan. Makes me wish I were better at human form's and rigging them. I really like what you're doing with the webbing. I like the traditional blue and red the best.
-
Another thing to consider is building half the car (one side) and then once you have worked out the splinage and have your shape the way you want it you copy then flip the axis to create a duplicate half then line the halves up and connect them. I've recently found that building a car can end up being quite a task but with continual refinement it will eventually come together. Also keep in mind that it doesn't all have to be one piece. Alot of your trim etc. can be modelled as seperate pieces and fit into place and it will look fine. Break it into smaller pieces that will make up the whole much like a real car. People here WILL help you with figuring out how to best reach the final goal and having input will help you decide how you want to build to best creat the look you want. Experiment and SAVE copies of the model when you try different techniques so that if it gets messed up you have a good place to start over from. Good luck!
-
I'll double check that... and I think I'd have to use ver 13's displacement to do that. You might be able to get away with a bumpmap reversing the colors and a slight gaussian blur. It'd be worth a try. I've done some spaceships where I did the seam's for the plates making up a fuselage that it seem's to me would work well for that. Just a touch of blur should give you that edge around the letter's to make them appear indented. Here's an example of the indentation I was able to get using that technique. I can get you the percentages if you think it would be worth a shot.
-
Lookin good so far. At first I quickly clicked on the pic's before reading all of your post. Thought the roto was the model (WOW that look's like a photo!) Oh, it is! Can't offer any advice on the lighting and no crit's at this point. What I see look's good to me and the decaling look's fine. I want to see that chassis (main body) come together. Are you building it at the angle of the roto and planning to rotate it once it's finished? I never thought to model that way but I suppose with those key's (nice job on those by the way) it could be necessary.
-
Maybe this will help. I did my best to take you through the process. I can tell you like modelling and that spaceliner is pretty cool with the seating. Getting familiar with basic splinage takes time and practice. A couple of tip's, try not to have more than 2 splines intersecting in a CP as it causes creases, practice cutting and re-routing splines that do not "flow" smoothly. Look into creating some window's to show off those seat's. I'll try to make another step by step diagram to show you how to do that. Like I said, it will take time to get the hang of it but you're well on your way to modelling some cool ship's. Hope this help's!
-
You had an invalid patch there. I fixed it. Just an issue you will learn to see as you gain experience. AM_Ships_Human_Fixed.zip
-
A typewriter! (yikes) there now you can make all the internal part's. I remember the old mechanical ones. OOH! You could have fun with that. Sound's like a real challenge just with the external but c'mon all you'll really have to make is one of those arms and copy it a couple hundred times! (LOL) you don't need the letters on the end's. Oh and I just realized you were talking about the rear window and not the vent. I keep forgetting to shift it to fit the curve of the roof but next render I promise it will fit right. But I still gotta tweak that vent and put a handle on it. I'd like to have the Chevelle ready if there is a mechanical image contest but there's some real stiff competition around here and I have a way's to go on the lighting and a garage to park it in with a bench and......... I looked in the radiosity forum but had no luck on Xtaz's tut or mufoof. Read some other post's though and found term's and references to thing's I have no concept of how to do. Still waiting for the 2001 moment there.
-
Ok Charlie...what are you making? If you need "help" with part's let me know! Just think about each part as a component and build it and place it and eventually it all come's together. Just remember "refine...refine". I look at my 1st post of this car side by side to the latest and have to laugh at how "good" I thought it was looking when I posted it. I'm reading on the radiosity forum and making "slow" progress on my lighting. I attempted a render with radiosity on the other day but all I should say is I have a long way to go! It looked like "modern art" as if I had taken paint of all bright colors and put it on a tooth brush and speckled one of my print's. Those Bradbury boy's are good! The abort button was most definately very handy in this case. Yes that side window is way off as I have been studying my references. I just added the inner chrome trim and the glass(double walled) and I am in the process of a major resplining of the car (so much for those minor tweaks). A lead's to B lead's to C lead's to A as captain Braddock say's. So far I have redone the front fender as I had a 5 pointer at the front corner of the body that was driving me crazy! I'm not sure if I am ready for CG talk but I may give it a shot. Alot of those guy's don't respect AM enough but perhap's once I get a better handle on the lighting. "A nice little program for beginner's" I'm starting to see how massive AM really is lately and I've been at it for 3 year's! Uh, mostly modelling with diffuse and decal's. I'm watching Colin's demon and man does he have a handle on thing's when it come's to materials and all aspect's of AM. His mini cooper ( Colin if you're reading this"your mini cooper") breakdown helped me alot in understanding the right way to build a car in AM hence my desire to attempt this one. Here's one with the new fender...no more crease above the headlight trim! But still tweaking where the hood and fender meet.