Scottj3d
-
Posts
485 -
Joined
-
Last visited
Content Type
Profiles
Forums
Events
Everything posted by Scottj3d
-
Ok I've halved it and reworked alot of splines as well as added a few. Rodger I tried to concentrate on specifically the area's you pointed out but still have some minor tweaks to make as well as a few more new pieces for the mesh. I'm up to 8 light's now! Question is how do I get only one shadow? I'm thinking I have to select all except for one light and turn off cast shadows. Please tell me I'm close. Also I tend to just move the light's around in the chor and adjust the intensities in shaded mode to see where they light what I want to show up clean. Is there a "pattern" or arrangement that is considered a standard for a well lit chor? I'll be donating the door handle as a model file as soon as I finish getting it "just right" for any one who may want it as a primitive to copy paste into other models. You never know when you might need one.

-
This is great! When you build a room (and spacious one at that) like this, do you build it as a single model or as seperate models assembled in the chor? The look of depth and lighting is impressive. 90 kliegs tell's me that my 5 bulb light's in a chor is not as many as I thought. I actually thought I was pushing it.
-
I may whine and complain and drag my feet! But you guy's can only make me a better modeller. And that's enough for me. I wouldn't mind animating this thing but I am perfectly happy calling myself a modeller, oh and once I get this lighting and properties thing down a bit better a "renderer". I don't really think you're being though. I get better results with my progress from honest opinions. I have printed some of the renders I have posted and none of my offline friends are familiar with working with 3d software so they are "baffled" as you say. You guy's are familiar with what AM is capable of which makes it easier to point out things that otherwise go unattended. I think we all admire the work of others here and I believe you can critique and admire at the same time. I mostly admire but occaisionally toss an idea in if I get there in time to do so, but that doesn't happen very often. Oh and Thanks!
-
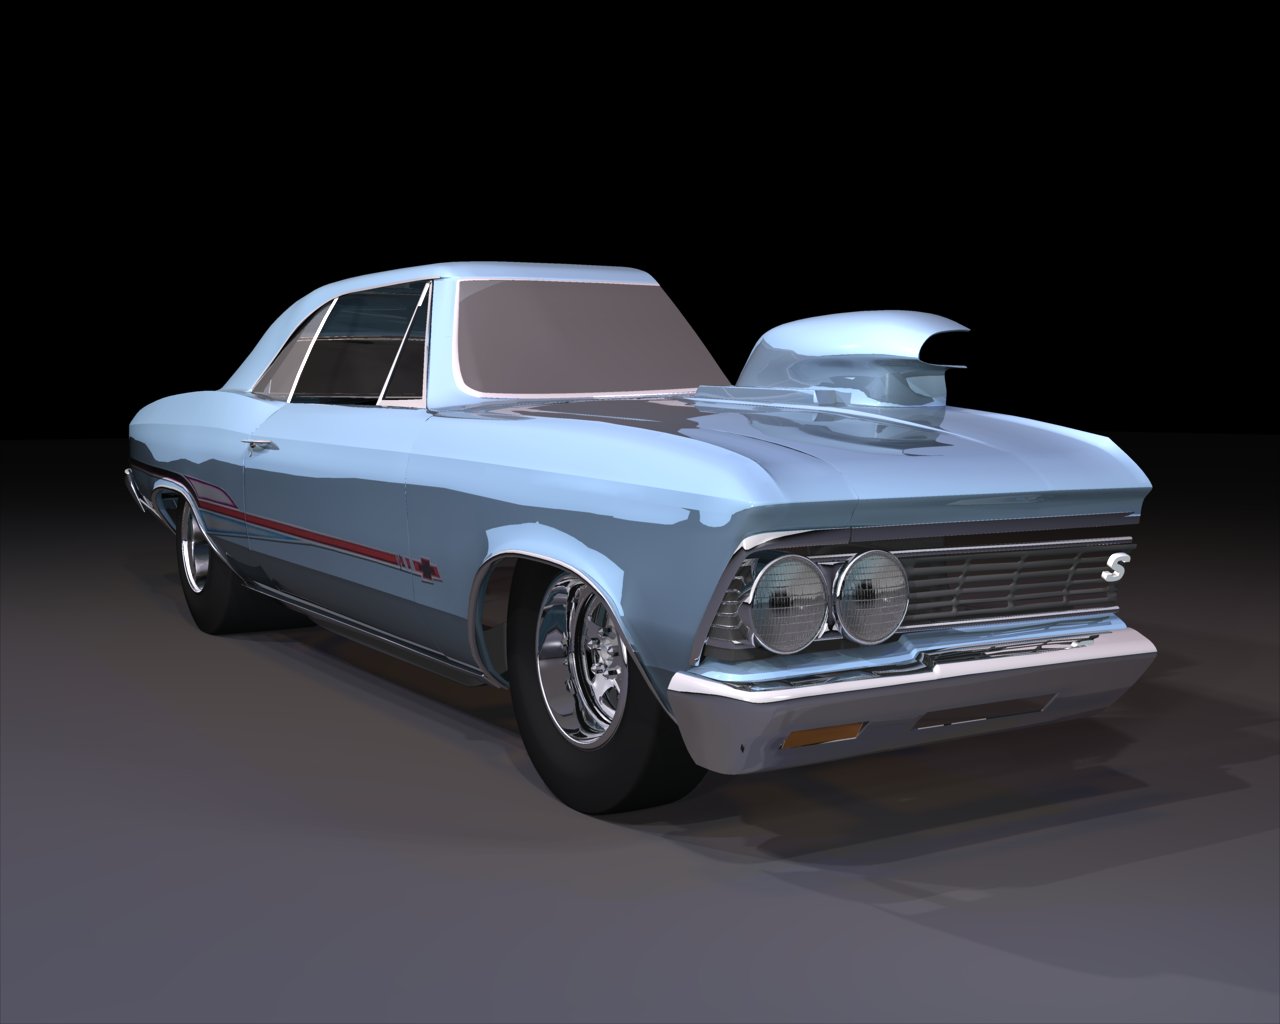
I agree Rodger and thank's!. I actually have much to do on the body. The roof is still also too thick if you are looking at a profile of the car. I have been tweaking it bit by bit and did actually do some tweaking to thin it a bit and the area's you discribed are "in my sight's" as since tweaking it they stand out even more but I keep bouncing around and adding things to try to bring the overall together to get to the point where I can focus more on tweaking than building. I have been focusing ot the "nose" and engine as far as where I have given most of my attention lateley. I am getting to the hood and firewall area next then plan to tweak the corners of the trim at the roof as well as where the roof meets the pillar's at the two areas you have illustrated. The hood will be extruded to "roll" the sides under to give a sort of bevelled effect for a cleaner line as will the fenders where they meet the hood and then they will get a final tweak to match them up a bit better. The render with the doors and hood I just posted for something different and to show the progress of the chassis as I just added the radiator support but that group which hides the doors and hood I made specifically to start working from the firewall up to give me better access to the cp's I need to adjust. I also plan to raise the center and back of the hood to match up to the firewall better and bring the center area of the firewal forward to give the windshiels a better curvature. I'll get some wires together to better show you the splinage on the corners of the windshield as I am using the cp's to "steer" the bias in the right direction which is something I am still getting the hang of. the trim around the windshield is basically the same slpinage in all four corners but the angle's are very different, up top the corners must be sharp which requires more attention that the bottom where they sweep around wider. As I am learning to do this I am realizing how much more you can use it to get the most out of the splines and also how you can tweak on one axis and screw up another. Guess that's why we call it tweaking. I appreciate the input as it will help keep me focused on improving those area's. I have much to do on the rear as well but I am working from the front to the rear. (hence the lack of rear render's) I was teasing the owner about having too much trim on this beast as the window trim unlike the fenders and grille area are integrated as part of the main body mesh rather than seperate pieces like the rest. I can already claim that this is the best model I have built yet but it's far from finished. Some of the other "CG" forums don't give AM enough credit for being able to show detail and that's part of why I decided to build this car. I have to admit at this point I had no idea what I was getting into but I am happy thus far and still think I can pull it off. Thank's!
-
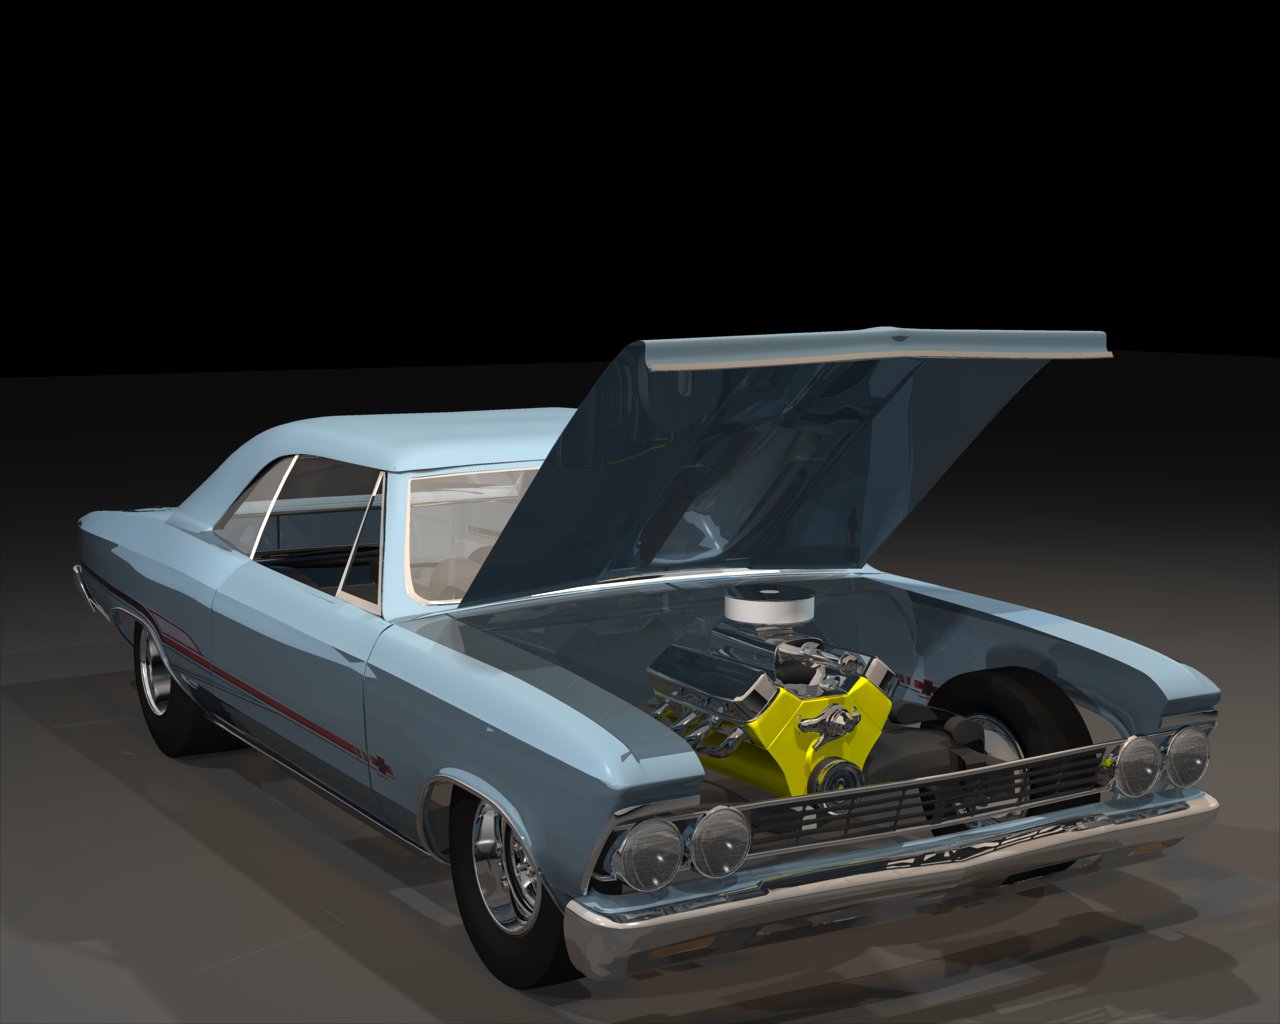
Did a little work on the chassis and the bumper where it meets the body and I'm almost "happy" with the headlight's. Had a funny thing happen when I rendered the chassis with the bare body. I have two groups one for the body color called "Bodcolor" that includes all the body parts that are painted. And the other called "barebod"that has the body minus the hood , door's and decklid. Bodcolor has all the specularity and reflectivity etc. adjustments for the paint. Bare bod is not set as it is only for exposing where I want to grab cp's for shifting around and hiding the rest. When I rendered with the Bare body and chassis I got this "flecking" in the paint that does not occur when all is visible. I assume this is because the group that is selected has no adjustments to it's surface and is what AM "thinks" I am asking it to render. The whole car render is a tad dark but I think it's one of the best I have done so far. Now back to that engine!
-
Look's like it's showing. I wasn't sure you were going with the ball shaped joints like the shoulder's but you did. Couple strokes of the Y key and the k and reattaching and you should have it whipped. Looking good!
-
This robot is shaping up. The only thing I see that I would like to se different is the rings where the legs would be. I think they might look a bit cleaner if the splines that make up the hole were a continuous spline. I'm liking this robot. Keep it up!
-
Just the tab? Hey! I meant... [attachmentid=14910] Surely, this Hot Rod has a Harmonic balancer with the degrees marked out on it... (all of them degrees.. not just the ones needed for timing...) "Bwahhhahhahahah!" Said the evil taskmaster rubbing his hands together and making the modeler sweat ALL the details! Oh, and thanks for the reply in the macro thread... I replied to it, too. My mouse hurt's!
-
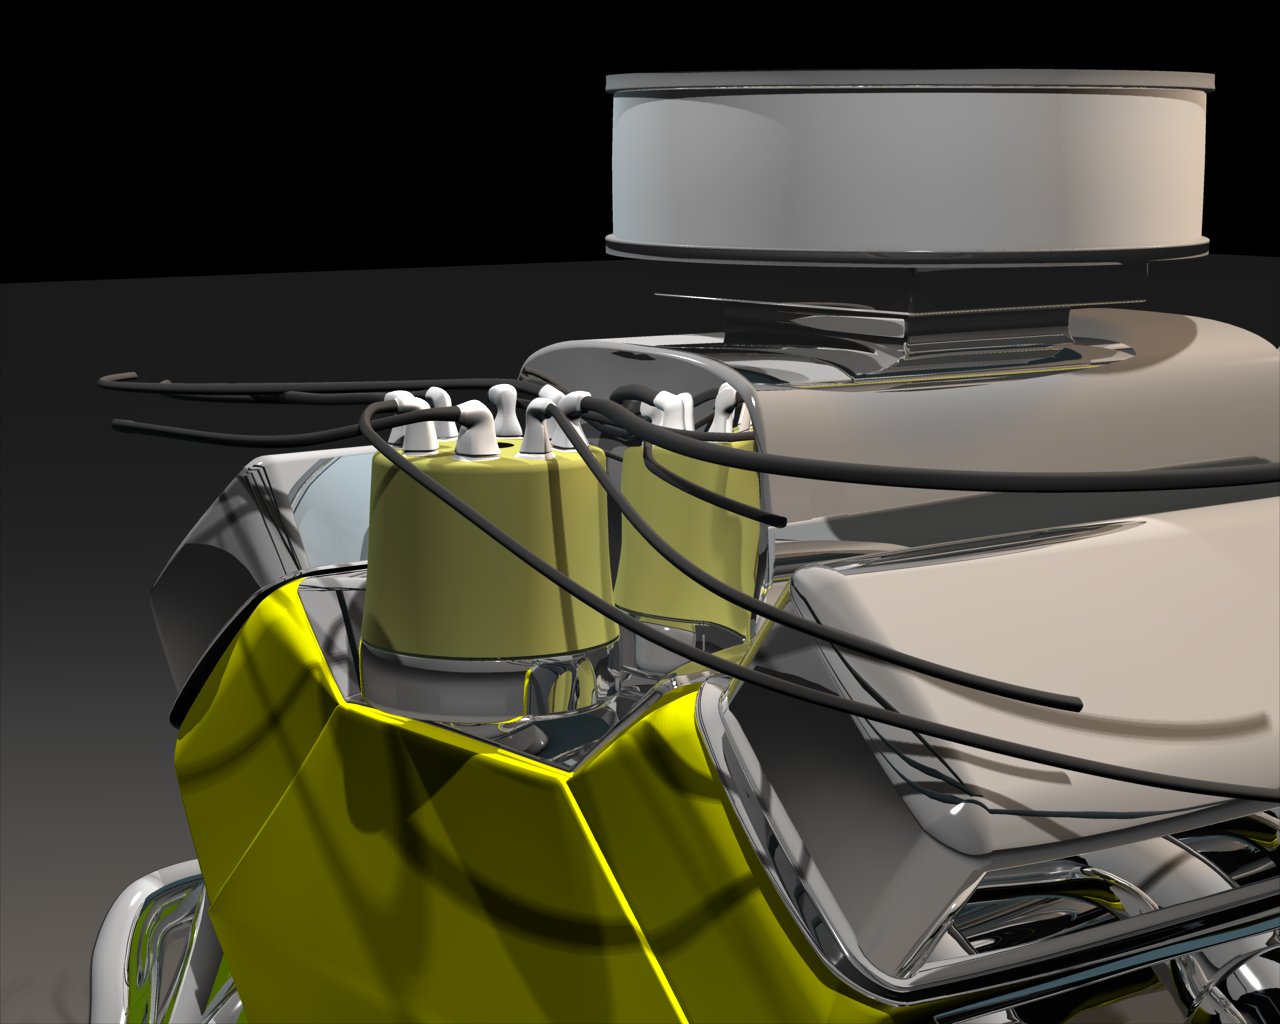
Not the text...no...no...I'm not doing the text (he said as he was making the decal) (LOL) Actually I'm not doing the text...."really"! I'll make the timing tab but not the text!..... Ok, if I do a showcase of just the engine as a later project I'll make the text. Yeah this modelling is actually more than fun. It sorta becomes part of what you do like eat and breathe. I can't think of anything I get more hours of enjoyment from. I think to myself while modelling sometimes "I wonder if Martin ever has those moments where he realizes how many lives his software is honestly an important part of." That's something to be proud of! And the wire's will increase in diameter! I have also matched the RGB now to better simulate the color in the pic's.
-
I was thinking the same thing. Soon as I add the boots I'll fatten them up a bit. The spline rings for the wires and boot's have only 4 cp's for control so they have a semi diamond shape but I intentionally did that to conserve some splinage. I know one would ask with the increasing detail I'm attempting "why" but I tend to "try" to keep the spline cout as low as I can out of habit. Thank's Dhar.
-
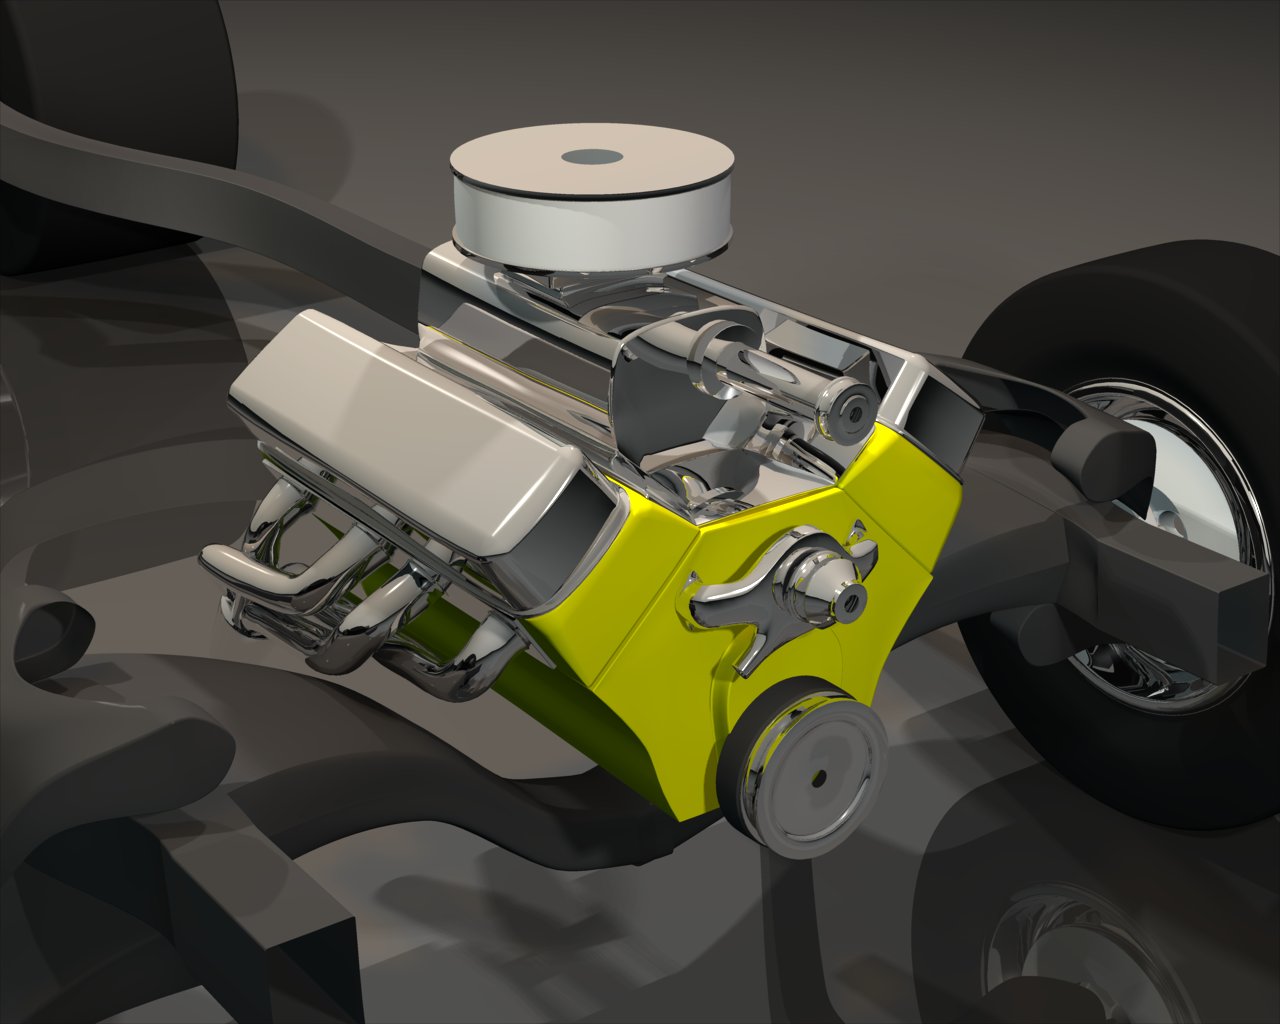
Ok guy's, I think I'm on to something with the headlight's. Had a prob with my original chor so I deleted it and started a new one. Same lighting but the 5th bulb is now blue. I adjusted the diffuse and reflectivity falloff of the cones behind the lenses (Charlie you were close) so I'm not sure which one fixed it but I will experiment some more. The lenses are much clearer now (maybe too much) and the 396 emblem doesn't show too well here, but it's getting closer. Oh and a current render of the engine. Still gotta add boots to the spark plug ends and make the bracket for the idler pulley under the blower pulley but it's also getting closer. Maybe I'll get on that dash and floor soon Charlie!
-
Thank's Dhar!! ,I haven't heard of him but I now envy his work. Trust me this motor is hollow. Man just when I was starting to think I was getting close to enough detail! Actually I'm reliving my childhood. I must have built six of these things when I was a teen. Revell had a 66 Super Rat plastic model with a flip flop front end. Well doing one in AM truly leaves the old plastic and glue stuff in it's dust. I can aspire to that level of detail but I'm expecting my pc to start smoking anytime. Here's a wire I took the other day, it's about as close to that shot as I've got.
-
Here's where I am on the distributor. Still tweaking stuff so some of the shapes and diameters will improve. The hard part is done but the wires still need to find thier designated resting places. Charlie, I have spec=white and also tried with the cones diffuse color to white but no apparent diff. I also have the diffuse set to white on the lenses but with around 96% on the transparency. Dan, I can't find the "darkness" setting you mentioned. I see intensity and attenuation, width and falloff. Added the index of refraction value and that did improve the "glassy look" but they still look "smoked" as Charlie say's. If I hit it on my own I'll let you guy's know what I did but I'm still "listening". Thanks.
-
Thank's Dan, If you're talking about the light's in the chor (and I believe you are) so far the only thing I have changed as far as settings on the light's is the intensity. I am not really sure what the other settings do so I tend to avoid them. If you want to enlighten me please do. I will check it out though cuz that was something I thought was odd as well. The engine is a seperate model currently and is set into the chassis in the chor so I don't know if that matters. I have 2 of my light's set slightly above the fenders on either side of the front of the car so they could be coming in through the grill. I suspect my lighting set up to be alot of it as I am still pretty green in that area and prolly have it "all wrong" in terms of how lighting should be setup. I haven't used any light plugins either and have no clue as to how to get them into AM and tweak them. I will try that index of refraction and see how it look's. Perhaps that will make them reflect better They were definately glass but I thought about modelling some element's to pop in from the back like modern replacement halogens do today just so they would complete the look of a bulb. Also the glass for the window's (that I have so far) is a single wall of patches and I have thought about extruding it to give it a "deeper" look but have not as yet. About the only window in AM I "Feel at Home in" is the modelling window but I'm getting more familiar in the chor these day's so I think if I am pointed in the right direction I'll be able to have a better handle on it. The way that Retro shines is tough to accomplish! Heres a test render of the chassis and motor as of thursday night
-
Charlie, I was kidding about grill. But actually "feared" you might get me on that one so I fixed it. It's not that noticable and could have appeared to be hidden behind the chrome strips but it had been bothering me for a while. That grill is full of 5 pointers as is the distributor (render soon). I've also done alot of tweaking to it as the part that I added "stuck" out from the original and cut my 396 off at the bottom by penetrating it and I did'nt notice until I had already posted the render. I'll check the specularity on the lights but I believe it is white unless I changed it or forgot to set it. I did have the lenses set at diffuse=white and spec = white but I need to double check as I have tweaked so much lately that I can't remember offhand what it is from memory. I tend to default all my spec to white. I've also been up and down on the transparency of the lenses but above 90% it doesn't seem to change much. If I drop it they look a bit chromey. On the v12 render I have 5 bulb lights all set at 30% as well as the default light's that come with the chor. I really like the way V12 renders though. I move the 5 bulbs around until I see what I want to see or something close to it. I'm still experimenting with rendering. I'd rather have a driver as well and plan to mod this model once it's done to something that might handle virtual corners a bit better. It took me a while to get the metal settings right using only diffuse colors for the chrome, but I like to keep things simple. I believe there is a group in the headlight I posted called chrome which I have all the chrome pieces added to on the model. I still would like to get it looking better but so far am happy with it especially the way V12 renders it. I didn't have much luck using the chrome material and for that matter am not very good with materials period so I try to use the diffuse colors as much as I can.
-

Combining Two or More Models into One in the same Project.
Scottj3d replied to Technodandy's topic in New Users
On my current project I have done something like what you discribe. If you have multiple models in a project you can have the model you want to copy a part from open then copy the group in question then close that model window. Double click the model you want to copy it into in the pws to open it's window and click the paste icon or use the shortcut on the keyboard to do so. On my chevelle I have the motor and the car as seperate models but once the motor is complete I plan to copy it into the car model. You can use the hide shortcut to avoid having to do that when the splinage gets heavy but sometimes it's easier to build your part as a seperate model. I do this all the time so I know it works. -
Oakey you do have a good "eye" or maybe two, which is what I was referring to my having challenged. I have tried bumping up the lighting and even changing the diffuse color on the domes behind the lenses and still it comes out dark. Here I have made some other tweaks as well but the lights still come out dark. Tried flipping the normals and that made no diff. I took the model back to 10.5 and rendered again and the light's are brighter but the rest of the render looks poor. V12 certainly renders much prettier but the lights are still too dark. I did add another row of "holes" to the grill as the original model had 4 rows of holes from top to bottom (cant believe I got that by you) where the actual car has 5. I also pulled the trim down to match better but it's still slightly off and the trim between the lights and on the outside of them will be in place soon as well as the chrome strip at the bottom of the grill just above the bumper. Gotta finish the radiator support and get the radiator in to close off the front end as well. Wait till you see the cowling. I was gonna use a transparency map but I've decided to use the grill and CFA to model it. I figure at this point a few more splines shouldn't hurt and it should look more realistic.
-
Ok I feel better now. Master O forgive me for my insubordination. I was wrong and you were righ...ri..rrr-ight. I spoke to the owner today and he was suprised at the resulting information. Please accept this small token (headlight) as an apologie for challenging you. And while you're at it... should you come up with some tips on how to better it please post it back to this WIP. It is as it is on the car model at this time and the chor is set up with my current light setup except for two more lights at the same intensity but should anybody post a better solution I will be happy to add it to a fresh backup of the model or reverse engineer it and reproduce it. Hmm..I could find myself back in the parts business only in a virtual way. I plan to post the engine model when I get it done (and maybe some different intake solutions) but am not too sure as yet about the whole car. Could be fun swapping part's with people to see what kind's of Franken cars we could come up with. HL_10_5.zip
-
Know whut! Imma hafta send that pic to tha owner. I specifically asked him about that weeks ago and he told me what I told you. See...thats another reason I posted it so you could show me that. I actually have found some that looked like the one I posted but did a search of my own after you posted that and found some more where it's even. That's it... I'm stopping this model due to corrupted rotoscopes and misleading information. Excuse me I have to go shower now!
-
Charlie the wipers have actually been on my mind as well as the rear view mirrors (driver and center windshield and a transparency map for the cowl) as for washers I'll see what I can do (but they won't squirt till I learn to simulate water) as for the trim I gotcha, for whatever reason GM decided to build them that way (see pic)(my front roto). The headlight's I'm working on. In the chor I am still learning about lighting so it may be that or I may need to adjust some diffuse settings to brighten them up. They are basically a lense set to transparent with a grid like bumpmap applied and a "chrome" or silver rear half just like a real headlight has. I wouldnt mind figuring out how to give them that magnifying effect that a real headlight has but I wouldn't know where to start. I dont feel you're picking nit's. That's part of why I posted it to get feedback and perhaps guidance. But I gotcha on that trim
-
Ha! Don't know how I missed that MMZ. I'll make you a deal. I'll model the wires and we'll pretend the insulation is there. 1st comes the distributor Course this is V12 so maybe some simcloth eh! Heres one I like. Still missing some pieces and need to adjust where the hood and cowling meet but had a go at using the font wiz for the 1st time.
-
Thank's Zaryn I actually was'nt thinking it would go this deep but the more hour's I put into modelling it the more it seem's a waste not to go full tilt and see how close to the real thing I can get it. I've started setting up my lighting which is something I did'nt play with much in the past. Not much experience with pre-made light-rigs either but I'm moving forward to better lighting. Here's one fresh off the renderer. The camera is not centered properly but I have the halves connected even though I still have a few small pieces to do on the body.
-
Thank's and....you're killin me man! (LOL) Detail's, detail's. Yeah as soon as I get the distributor and fuel pump,water outlet and oil filter,transmission, starter AAAGGHH! I'll add that little tab with a bumpmap for the degree's..oh and a bumpmap for the front of the engine for the freeze plugs and casting finish. The body's almost ready to make whole. Just looked at Rodney's CFA tutorial and used what I learnt to make the basic shape for water pump last night(think it's too small?), worked like a charm I can now CFA without that seat of the pant's feel! That's gonna really improve my modelling. Thanks Rodney!
-
A little update on the engine.
-
Charlie I'll get back with ya on that cast iron, I may try using patch images for that on the areas that will be seen after I add the rest of the "goodies". Tighten that drag cuz this models gettin hard to turn! At least when the whole thing is visible in shaded WF mode. Thank's Hash for having that H key shortcut! Here's where I am on the chassis. No springs attempted yet , still shaping it and here it has been copied flipped and not attached just to test the proportions. I played around with some rigging (with varying result's) but am still figuring that out as the geometry is not finished and I'm not sure how to rig the control arm and spindle/wheel bones. I have something working but when the arms are moved the tire changes it's angle(camber). The movement is almost right but I think it has more to do with the length of the arms and a little bit to do with the spindle as I need to refine the shape. David I'm watching your post looking for rigging of automobiles as I am also interested in rigging this chassis to "work".