Scottj3d
-
Posts
485 -
Joined
-
Last visited
Content Type
Profiles
Forums
Events
Everything posted by Scottj3d
-

The Enterprise vs. Martian War Machines!!!
Scottj3d replied to jesshmusic's topic in Work In Progress / Sweatbox
It's a tough call. That looks like the old Enterprise and Scotty sure had a tough time keepin her runnin. But them Martian ships moved pretty slow in the movie. Yup...Tough call. -
Here we go. Still refining...well actually I am going back to the actual model. Refined.mov
-
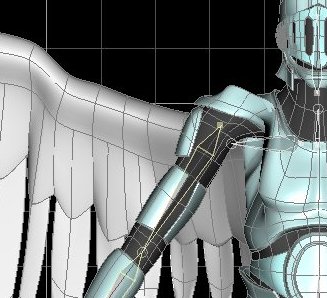
Ahh but I now understand why we should be rigging during the modelling process. It allows us to "refine" our mesh as we build. By testing it in the chor we can bounce back and forth between the modl and chor windows to tweak out undesirable appearances. This is what I have done simply by breaking the spline running under the pit and hooking it so that I still have the upper part for shape but got rid of the bottom with the cp's that were causing the crease(it didn't matter which bone I gave control to as either caused a crease). There is another spline there that is rendering a slight crease but I am confident that I can eliminate it by modifying the "creaser" the same way I did with the one that caused the bad crease. This has no smartskin or cogs as yet. I'll post a new .mov as soon as I get it worked out.

-
One day I'll be that good! You're safe for now.
-
So I made the tube arm(a few times AM didn't like me deleting what I thought was a pose) and it was working out okay so I decided to lopp off an arm and play with it. It was a breeze setting this up (and I know this is simple to many of you) but to me getting here is a big step. I'm gonna figure the wings out (hybrid ones) now and then worry about the whole model. Can I add these bones to a rig and get them into a hierarchy? Or would it be easier to just duplicate build the same set up. Knowing to lock IK on that shoulder bone would have been a plus for me when it moved like the previous post. I still have alot of work to do and more to learn but this was my 2001 moment so I had to share. Forgive me! Arm3.mov
-
Here is what I have been running into. This is why keeping the cp count down is a good thing. I have been struggling to figure out which cp's to connect to which bones and had them better than this shot. TSM2 makes a nice rig but I don't know how to use it. And my wings are not at all folding how I want. I have decided to start fresh and build a tube arm and add my own rig to learn how it all works.
-
Nice!
-
An army of dark warriors. At least once he gets through uh...physical therapy.Thanks!
-
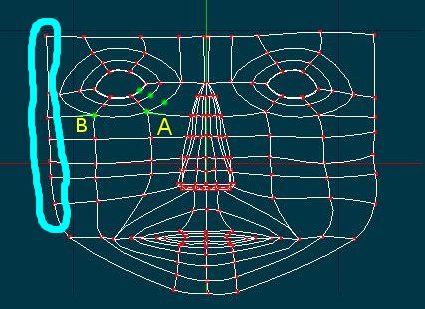
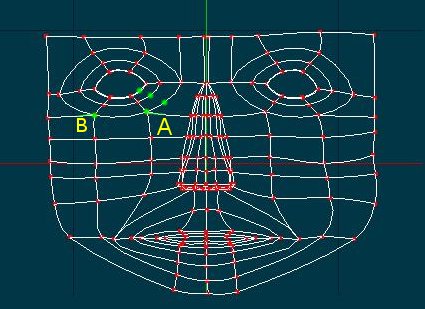
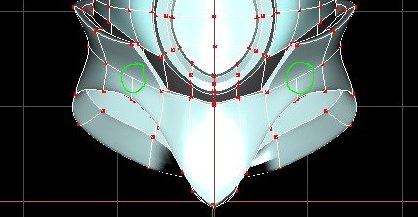
I dont use magnet mode myself. The simpler the better. Try (i know it sounds rough) cutting the mask in half. From the front #2 view select the row of cp's at the outer edge of the face(Circled in blue in the pic , name them as a group in the pws), hit #5view wile the box is still surrounding the selected cp's or if it is not select them in the pws then drag them towards the rear, do the same for the next group and work your way in. You can extrude the outer ones and use the same process as well to form your head. Then it's just a matter of tweaking the shape. Nevermind A and B in the pic it's the same one I modified earlier. Have fun!
-
There were 2 bones in the thighs 1 on each side that I have assigned cps to that were hidden in the setup window after running the flipper. I have assigned cp's to them after the rigger. After running the rigger and in the action window all the leg bones were hidden so I unhid them as well as the two already mentioned. I take it I should not have assigned cp's to any bones that were not there (visible) immediatly following the flipper. I'll rerig another copy tomorrow after work and start testing it before rigging it That should keep me busy for a few days at my speed. Thanks!
-
Aghh! Wait a minute, I've watched it. I told it to auto assign bones just before running the rigger but it assigns many cp's to the wrong bones. Probably due to the armor. Some of the foot cp's stay where they were when the foot is moved similar to the pic so I have been reassigning them. Is this wrong? Can I test it in the action window before running the rigger? As is I have been bouncing back and forth from the modelling to the action window looking for idle cp's. Once rigged can bone placement be refined?Oh and tsm constraints is on.....Help!!
-
Nothing much to see here. Just to show that I am actually working on the rig. I actually have "most" of the right leg working almost right. I'd like to know if it is possible to give shared control to bones. The knee is moving too far outward to the front at the top of the knee armor. Is this a job for smart skin? I am finding that assigning cp's to bones is more tedious than modelling. This is where I usually say "nope, not ready for this yet" but uh-uh not this time. My hat's off to all the experienced "riggers" out there. I'm using TSM2 so I dont have to add all the concstraints etc. I am getting more comfortable in bones mode though. The leg bones were hidden so I had to fish around in the PWS to find them. (like a child in a dark forest at first)
-
To join, or not to join, that is....
Scottj3d replied to Eric2575's topic in Work In Progress / Sweatbox
I believe it would be necessary to be connected in an instance where a mesh is required to stretch. In some cases it may affect the render of an animation. I recently started doing that. My wings on my seraphim are actually 2 parts. I am learning to rig him and other than not having my feathers cp's attached the the right bones while checking the rig in the action window it doesn't seem to affect the area where they intersect. I think it is a matter of experimentation. Just my opinion though! -
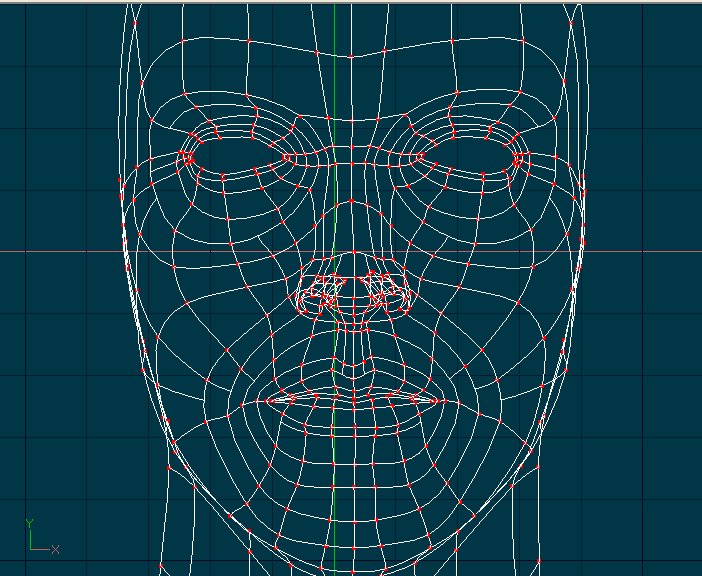
Here is a wireframe from my 3rd face. It's not the best (talk about an insane ammount of hooks) but demonstrates how the bridge of the nose "can" be done and a similar hook to the one Garcon demonstrated. The mesh is still heavy I am told for animation and I'm sure you can find much better here if you look around. Thats how I found out the best way at the time for me to run the splines. Faces are not easy that's for sure. Anf from what I have read recently the 5 pointers aren't such a problem as they used to be.
-
Garcon beat me to it but here is another variation of what he said. A you can disconnect and work it up through to the eyelid following the green dots or use a hook as he demonstrated. B you can delete and make a 5 pointer. I'll see if I can find a good wireframe of the nose bridge for you.
-
If I am not wrong this is a hook. And I'm not seeing any.
-
Try working on only half of the face then copying it and flipping and attaching once you have the shape the way you like it. Look at other peoples meshes and see how they run their splines as a guide.(particularly the nostril and bridge of the nose) If you're not using the shortcuts to the views start getting used to them(be sure numlock is on). It'll be 2nd nature before you know it. It looks a bit flat yet but using the 5 key on the numeric pad will get you on top of that in a hurry. Hooks are also a good thing to practice. I remember my first face. It was so dense you could use it as a net to catch mosquitos and I modelled it the way you are(whole). It was much easier working on half then copying it. Yours is much lighter. I never could get copy/flip/attach to work for me so I still do it manually.
-
-
And of course the front and side renders. I'm not sure about the aliasing. I suppose for animation with not so close shots the lite one will (in theory) be good. But for close ups I'll want more detail so I'll keep working at the rigging for the original model. Maybe after getting more time in bones mode and in the action window It'll seem less like Kaos trying to figure which cp's to which bone etc. I still need to tweak the upper feathers but this shows that it worked.
-
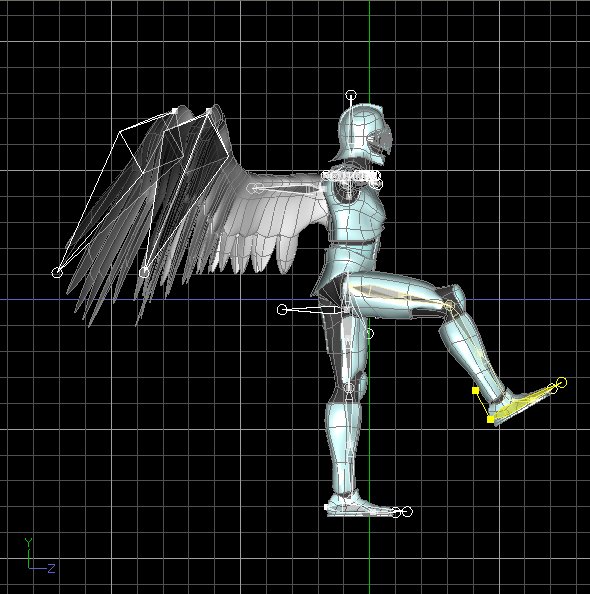
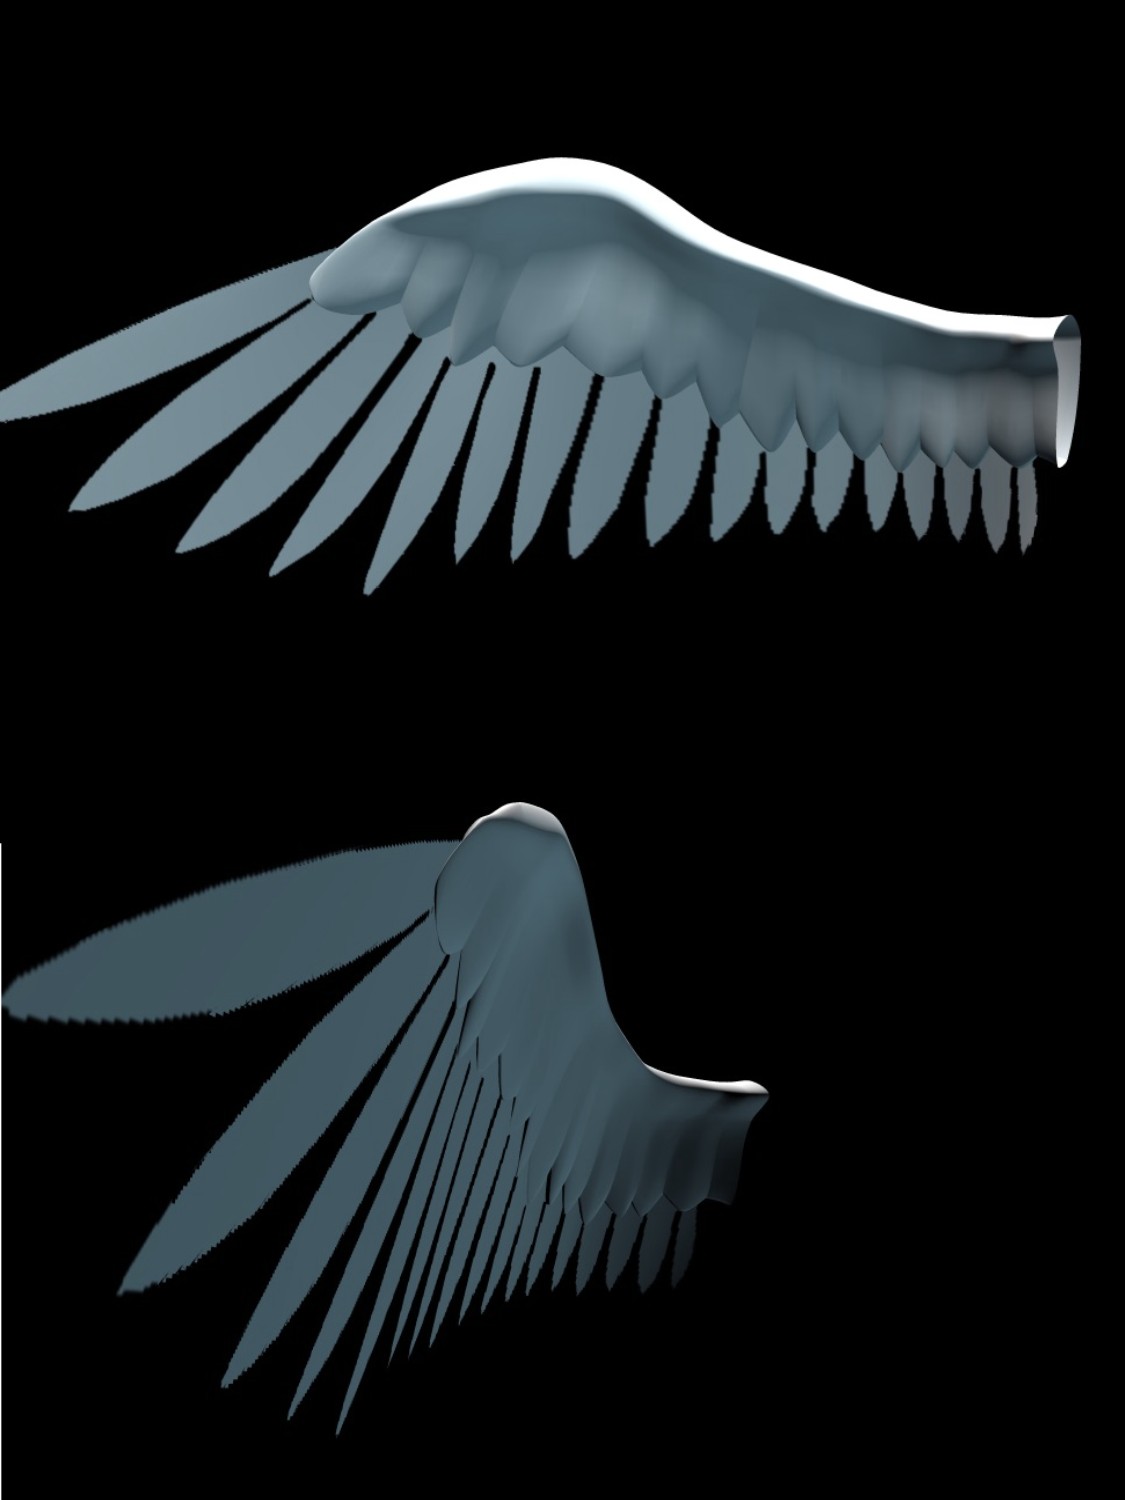
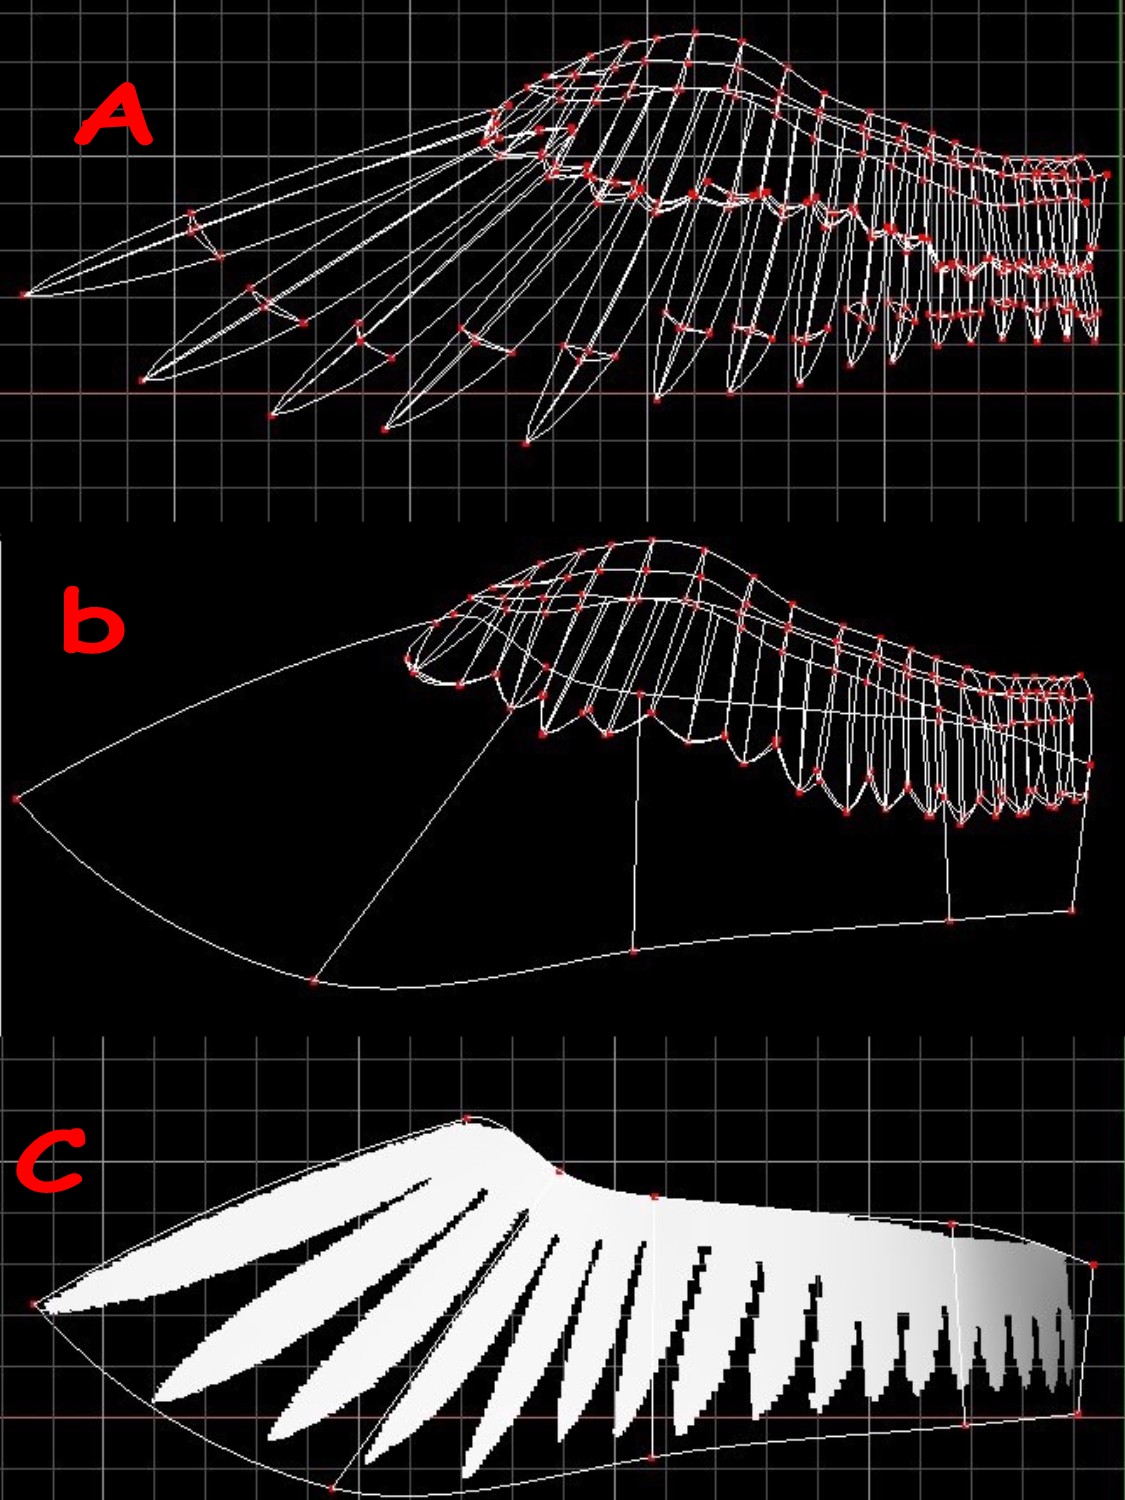
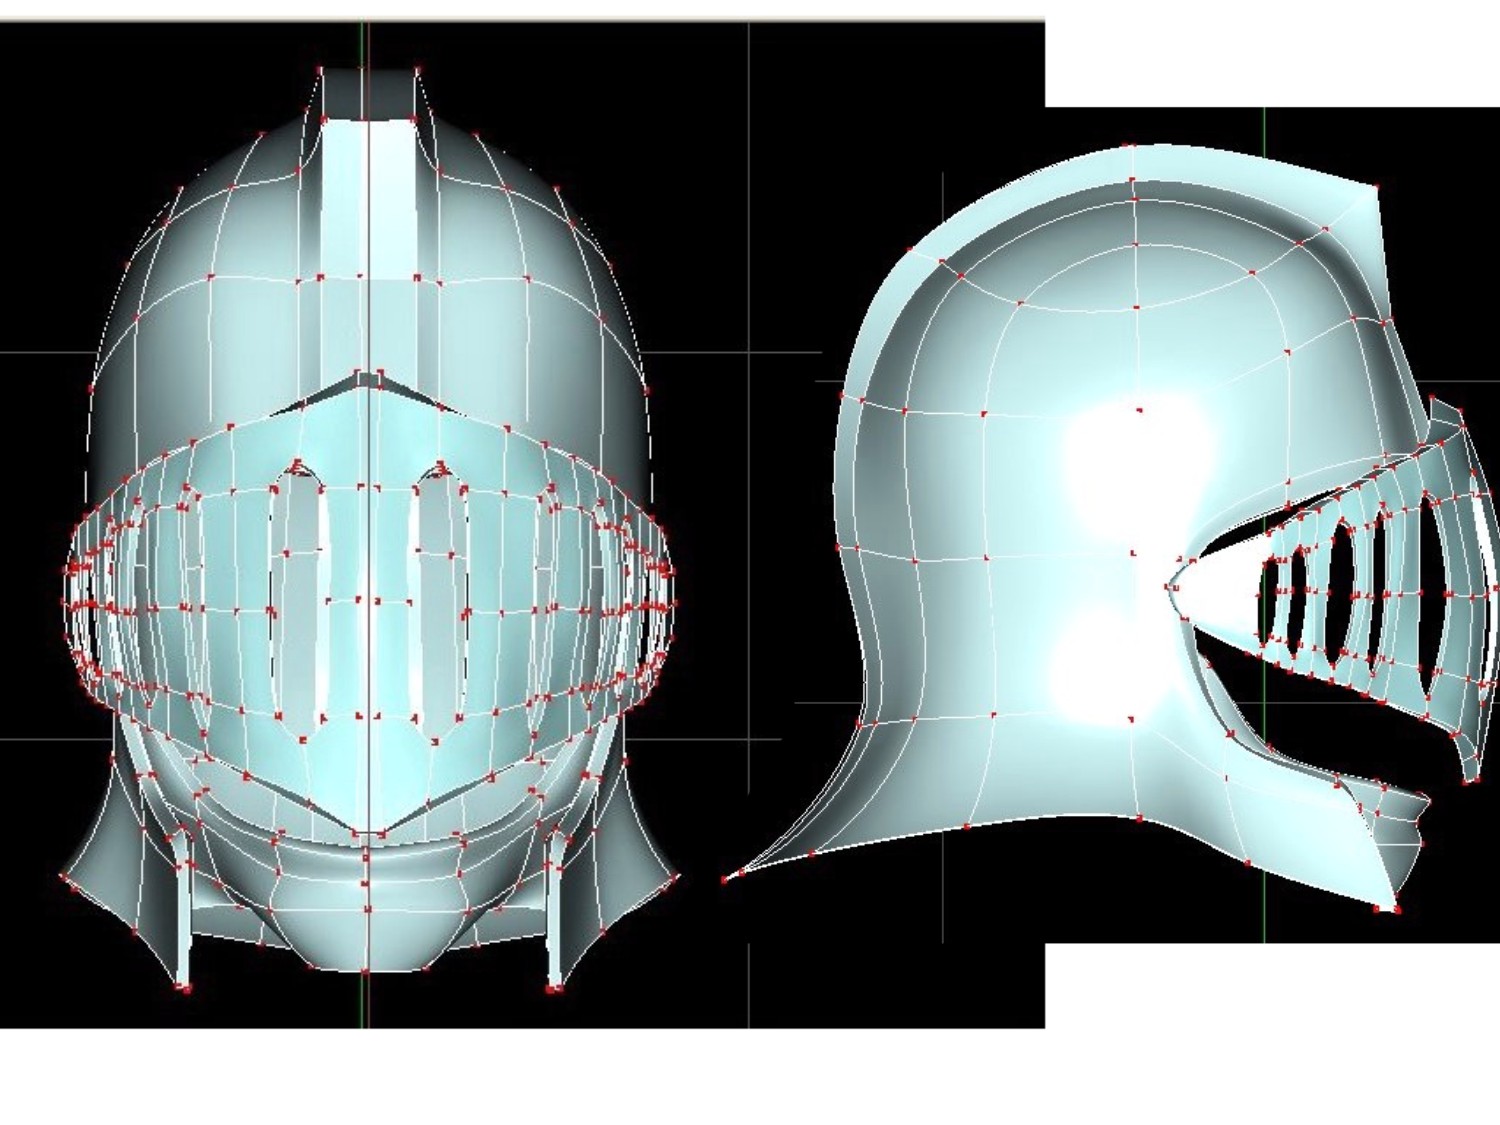
I messed around with the wing idea. A shows the original mesh, the individual feathers contain 144 cp's. B shows the"experimental mesh" for the lite version and contains 10 cp's for the individual feathers. C is the decal which is applied as a cookie cut. For some reason it does not work as a transparency although the previous one for the face shield did. A.M is being finicky today(but I still love it). I'll be running TSM2 on the wing tonight to see if folding the wing works better than my attempts with the "heavy" wing did. Joakim I'll have him doing crunches soon:)
-
And here the render of the results. There is some antialiasing that may be attributed to the decal. And I am not sure yet if the decal will actually be lighter on the PC than all those splines but once I finish my spline reform I will know for sure. I am going to work on the wing next. All the flight feathers are individually modeled. I am thinking I can create a sheet with splines to cover the whole area the feathers do and use a transparency decal to give the illusion of the row of feathers. I'll post the results when I get there. Any idea's?
-
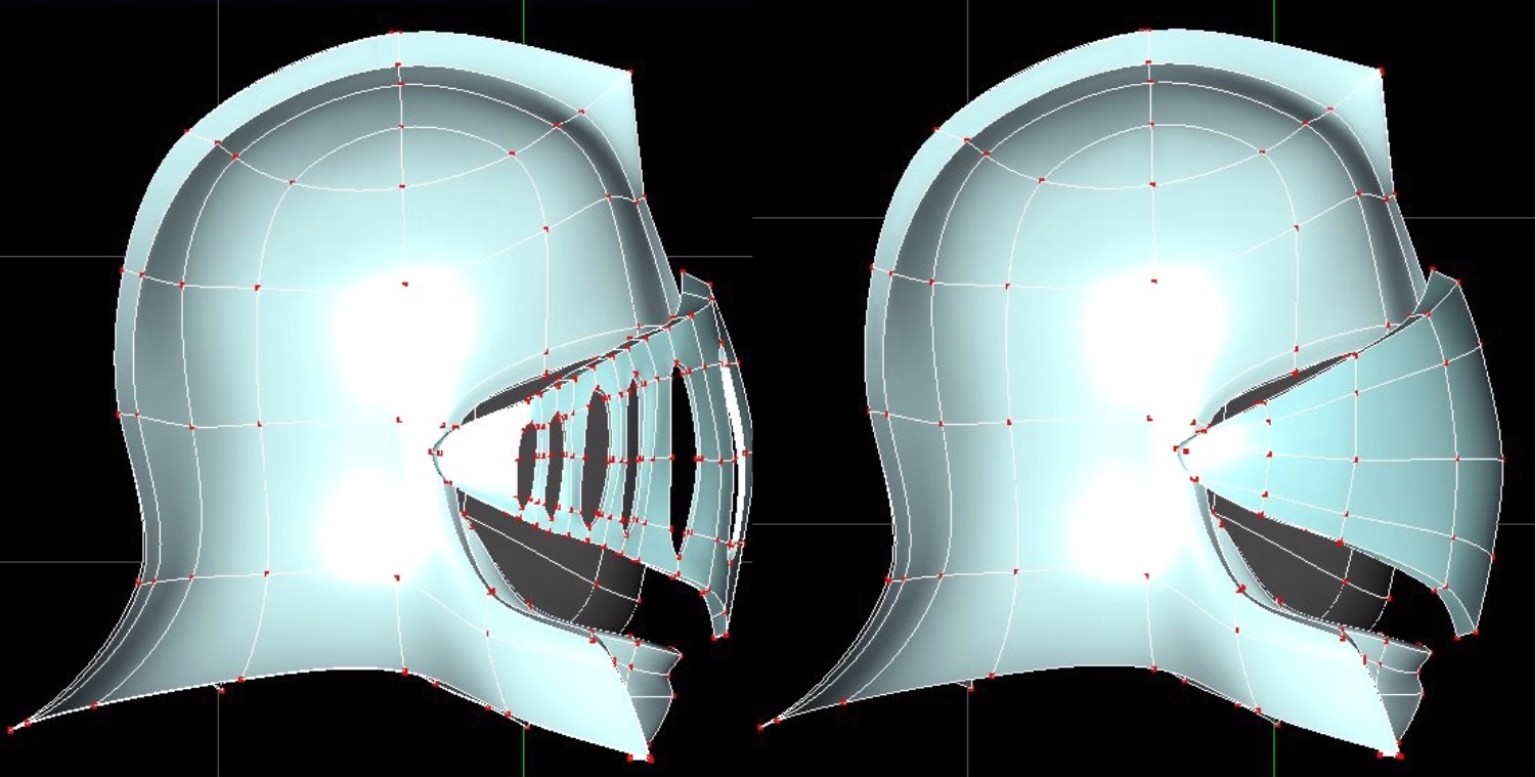
I wasn't sure if I should post this to the new users area so it is here as it is still a WIP. I am learning the need to model with minimal splinage to help with the rigging process. I have decided to try to knock out as many splines a I can figure out how to without ruining my geometry and losing detail. Copied and pasted half of the "finished" seraphim and named it "seraphim lite" I had asked if I could cut some of the splines on the faceshield by using a cookie cut or booleans. In researching the "right thing to do" I decided to try a transparency map to achieve the same result I had by modelling in the slots for the faceshield. I need to work on the decal a bit but here is what I got. The left helmet is the original showing some of those nasty splines that were slowing my PC down enough to spawn S. Lite. The right shows the much lighter version of the faceshield.
-
I've been meaning to ask: Could the face shield be done using booleans or is it a cookie cut. I am trying to thin out some cp's as this model although workable does put a little strain on the PC at times. I've noticed decals can do the same when there are alot of them (probably too big due to my "want" for detail) This was the only way I could make the slots that one would see out of if wearing the helmet.
-
Actually I know the cp's in question there and will tweak them. I just had to defend him (have some fun) as my old self (who was and is not easily offended)is my reference. The top of the belt needs to be brought in just a tad. Thanks for the "kind words" but you did give me an idea for my first attempt at animating him. It'll be something like the old disney stuff where the artist is messing with donald duck while animating (drawing) him.
-
A beer belly? C'mon man...I'm still looking at those thumb's. And the wings are definately bigger.....Beer belly? I'm not splittin him again!