Scottj3d
-
Posts
485 -
Joined
-
Last visited
Content Type
Profiles
Forums
Events
Everything posted by Scottj3d
-
The concept for the bot.

-
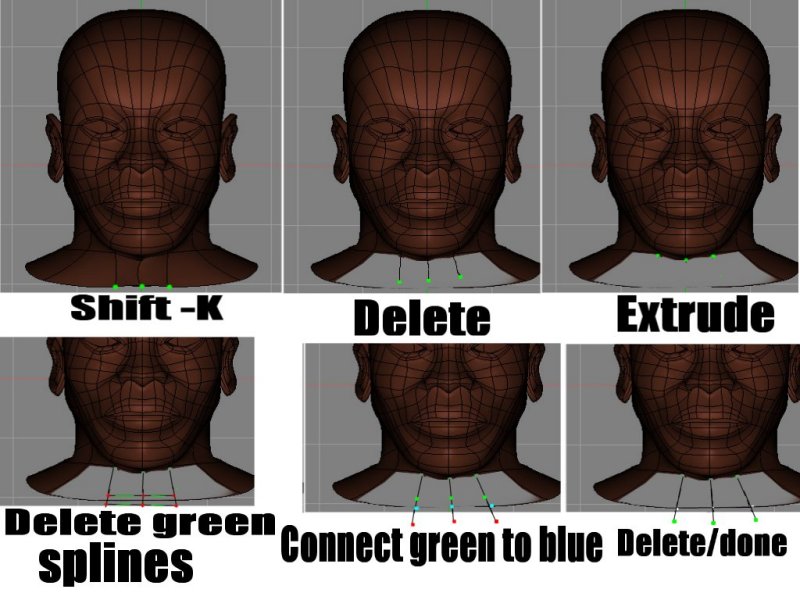
You should be able to break these splines (k) and use the cps on either side of the green to extrude.
-
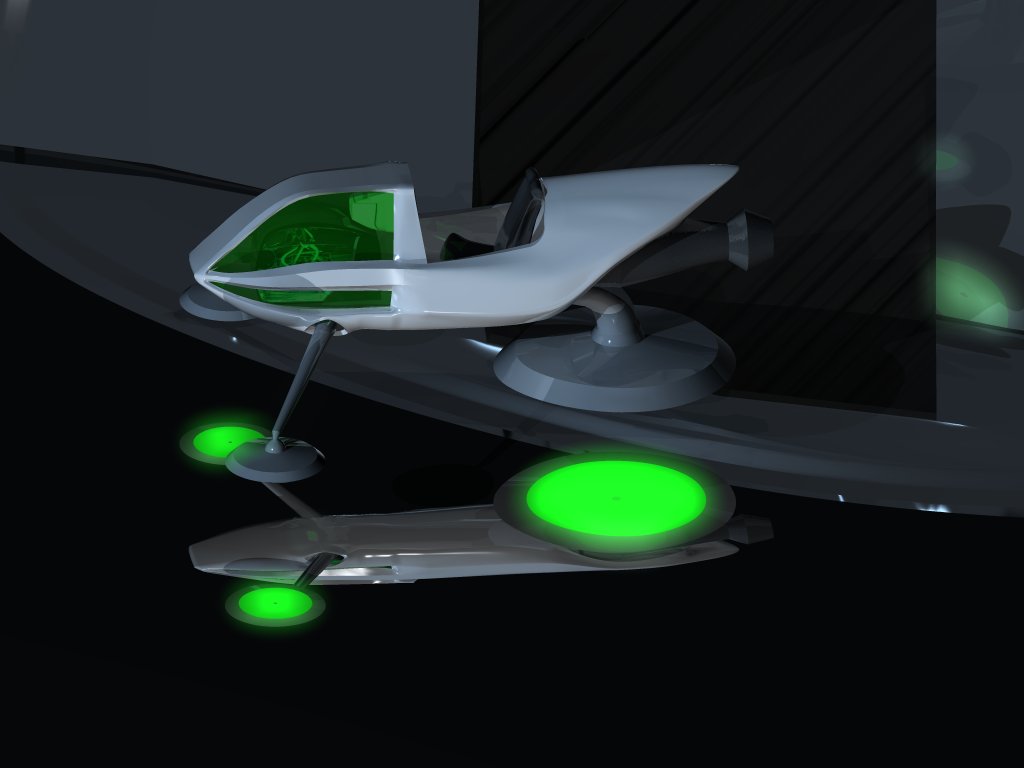
Here is the ship. I have done some animation tests but they are too large to post but I am having trouble getting a smooth accelleration when transitioning from hover to forward flight. I'll try to do some at a lower resolution that I can post. I have much to learn about animating so any input would be appreciated.
-
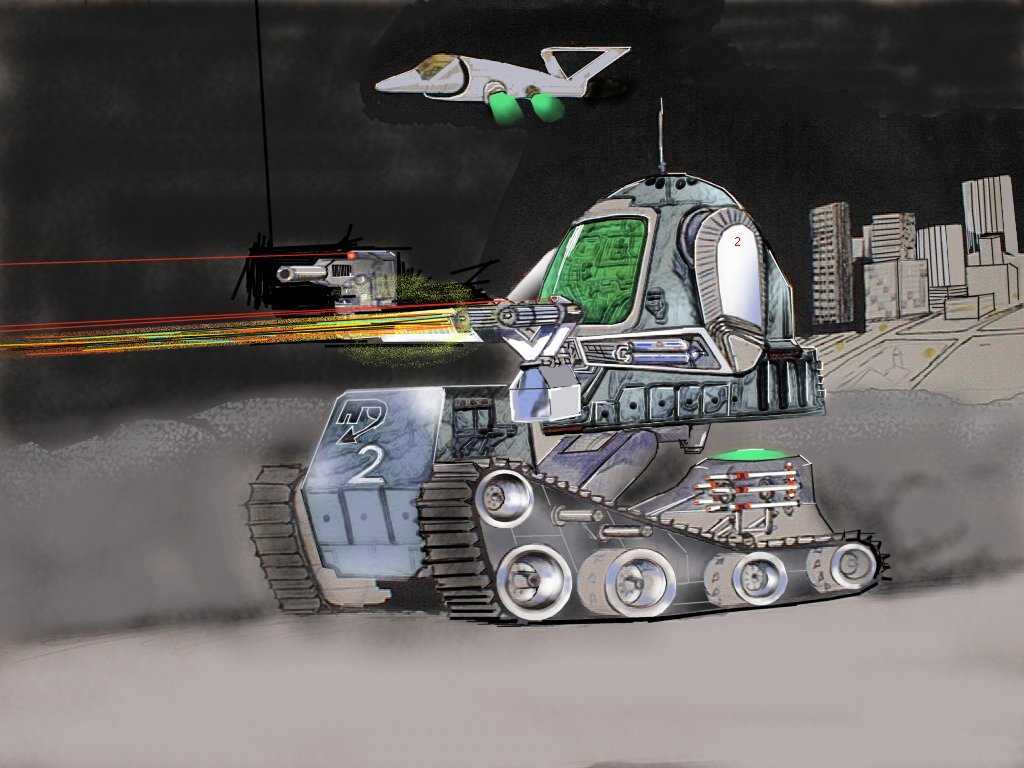
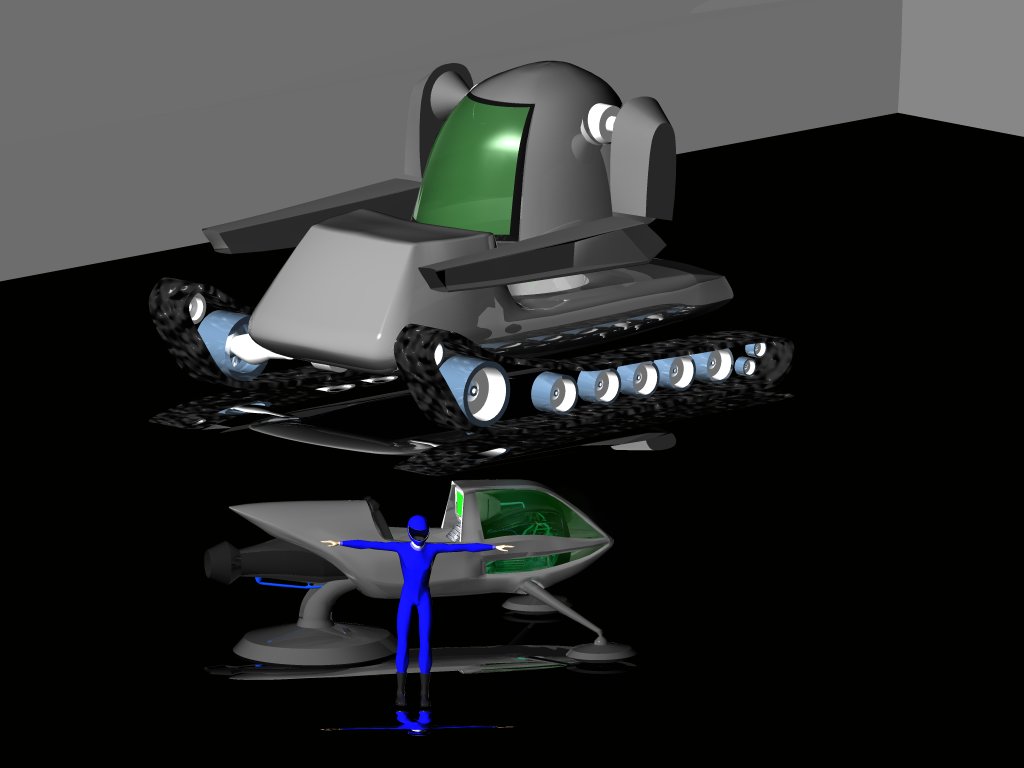
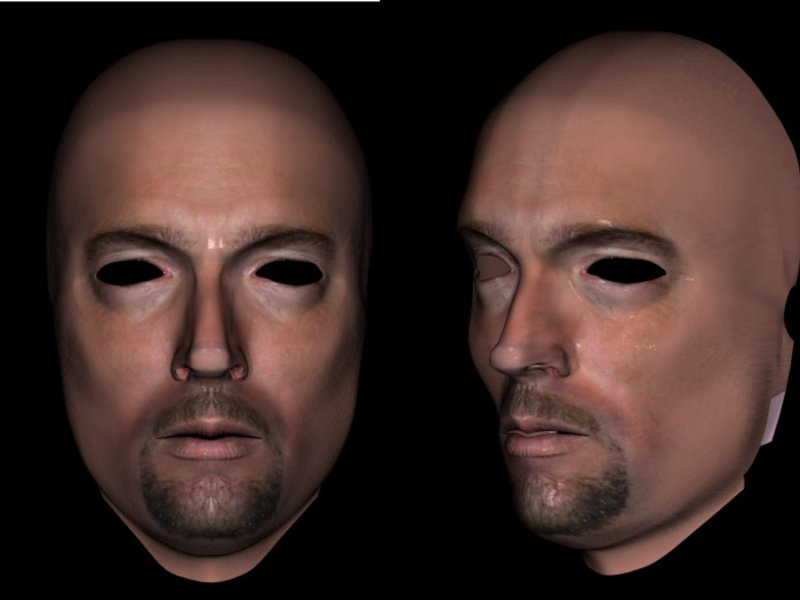
I am currently building some models for an animation I plan to make. I am just starting to grasp the animation aspects of AM or software period. The ship is from the concept I used as my personal photo which was one of my 1st models in AM. The "bot" is sortof a cross between a mech and a tank. I have a pilot for the vehicles but am having fun learning to rig. Any info that can help make bones and constraints easier to understand would be appreciated. As well info on modeling environments and lighting and camera control will be appreciated. The models are still in the assembly stage and are set into a hangar or what will eventually be a hangar with some adjustments for reflection from the floor. The tracks on the "bot" are just adjustments in the surface as I have not yet started the decaling on it. I'll need advise as to what would be the best way to animate the trac's and any input will be studied. I haven't posted for a while but the pilots head is actually my 1st head model from a wip I posted when I first started modeling. The one pictured has a helmet and is the stunt double for the one I just mentioned.
-
The easiest way is to extrude. try opening the bottom and selecting the cp's and use the extrude button on the right of the modelling window. I believe it is above the lathe tool. Here is one I just did for a wip I am posting soon.
-
I wish my own had improved so quickly!
-
It looks like the sides of the mouth need to be pulled out to make them wider. In doing so you may have to rework the splines where the sides of the mouth transition into the ckeeks. Also finishing the chin and neck may give you a better perspective of the mouth as they play-in together. Keep at it and it will come together.
-
Oh, and please excuse the apprentice for not seeing the 5 pointer. he was so focused on the center he missed it. You should still be able to implement Phil's recommendation on the hook. The nice thing about AM is there are many ways accomplish the same goal.
-
Here is another way you could do it. It is basically the same except by extruding the 3 cp's in question you can do 3 at almost the same time. By deleting the disconnected splines the center one (with the bad bias) should become continuous with the spline running horizontally. Select the 3 green ones in the 3rd pic to the top right and extrude twice, This will creat the cp's to connect as well as the dangling ones. I've been getting alot of practice at this recently and it works pretty good for me. I just thought "for once here is something I can help with".
-
I have to admit, this is interesting to watch. I hope to "get in" on something like this in the future. I'd be willing to bet that some excellent "AM CG teams" could come of this forum. I can't wait to see her continue to develop. Nice work!
-
http://www.flsuncoast.com/animationmaster/...ls/headtut1.htm Here is the page with the tutorial. If the link doesn't get you there go to AM resource Matrix/heads and faces and look for #260 by Cindy Groves on the second page of the tutorial she covers lathing the eye sockets. My process is modified from that but this is where I found out how to use the lathe tool for something I never would have figured out how to do if I had not seen how it was done. All the tuts on that site are of great use but this one covers some good ground and may give you "ideas". Good luck!
-
There are some very good face tutorials on the AM resource matrix site. I spent months trying to learn to model and they were most useful. Practice simple models to see how splines behave and soon it will hit you and one thing will lead to another. The lathe tool will help you in the eyesocket area(there is a Tut on the arm site under heads and faces that gives an excellent example of lathing the eye sockets which inspired my own modeling abilities). I still have much to learn about animation but once you get the basics of modeling and the approach to "making parts" it will get easier. I have not used any other modeling software and was getting frustrated and getting nowhere but with practice at making simpler "parts" and learning how to attach or extrude them I began to change my approach to building a head and it made all the difference (and still is ). I will find the tut and refer the creators name as I do not know how to post a link but it will help you. Keep laying down splines and practice breaking cp's and reattaching them to correct bias probs and using dangling cp's where there are sharp cornersor wher the attachment of a new cp creates a bias prob and the lathe and extrusion tools and you will get it. I am by no means an expert but if a new guy like me can get good results once it clicks you will too.
-
Practice makes...more practice. I like getting feedback from peers and will take any advice I can get. This forum has helped immensely in using the tools AM has provided. And Zack if you think about it I have "reHASHED" my mesh 3 times so it's technically my 3rd model or 4th if you count the skull. Don't "quit "( I know you're kidding) the curve is gonna get real steep when I start animating and I'll need input.
-
I couldn't resist an attempt at decaling it. I was elated with my results but have some areas to work on. Now for those ears!
-
Here are the side and front views. In the side view I have already(since screen shots) modified the splines running from the ear holes to the top and back of the skull to be straight rather than goin all directions but the splines have not been added to or subtracted from. Heading towards the earholes it appears to be pretty confusing(I must fix that). I want to make smooth meshes eventually. I am not sure if I should use the holes and extrude out or try to lathe and cut and then attach the ear.
-
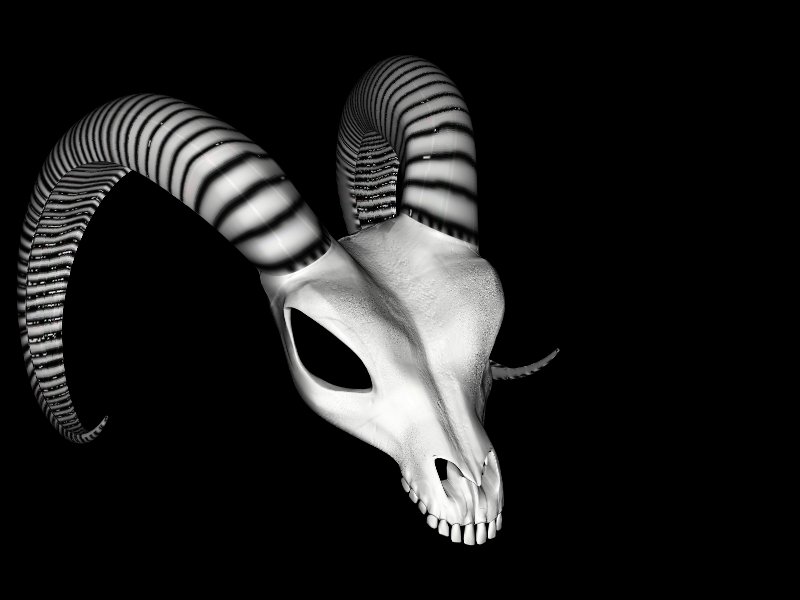
Chris,I started the skull with only the horn just to see if I could get the shape I was looking for, and then to practice some decaling. I have 3 versions of the horns all from the same lathed cone. the ones on the skull were the best yet. Changing the decals to bumps I lose the color but the bump effect works ok. The skull I know is not identical to a real ram skull as I wanted it to have a less than friendly appeal. There is a little bit of my dragon there. I have made some better bumps for it but first I need to chop it back in half and redo the horn with bump as well as color maps. I kept the color on the horns as I just like the way it looks. Jeff I will post a good close up of the #3 head if that is the one you are talking about and maybe you can give me some suggestions to work on. I am not sure how to do the ears and once they are there I may see a better way to bring the cheeks to the ears. The thing about heads is getting the splines to "flow" smoothely and still look the way you want. #1 has some of my features. #2 well, I dont know how she came off of my "photoscope" but she can be the mate to#3 Who takes about 10 years and a few pounds off of me but I am (mostly) happy with it so far(still tweaking). Rodney, I read the digest almost every time it comes in and as busy as you are with the technical help I can see missing many threads. Here is another skull render with the mesh partially used as a bumpmap (forgot to remove the reference layer but a good demo of bump effects the right horn has an attempt at adding the bump to the horn after rotating for the shape. I will redo it on the cone and believe that the decals will match better by applying before breaking out the "pipe bender"). I have much practice to do. Thanks
-
I think I will turn this into a hat for the head. This is a good way to learn what splines will do. I have been working on several models since I will need props after I earn a few more blue squares.Decaling is actually alot of fun but will take some time to master. I added some bump maps to the skull and the horns I applied as color maps and did not know how to tell AM what to do. Frank Hulsey was a big help there. Anyway after I bent the horns I found out how to "apply as" but have no idea of how to apply a new decal with all the twists etc. I learned alot in the process of building it.
-
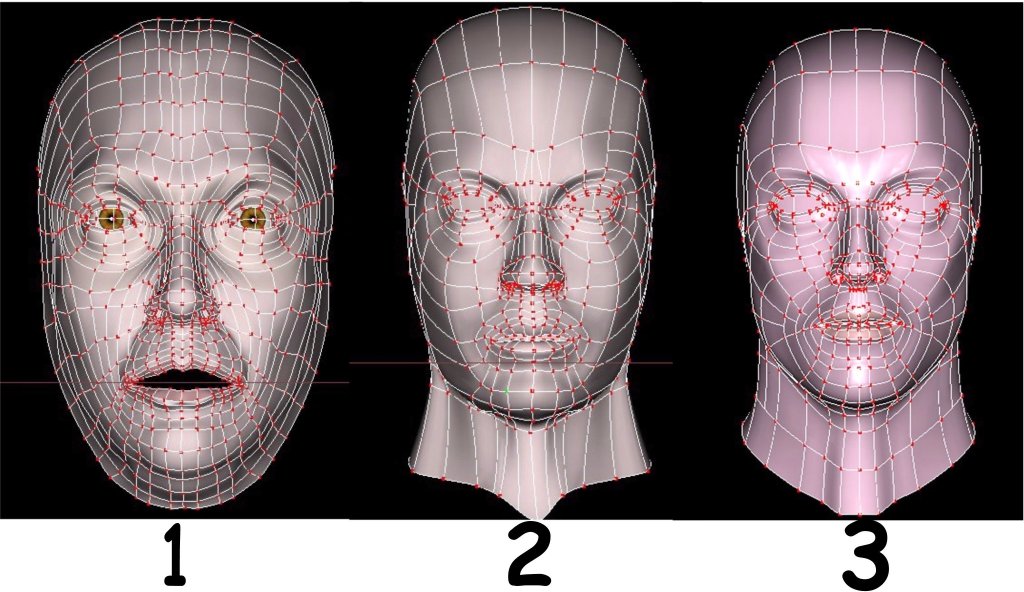
Here is the evolution of my splining directly resulting from this forum. The 3rd one is my best and still maybe a bit thick. But I'm still tweaking it. I don't want to think about the ears but they're not far off. Then I should be ready to decal.
-
I like the way you showed the transiton from the side of the nostrils to the cheek. That is exactly the area I have been having trouble with on my own head. I have run that spline that goes from the nostril side to the face every way I can think of but seeing it run down to the chin area and looping the facial splines over each other near the eye sockets gives me some inspiration. In reality a real face is not perfectly "mirrored" but I believe it is recommended for rigging the model for animation purposes. Nice job!
-
I see this character evolving and it makes me wish I had five more years experience. Thanks for sharing the images and techniques you use to achieve them. The tut's are like kicking in the warp drive for those of us who can watch and learn better than deciphering what appear to be long drawn out explainations of "how to" the manuals offer. Great work!
-
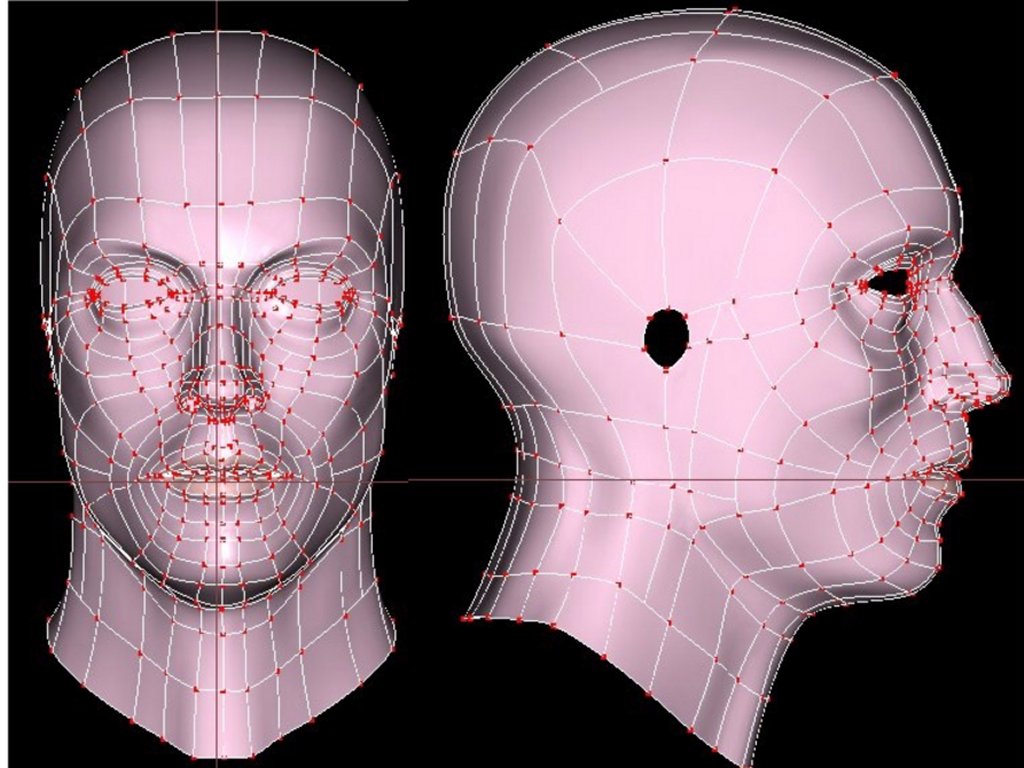
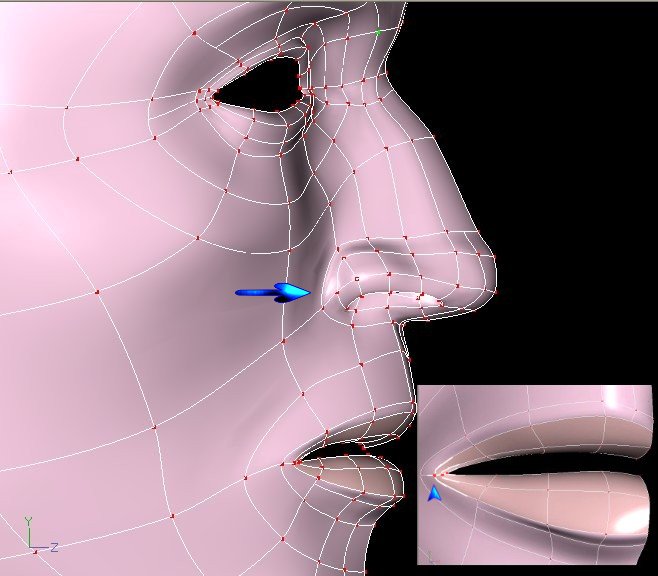
Thanks Javier. I'm still working on the new mesh. I'm posting a pic of my nostril to cheek transitions. the arrow points out the best config I have come up with. I'm still working out thinning in the nose. I have taken a look at alot of picture tutorials, but have not seen the proper way to transition without bias problems.(creases) I have looked at alot of meshes here but the area in question is not usually displayed in detail. Also the lips, I would like to know if they are properly configured for future animation. Anybody got diagrams or screens like mine they can post? I would like to see how other do it and develope my technique. My current config doesnt render bad but I would like to trim the splinage down and keep the smooth stuff.
-
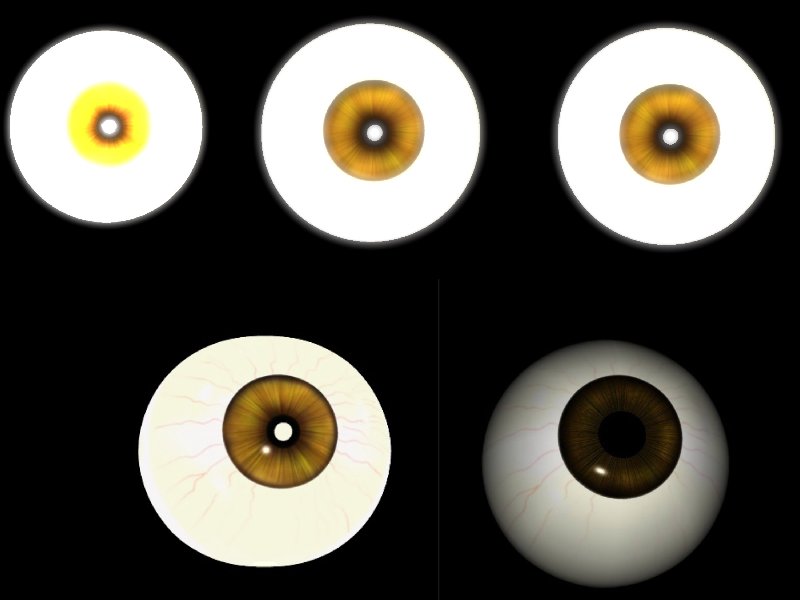
Here are the eyes for my head. I'm still working on the resplining job, studying meshes and seeing with a little more understanding of the need to space them out. I had trouble rendering the lighter version as you see at the top of the image. They rendered with the original head just fine and I tried adjusting the surface settings but got the same results with many more renders than I have shown in V9.5, 10, 10.5. I finally deleted the whole thing, relathed the sphere, applied the decal and got a good render. the final eye is my best one yet and was assembled a bit differently. (for all the other new users) The lighter one has the decal applied to the sphere as it comes right off the lathing tool(broadside). On the final eye I rotated the sphere on "I believe" the X axis so as to look straight through the two center holes where the splines all come together selected the rear group, scaled it up and tucked it into the inside of the eye. I can find my way around while I am modeling but the axis are not second nature to me yet so dont trust me on it) This eliminated the bright spot in the pupil. Tucking the back in gave me an idea which I will see if I can make work tonight. I'm sure some one has already done it but I haven't seen it done and I think it will give the eye a more realistic appeal. I.m still evolving the color blurring in the center and working on a way to make the viens look better and hopefully will have applied them (possibly in the new head mesh) for my next post. Any tips will be appreciated.
-
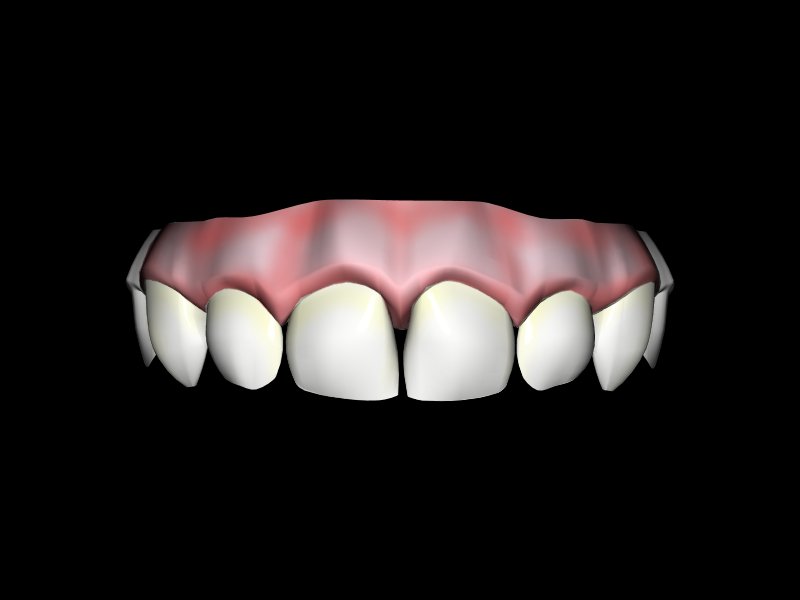
I have to work on bones a little more to understand the constraints and things like IK. But no not yet Frank. I have looked at alot of meshes lately and I believe I am using too many 5 point patches and was reading and discovered that 3cp's intersecting causes creases. I did intersect 3 in a couple of places and plan to fix that. I see many meshes where the first 3 to 4 splines of the lower eyelids closest to the nose appear to run down the cheek and sides of the nose and turn back up to form the nostril. I Have trouble with bringing the Eyes, lips,and nose together without chasing 5 point patches across the jaws(cheeks, which I believe will distort). Most likely I can save much more of this mesh than the last... But I'm close. I am starting to develop techniques for my decaling and am gonna try some bumps. To get the "now easy" stuff down so that when I get the mesh right I can paint the details in and make them look good. If there is something you see that I should pay attention to, "by all means" point me in the right direction. I dont want to copy anyones mesh but if I can integrate some proven tecniques, it will speed up my learning process. if you want I can set it up with bones if you forgive my most likely improper placement, and do a series of screen captures , put them together as a 2d GIF animation and email it to you to to evaluate any probs and possible solutions if it will help. I want to become a master myself someday! PS:I looked at your site tonight and once again was impressed, some of the images were hard to discern between 3d and photo. My mesh for my teeth is an almost identical mesh to yours from the gumline down, lets me know I'm at least partially on the right track Thanks
-
My final post this weekend. I need a bit of practice but looks like PSP will work fine for decaling. Jims tut made it easy other than the process of saving the decal image, it works differently than photoshop but once I get used to the post flattening process of pulling out the overlapping splines my decaling should improve. Thanks for the links Frank, now I can relax and let the swelling in my brain go down. Jim, thanks for making a video tutorial available for us newbies. This was a test render using a decal without flattening. It's a forward view so the scewing on the sides is not visible but I see now why the need for flattening the mesh. Thanks guy's!!!
-
Thankfully I made progress. It was a copy of the original but about all that is left of it is the eyelids. Still a bit patchy and womanly from the front. who knows I could save a copy and it could star as miss daisy. I'll get it tweaked in and do a render. It is probably still a bit thick but it is much lighter than the original. Now I can watch the tut's a few more times and start learning the decal process. I use paint pro but I can adapt. It doesnt have all the bells and whistles but I think it's a good app and it fit my budget.