dblhelix
-
Posts
457 -
Joined
-
Last visited
Content Type
Profiles
Forums
Events
Everything posted by dblhelix
-
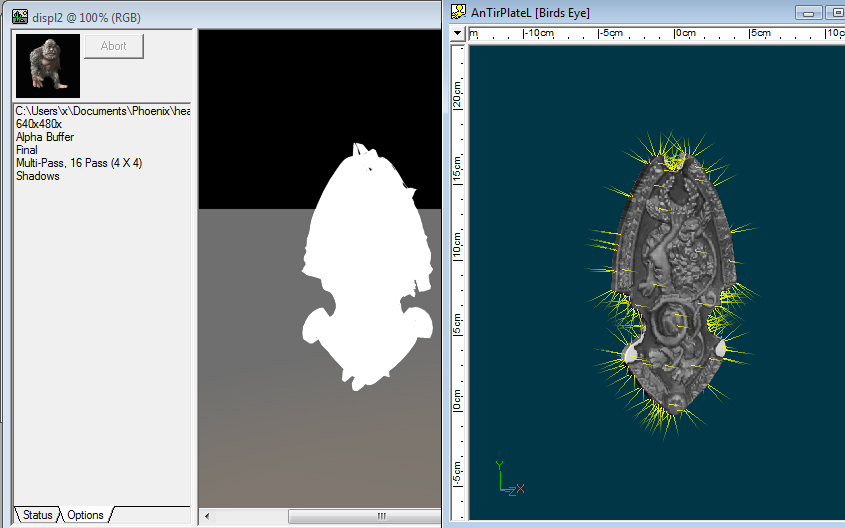
that alone didn't help, proceeded to tweak chor/cam settings to look for a general ambiance that would bring out object ambiance and have been rendering black squares for an hour. *sigh* reason for posting: while reading everything displacement in techref again (without a single reference to ambiance in the context), have decided for bump instead. this particular crown (the image is a part of a crown) won't be in close-ups and the smallish giddyfiddly craftsmanship exstacy won't form that big a profile in medium shots. plus there's no light source to move shadows and i'll be modelling the elevated settings for stones in the round holes. trying bump, same problem remains. nothing's happening. tried 3%. need a tutorial. there's something fundamental missing. it's a decal, right? the image is applied as decal, then assigned as a specific map? EDIT: if it's the giraffe thing, i'm on it right now.
-
don't even know where to start. to the left, a render with an object with a decal appointed as displacement map, 200% to the right, a model view with said decal as color, just to illustrate here. there are so many things going WOW! so just pick one.. any one.. what is UP with this render? been following a tut on the xtras dvd, a battleship side. didn't seem difficult. hoping this is not of the "turn the lights on!" type of problems? does the decal have to cover all of topography to render? didn't even bother to position it for testing - and the round gaps will have modelled detail eventually, without displacement map.

-
think i read the techref "Export Action As" chapter once too many cause i've gone all Linda Blair. is this how it's done: i've animated Eugene's legs&hips in an action. now i want to work shoulders, head + one arm and keep them as a separate action. > chor > shortcut to Eugene > add the lower body action > animate away on the upper body > delete lower body action ? > save remaining chor action "export action as" ?
-
there might be a problem with that link, explorer doesn't find it?
-
haaaa. it's a part of a crown, not a pipe shape as such, the top of the piece forming a flattened bowl shape. have to rethink the process from scratch. thanks!
-
i closed my work'puter already, but how's this: if you were to make a ring with 4 CPs, then select them and extrude twice, you'd have a pipe, or a tube. the rings in the ends won't close up automatically. they don't form a patch. i'm asking about the laws of a:m, how to plan ahead to avoid this. if i recall correctly, the piece i'm working was modeled from the long side and then extruded.
-
sorting out weird patches i run into one that refused to get covered. then i realize this could have something to do with the shape of the piece; it could be interpreted as i kind of tube. and i know for a fact there's a page about this somewhere but i can't find it. what is the logic here; if i have a hole - well, two holes - with 4 or 5 CP's then it's not doable (=a patch) in principle; i need to plan around and model more to make the piece more of a mesh formation?
-
and wouldn't you know, that one went away on its own. phew. nothing to report. thanks robcat!
-
yeppp. should've known. back soon with the actual question.
-
i need to ask something but i can't make an image to illustrate... i can't render in the model mode, in the model window. trying a jpeg, tried particles ON if that was an issue; wireframe; i need an image that shows normals, my actual question is about those. help please?
-
tease! wonderful surprise, the stairs! light patterns on floor seem to stem from the stars in the "sky", romantic and funny! i was mostly thinking of lighting of movement this time; there's a difference in 3D experience between the previous rehearsing lights and these stage lights, mainly in the very beginning and then again when Lothario stops when she takes a few turns on her own. in real stage environment, a row of side lights on either side bring out depth and limb movement the best. but maybe you were just getting to those tests; must voice thunder for your camera placement as the choice for advancing movement! just the perfect height. (curious to see 24fps version)
-
so close to making a visual, but since Nancy's undecided on the surroundings anywho, just words: my description is of a move that separates characters from their surroundings. what i should have said was, while camera sinks and tilts up to character, people&props&decaled wall also sink out of sight leaving only character in frame. the lowering of everything speeds up process & helps keep a more ordinary angle on character. having (light) shapes decal on wall gives 3D with low render time; and a big wall (=larger than intended frame) can naturally be used as two walls. (light) shapes help define left&right, maintaining the illusion you're cutting from one side of room to the opposite side. that's how basic that was! (no wonder they've invented storyboards...)
-
just brainstorming, bubbling; planning a group scene in my project with an exhaustive array of possibilities and suddenly i get a flash from your film. that is, the version i have in my head of your intro-to-be-?. i'll just plant it here, for whatever it's worth. if you plan to have them "meet" once you've established the environment, IF there are props, people etc make a "wall" with volumetric lights - two from each side render one really large image of that make it a decal put it on a wall prop you can separate the two "into their own world" early on if you trolley closer lowering camera while tilting up and simultaneously sinking the "environment" a lot (slowly) and the wall a bit less faking a larger movement than what you actually are doing keeping the subject in an interesting angle = not too low use wall behind them both, different sides of it = change in light pattern
-
didn't that hit the spot. thank you not only for the materials, but for contributing an all-new scene to my script through this tech. just what i needed and didn't even know.
-
and thank you! again
-
this was interesting but could simply be due to the length of the tail - it would then look thinner when further away from the camera! the inet seems a drag, congested at the moment, not encouraging film downloading so sticking with that quite plausible statement. so you noticed the parenthesis around "time&"... right there with you. it's all about the process, isn't it
-
it's Uma Thurman and John Travolta! = i think the music really works. don't know if you like the association. thinking out loud; the sound architecture could use the song pre-dance as a song playing in the background, mixed low together with restaurant athmosphere, chatter. when dance starts you could fade "the entire restaurant" away and bring up the intro, separating them into "their own world" = bring them closer together. a prelude to the dance wouldn't have to be labour intensive animation-wise. the more you build up between them before they get to da shimmy, the more it will heighten the dance. this goes two ways! you're right about proportionality of course. the shortness i like, but when the fluff-puff was smaller it emphasized Johhh... Lothario's girth, adding to the general disproportionality; in him; between him and Uma. it also added to the funny and made him just a little bit better dancer. but maybe it's just me. go pro & fake it with a stunt tail and composite. you probably want to do a pure a:m masterpiece, but what you're doing is so unique already, if you can win (time&)energy for animation, take a shortcut and think nothing of it. you have got to be kidding? ok hands off the browser and name your price?
-
instead of smiles how about a ball of fire
dblhelix replied to johnl3d's topic in Tinkering Gnome's Workshop
yeah hi never mind me just hoovering *cellturbmatez2.zip*cellturbmatez2.zip * seriously, though i've probably said it already or someone has; you should render a selection and sell them to clubs to be used as "paintings" you see what i'm getting at. thank you! -
irresistable insanity. the Chaplin song 'smile' at triple speed (or more) might be the soundtrack for these.
-
just seeing this thread updated is a kick - bouncy! does he splay his toes in sidekicks? he's so cute! the moment when he stops (shuffle) and she dances is already hair raising, that's all the story you need here, that they meet. he's quite a dominating presence, so initial reaction is; the story is about him. what if she picks him up - bit of eyegames - and she asks him to dance - he could be shy - then dance, make a moment of him reaching his hand to her and end with them embracing (more or less comically)
-
nice even numbers, did you flee the scene or have a big bash for the whole block? many happy returns !
-
nummy! thanks, again.
-
1) wow. 2) now you're telling me! 3) this is operating the timeline in time not by frame? 4) if i set start frame to fractional value in an animation, will this "push" step count so that the fraction is maintained throughout? (nope, testing on my own sounds scary! how'd you ever think of doing something like this?)
-
but, how is this done? when rendering, a:m goes mute. you can't operate the program not even to just scroll a window. there's something i'm not getting, right?