-
Posts
635 -
Joined
-
Last visited
-
Days Won
3
Content Type
Profiles
Forums
Events
Everything posted by markw
-
Is it normal for A:M to grind to a crawl when working in a Chor using particle sprites? I'm not be able to scrub through the Chor timeline as normal in order to see how they are looking or how the animation timing is for the emitted particle sprites. I can step through the Chor a frame at a time but I have to wait for a couple of minutes before the each frame is displayed. This is happening with my old nemesis, the Rear Window set! I have deactivated most of the set and character to try and speed things up, which has at least got the wait between frames down from 4 minutes! As soon as I turn off "Show Particles/Hair" I can scrub through normally again. I don't think I'm using an excessive amount of sprites? Is there any thing else I can or should be doing? Or is this as good as it gets and I just have to try and work with it? As always any help would be gratefully received.
-
Just got the DVD today Love it especially your twist on that classic of toon gags, an anvil
-
Interesting... I was wondering because A:M on Macs isn't 64bit and other graphics apps that I use which are 64bit just eat as much RAM as I can give them! But whilst using the Rear Window set, my copy of AM seems to be often forgetting things in a random sort of way, similar to what can sometimes happen when there is not sufficient RAM and the system has to write/read to disk a lot and sometimes gets it wrong, so I thought maybe it was a RAM memory thing. For example, some hidden bones and nulls in the Literig that should be rotated automatically by their controlling bones are not always and I have to go hunting for them to do it manually. The Lower Hip bone has now stopped working altogether! The bias settings of CP's on joints slowly creep out of place. Thankfully I found the CP bias resets after closing A:M and opening it again. I'v not embedded the main character, so its still being referenced from the original, and outside of the Rear Window set the same model behaves perfectly! So anyway I was just wondering, thank you both for the info.
-
Done, another bug reported. I've been trying to precisely place some emitters but its a killer when the only way to see the effect is to wait for the entire screen to render. I am still curious about the memory usage on Macs though if some knows.
-
Is there a reason why particle sprites don't show up in Render Lock Mode (shiftQ) but their shadows do? And how much memory can A:M use in the Mac version? I have 8GB but A:M never seems to use more than 1 or maybe 2 at most. After what seems like only an hour or two trying to work with the Rear Window set things really start to bog down. Edit: OK ignore that last bit about the set. I'v deactivated and/or hidden as many of the set models as possible and things are running much better now. I just have to remember to turn them all back on again when it comes time to finally render!
-
Yes it fails every time for me. I have also made another new test project and that went the same way 10 for 10! so I've posted a report about it. Thanks again Robert.
-
Thanks for trying it Robert. Maybe it is a Mac specific problem... Would anyone else with a Mac like to try it and see what happens?
-
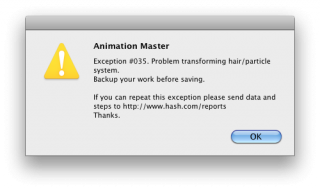
Firstly dose anybody know what "Exception #035" is ? I'm getting it every time I try and bake particles and then A:M locks up. Mac v16b and v17beta. Here's a test project that consistently fails for me, maybe someone could see if it fails for them too. Or am I just doing something wrong again? The zip contains the .prj and the .tag sprite images used in it. Secondly, for speedier rendering I would like to use NetRender. Do I need to bake particles before rendering? Particle_Bake_Problem.zip
-
Ah, I knew I was doing something dumb and that there would be a simple answer to it! I thank you!
-
Could you show that from the PWS rather than the Timeline? How about a vid and the project file instead? It's just a quick recording Robert of whats happening so you can see what I'm actually doing. I'v also attached a test project file too. Emitter_Keyframe_Test.prj Sprite_Emitter_Test.mp4
-
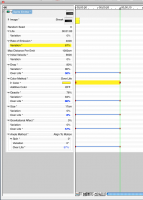
Thanks for the reply Gerry but I'm sorry to say that I was trying to do that before and just can't seem to get it to make a key frame Here's a screen shot of emitter settings and as you can see the only ones that I have been able to set keyframes on are the "Over Life" options. What else could I be doing wrong?
-
OK, so this is probably a dumb question with an easy answer but; how do you turn on and of sprite emitters during an animation? All the tuts about them seem to assume that you want them on from the very beginning and with some pre-roll. What I need it to do is to start emitting some 10 or 20 seconds after the start of the sequence and last for 3 or 4 seconds, then stop emitting briefly, start again for another 3 or 4 seconds maybe and then be off for the rest of the animation. This is also a one take shot with no camera cuts. As always any help and advise would be greatly appreciated.
-
¡FELIZ CUMPLEAÑOS! from here in Spain and thanks for all you do on the forum here!
-
Finally got Niki working Thanks Nancy for pointing me in the right direction for where to start fixing things. The easiest were the feet, as that was due to the feet bones having the wrong Z rotation set when I placed them. It pays to not only double check but also triple check if not quadruple check these things For the arms, as you suggested, I deleted all references to the left arm that showed up in the right arm relationships. I have still not been able to stop this from happening every time I export a model but at least its quick to fix afterwards. I also seem to have an extra null between the feet called "Body Controls" that is not in RobbyLite? It moves both feet/legs together in IK which is handy but for some strange reason the hands are children of this as well? The odd mesh deformation that happened turning on IK in the right arm of the model in the PWS, I think is related to the 2 bones I added for controlling the shirt sleeves. Though as far as I understand the instal instructions this should not be a problem. But as I say rigging isn't my thing. But some driving instructions might not go amiss for this LiteRig. For the freshly exported model in the PWS, do not turn on IK arms or feet. Just leave them alone! The hide extra bones, show lower spine and things do seem safe enough though to set there. When animating with this rig to switch IK on and off, if/when you need it, there is a bone between the models feet called "short cut to (model's name)", clicking this will call up the properties window for the model's shortcut in the Chor and it is in there that you should turn on/off IK settings and only in there. For this model at any rate, turning on/off IK in the Chor has no adverse or unexpected affects on the model unlike in the actual model in the PWS. (so far, touch wood...) And now I have a rigged model Well almost, there's still the face to look forward to…
-
Thanks Shelton but I have to be honest and say that she is not totally mine but a re-modelling of a character I found in the Extras DVD just called "Woman", which was very similar to the look I already had in mind. If I have time to take part (and getting this mess sorted out won't help), I'm hoping to use her in the upcoming community project.
-
Well Nancy, thanks for the reply. I really don't know how stuff has got so messed up in the folders you are looking in. I'v not opened those folders, there being nothing in them that I should need to fiddle with in the normal run of events. It occurs to me that outside of the LiteRig install instructions, as given, I used the Mirror Bones plugin and Mirror Smart Skin to take care of the left side of the model after I had done the right. But if that is the cause, I'v never had it mess with constraints like this before. Would really like to know what cased this so it doesn't happen again. Have started to look through and compare my model against the RobbyLight example model and try and fix things but this really isn't my field. I hate rigging Forget a "Make Dragon" button give me a "Rig Model" one any day
-
Hi I'm hoping someone good at rigging can help me with my current project/problem. I am trying to install the LiteRig into a model. All seems to go well after exporting until you do any the following with the new model: Turning on right arm IK screws up the mesh on the right arm and also activates left arm IK. Turning on left arm IK seems not to work at all. Turning on legs IK flips the feet upside-down but not the toes. I have also tried exporting various earlier versions of this model at different stages of rigging and CP waiting, all seem to exhibit the same results. As far as I can recall I followed the rig install instructions properly. But its always possible I screwed up something somewhere along the line. Before exporting I only added 2 new bones as children of the Shoulder Bones. They follow the same orientation as the Bicep Bones but do not store roll. These are there to prevent the shirt sleeves of the model from twisting with the bicep. And SmartSkin on shoulders, knees, upper thighs and tummy. The the attached .prj contains the model before export, Niki8-MirroredBones and the resulting model after export, Niki8-expMirrorBones8c. LiteRig_Export_Problem.prj
-
Hi Walter I'm on a Mac too. Here's my snapshot, is this what you were expecting to see in the render? All I did to get the shadow to show up was turn down the intensity of light No.2 to 50%. I think it was drowning out everything else. No other settings were changed.
-
An excellent start Fuchur, I like it. I confess I'm not well versed in the anatomy of polar bears but do the feet need to be a little bigger? But my biggest advise to avoid retexturing any model would be to save the texturing till the very last thing. Rig it now and test how well the mesh works when moving. I've never had a model yet that didn't need some tweaking or reworking of splines around joints.
-
Definitely make the upgrade to Snow Leopard if you can. There's not much by way of eye candy in it thankfully but a lot of tweaks under the hood as it were, which is just what an OS upgrade should be. I had a quick look around on Google and it seems like lots of copies still out there to be had for a good price.
-
Hi Darkwing, yes if you have QuickTime X, which I think came in with Leopard, it can do pretty good screen recordings. I found the best results from setting the quality to "high" and afterwards compressing it down with HandBrake which is free! from here (Note; HandBrake may want to save the new file with extension .m4v but just change it by hand to .mp4 for ease of posting.)
-
And a big FELIZ CUMPLEAÑOS from me too!
-
I don't have a number pad either on my Macbook Pro but It's quit easy to setup your own custom keyboard shortcuts to replicate it. In A:M go to: Customise > Keyboard and start making shortcuts. On mine I have assigned the view options to the arrow keys in conjunction with one or two moderator keys. I chose the arrow keys because they actually give a sort of visual representation on the keyboard of Left, Right, Front etc… Here's my list; VIEW = KEYBOARD SHORTCUT Back = Control Command Up Bird's Eye = Control Up Bottom = Control Down Camera = Command Shift Down Front = Command Down Left = Command Left Light = Control Command Right Right = Command Right Top = Command Up
-
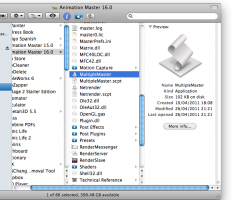
There's a little AppleScript app that Steffen added to the Mac version of A:M called "MultipleMaster" launch A:M with that and then wait 30 seconds and it will launch a second instance of A:M. The neat thing is you can keep on doing this as much as you want and/or your system can handle
-
Well I've made a short vid for you Thumperness, for the render as lines bowstring. Thought I would post the actual vid here as maybe it will be of use to others as well.


