-
Posts
635 -
Joined
-
Last visited
-
Days Won
3
Content Type
Profiles
Forums
Events
Everything posted by markw
-
Yes, something happens in the converting, probably not down to what app dose it, just that it needs to get converted for some reason. I've used HandBrake for a long time now to convert things to H.264. Yes its free, you can download it here; http://handbrake.fr/downloads.php By default, if memory serves, first time out it will want to add file extensions of .mv4 which I think is primarily for mobile devises and may give you playback/uploading to A:M issues. Just change that to .mp4 in the Save dialog box for more universal playback.
-
Yes that's certainly odd on the Low-res version. I have vague memories of this happening to me once. I think it is something to do with the output codecs used. I see the Low-res one is using 'Animation' as its codecs which I think is the reason but to be honest I'm not sure. Any way, now the weird bit. If you put your Low-res file through HandBreak and convert it to H.264, it comes out looking as it should! as you can see below. And its a much, much smaller file size. My "go to" movie output from A:M would be 'Apple Intermediate Codecs' as it plays nicely with FCE 4 or the old iMovie HD for something quick (I really don't like the new iMovie) and then when finished editing, output as H.264 or uncompressed and use HandBreak to turn it into H.264. S9_Clouds_Low_res_After_HandBreak.mp4
-
That's a much better pass around the figure this time. By the way I've only just noticed a huge typo in my above post on using a Null as a pivot. I've amended it now but hope it didn't confuse you when you then looked at the project file!
-
As Rodney says time for you to get to work. You're working for us now! So glad this is happening for you
-

Animation Contest - Entry 2 - Pirates
markw replied to higginsdj's topic in Work In Progress / Sweatbox
As a fellow laptop user also living in what can be a very hot and dusty part of the world this is my biggest fear. Every spring I open mine up and clean out the fans and heat exchangers before the hot weather kicks in. Fingers crossed for you... -
I agree here with Rodney, we need to see more examples of your work during the video. Also shots of you working at something on the computer or doing concept sketches stuff like that. Maybe start the video with that animated shot you did of Tar walking towards camera in the desert and have the Tar title zoom in from center to fill the shot. Then cut to you introducing yourself. No offense here but I'm not sure we need to see you all the time in the video. During the middle bit is where I would want to see images and animations that tie in with what you're saying in the voice-over. Then cut back to you for your final bit to camera at the end. Just my two cents worth…
-
Good man
-
...Imagine Kung Fu Panda if Quintin Tarantino directed it!... That one line on its own sold it to me
-
Thanks Mark for setting me in the right direction there with the thumb controls. I also hadn't realized that the 2 nulls work differently when you translate them, than when you rotate them. And unlike rotating one of the thumb bones, the coloured axis rings aren't important. Very clever! All is well now, thanks everyone
-
Thank you Mechadelphia, Bull's eye!!! So it was staring me in the face all the time. How embarrassing @ itsjustme; Yes the bones were/are dead on "0" for the X axis. It was just that extra 0 I had in the Mirror settings. That just leaves the lack of curly thumbs. Any insight as to why I'm unable to curl the thumbs? The fingers work just fine. No doubt I've done something wrong there too, but what…?
-
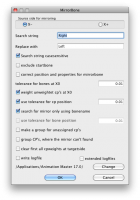
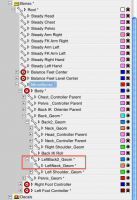
Well once again I find myself in the dread valley of "Rigging" and as always for me its not going so well. So any help would be most gratefully received! Every time I run the MirrorBones plugin installing the 2008 Rig, it duplicates the 'Neck_Geom' and 'Back2_Geom' bones in the spine. Effectively making the upper left half of the body controlled by a separate rig to the right side. The other problem I had earlier on when CP weighting, was that there seems to be no controls for curling the thumb? Shown here are the settings I used for the MirrorBones plugin and the bone hierarchy after running the plugin.
-
And here's yet another way it could be done with a Null as a pivot. Camera constraints: 1: Translate To > Pivot Null 2: Pivot Like Orient Like > Pivot Null I'm sure some sort of expressions could also do it too. But alas I no nothing of those dark arts! CircleRoundWithCamera.prj
-
Hi Simon! Yes, the sandstone... I wondered about that, it dose seem a bit at odds with the look the rest of what you've posted so far. Looking forward to seeing the whole tale complete by the way.
-
Ah, still makes me smile Good trailer!
-
Have a great day Robert May all your splines run ture!
-
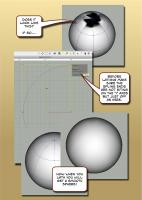
Hi and welcome sahold That sounds like it might be due to pinching at the poles of the sphere. Screen shots can always help in these situations. But try this as a remedy...
-
Are you maybe talking about importing an image sequence of TGA's into A:M and then rendering that out as a movie file? If so, at the end of my illustrated Netrender PDF (see link in my signature below) theres a section at the end called Now What? about doing just that. The proces is the same for PC's so don't worry that it says Mac's on the PDF!
-
Oh no, not another variable!
-
Thanks Robert, so that was 4 real cores and no hyper threading and 64bit right? Which would suggest to me, in this admittedly unscientific test as our hardware is not totally identical, that per physical core the Mac 32bit i7 render times are similar too, and in this particular case, a little faster than your Q6600 Windows 64bit times.
-
Mark I thought I had replied but, if you send me an E mail on PFG@tesco.net, I will send on any info I get. regards simon Thanks Simon, will do.
-
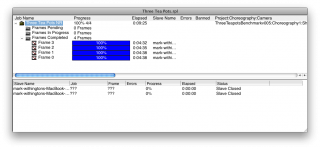
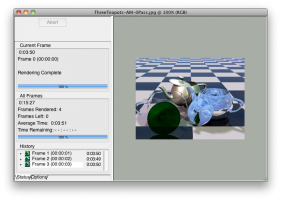
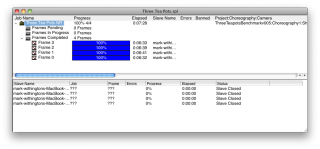
Well that was interesting! Thanks for the suggestion Robert of turning off the Hyper Threading! Total time for 4 frames rendered with Netrender without HT = 0:09:25 So although the Hyper Threading slows down any one frame by nearly half, with Netrender it made-up for it by being able to process 2 frames(no HT) or 4 frames (with HT) at a time. Conclusion; Netrender with Hyper Threading is still the fastest way to render. Now what I would really like to see, if anyone else here on the forum has a similar/comparable hardware setup to me, is how quick Windows A:M 64bit dose those 4 frames as I did them to get some idea of the actual difference between Windows and Mac render times.
-
Macbook Pro v6.2 Intel i7 2.66GHz. 2 physical cores & 2 virtual cores via Hyper Threading. OS 10.6.8 A:M 17g Total time for 4 frames rendered direct from A:M = 0:15:27 Total time for 4 frames rendered with Netrender = 0:07:28 So in this test, Netrender is twice as fast overall than A:M which is nice. But each individual frame took twice as long in Netrender, than from A:M. I'm not a programmer, so forgive this next question, but could Netrender be optimized further?
-
Mark Thank you for your feedback My preferences would be to stick with the Mac, after years of PC problems, they have been far more reliable. My younger brother has OSX,W7 and Ubuntu running on a PC laptop, likewise a good friend who is a Mac fanatic, apparently it works up to 10.68 at least ? regards simon Now that is interesting! My understanding was that the hardware check prevented it. I wonder how they did it? Can you ask?
-
For me the only advantage of using A:M on a Windows machine would be that all the plugins will work for you, like FastAO for example. Render times though are more or less the same on both platforms, so no specific gain there. Dual booting is of course a good option if you want access to all the plugins and you have a copy of Windows already that you can instal. Note though, Mac OS X will NOT install on a non Mac machine. Mac OS checks to see if its hardware is the real macoy! So if you want dual boot you will need to put the Windows OS onto the Mac.
-
Well Simon I'm not sure about why there are big white areas showing? It dose the same here in v17g. The cloud is near see-through (is that intended?) It is not actually a "solid" grey colour itself but has a fair amount transparency in it. This is how your file rendered in the chore; Sure doesn't look right! S6_Clouds0.tga


