


itsjustme
-
Posts
5,792 -
Joined
-
Last visited
-
Days Won
59
Content Type
Profiles
Forums
Events
Everything posted by itsjustme
-
The knees and elbows should be scaling 50% of what the bones on either sides of them are scaling...at least I think it's in the second version (depending on the angle, sometimes the knee/elbow needs to be rotated using the null though). What I'm doing now is putting in a more standard setup so that you can animate him normally and then just distort the body part you want with a null, I should have something new posted in a day or so. Thanks for the input, Mark.
-
Very nice, Jin! The only thing that I'm wondering about is the window on the door, it looks like one piece of glass from the door into the body behind the door (I'm not familiar with how this car's windows look, so, feel free to ignore me)...I could just be looking at it wrong. I'm definitely looking forward to the tutorial!
-
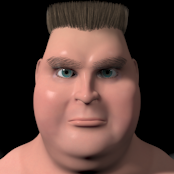
Okay, a few improvements on this guy. I've got a lot more to do (and several things will probably change), but this was a good stopping point this evening. Anyway, something to mess with.
-
I just got a chance to watch the Expressions Tech Talk (124 MB download) and this is something I used to try my hand at it. Not a conventional rig, but fun to mess with. If you need an extremely squetchy character something like this could be useful. Just move the visible nulls around in an Action to get a feel for it.
-
Jim Talbot has some tutorials you might be interested in here. ---------- EDIT ---------- This tutorial might also be helpful.
-
Ouch, I double-posted....well, I'll split it up then. There's a Tech Talk on hair located here (201MB...pretty big file) that might help.
-
Very nice work, the only additional crit I have is that I would use a couple of hooks and/or route a spline from going to the lip to going under the nose to meet it's counterpart to reduce the number of splines in the top lip by a couple...I'm thinking you could get rid of two on each side. The lower lip is perfect though.
-
Very nice start, Madeline!
-
John, it looks like you're using Camstudio to generate the SWF and HTML...just a headsup, Camstudio puts an error on the size of your SWF in the HTML. If you put in the right dimensions it will fix the problem. When I set the width to 911 and the height to 690, it appears to be close. Also, if you record the tutorial as a Camstudio Lossless Codec encoded AVI, you can edit it using Virtualdub, save it as an edited AVI with the same Codec and then use "SWF Producer" (should be part of the package with Camstudio) to encode it as an SWF without any loss in quality. Very cool tute.
-
What Scott said...looks like it's turning out nice, is there an entire gas station?
-
That's very nice, Tom! Very generous too.
-
For anyone interested, I've posted a project with a rigged (and unrigged) head in it that will be the subject of the tutorial that I'm still putting together (I know, I'm taking forever). You can find it here: http://www.hash.com/forums/index.php?showtopic=13963 I will have the tutorial done soon.
-
Thanks for the thanks, I've improved this rig some since I made it and (hopefully) I'll have the tutorial up in a few days. I'll include a rigged head as well, that'll give you a better idea of the weighting and such. Sorry it has taken me so long...it's been hectic. For organizing your poses, select your model in the PWS, go to the "Properties", expand the "Users properties", right mouse click and select "New Property/Folder"...that'll give you a sub-folder to put things in. You can drag the poses around in the "Users properties" to suit your needs by grabbing the box with the arrows on it to the left of the pose name. Hope that helps.
-
There is a tutorial section in AM Films that isn't populated yet...actually, I think there is one tutorial in it at the moment. I'm hoping that when I get a video tutorial done that Hash will let me post it there, I haven't asked yet though. As soon as I finish the one I'm working on I'll e-mail Hash. The Camtasia codec needed to view the tutorials is free, the program to make the tutorials isn't. There are cheaper alternatives though, Capturepad is $25 and there is still a free version of Camstudio on the net if you hunt for it.
-
Thanks Rodney, I'm presently putting the video tutorial together...I've been pretty busy the past couple of weeks, but, I'll try to knock it out this week. I'm trying to keep it a small enough file so that it won't be too much for dialup, we'll see how successful I am.
-
Animation Master short film on CGUnderground.com
itsjustme replied to Frank Silas's topic in Work In Progress / Sweatbox
Looks good...like I had any doubt. Keep up the good work guys. -
Nice work so far, Pancho. The only things I would alter is I would end the splines that go into the top lip immediately to the right and left in hooks above the lip and I would use the rule of fifths to size the eyes...but, that may just be a style thing, so ignore me if it is. I usually work in OpenGL unless I need to decal something.
-
Wow, very cool stuff so far, David. Sounds like you're chugging along nicely too. I can't wait for the finished product!
-
Here's a simple project with a surface constraint similar to the forehead constraints in Bertram's head. In the Action in the attached project, move the "surfaceaimtarget" bone to manipulate the "constrainedbone" while keeping the "surfaceaimtarget" bone's contact with the geometry (if you don't, the "constrainedbone" will jump to it's starting point). I posted this here as an example to a question on surface constraints...and it applies to Bertram's forehead.
-
Okay, here's the entire face including the forehead/eyebrow stuff with the same audio and Action file included again. I think I cleaned out everything that won't affect anything in this project...if anyone finds something, I'll go back and clean it out. I left in the "forehead plate" that the surface constraints are tied to (that might also get rid of any unpredictability with constraints working)...I left it set at 100% transparency like it is with the actual model. If there are any questions, I'll try to answer them.
-
Nice guns....you've been working out, obviously. Here's mine.
-
The cheeks in/out is only a muscle movement...I negelected to take that out, it puffs out the cheeks, sorry about that. The tongue also has muscle movement for width and thickness which I neglected to remove...I tried to be thorough, just didn't get 100%. To move the nose independently, you have to turn off the "nostril targeting". In order to manipulate the lower lip completely independent from the jaw, the "lower lip to jaw" slider needs to be set to "0" (in the "jaw" folder)...or at least lower than 100% for some independence. I made this a percentage slider so that you can gradually reduce the influence of the jaw instead of having to turn it completely off...that would cause some annoying popping and be very noticeable. If you look in the Action file, you'll see that I gradually decrease the "lower lip to jaw" slider starting at 12:23 for the last 5:07 of the face test. Occasionally I have things not work, but, I think it's because there's no geometry in the project...it's only every now and then, nothing really repeatable. I've had no problems with it when there is geometry. I'm presently using 11.0t.
-
Not a problem, Mark, I'll try to answer any questions you have. The forehead rig happened because I ran into a problem with CP's locking up that I couldn't repeat with any regularity...I haven't had the problem since then though. I ended up putting a bone on each CP of the forehead and making poses that way. Once I checked the poses from the side, I saw that Bertram's head was caving in a little. I didn't want to go back and set keyframes and such, so, I copied Bertram's forehead, made it invisible and then constrained the forehead bones with a surface constraint to that. The benefit I got was that I didn't need to put in additional keyframes, I could just adjust the "translate to" constraints. I'll try to put something up on the forehead setup in the next couple of days, but, I think the above explanation gets most of the idea across. Not a problem, Joakim. If you need any more clarification, just let me know.
-
Here's the second part of the web page.
-
Okay, I bumped up against the file size limit of the forums, so, the web page is now spread over two zip files. I'll post the first one here and the second one in my next post. Unzip both of the files to the same folder and point your browser at "riggingface.html".