Rodney
-
Posts
21,649 -
Joined
-
Last visited
-
Days Won
119
Content Type
Profiles
Forums
Events
Everything posted by Rodney
-
Thanks Will! I know I've got a lot of work ahead but praise from you makes me all giddy inside. It gives me hope to keep pressing on in this crazy world of animation. Hey, does that mean I get the bonus points for 'GET HIT IN THE HEAD WITH AN AXE!'?
-
 For PC users... If you use ImageMagick (or have it installed on your system) I created a little utility program to convert a directory full of PNG images into a GIF animation. It's pretty no frills but has the following features: - Converts a directory of PNG images into a GIF animation - Preserves transparency (most gif converters do not) - Works if setup properly from the Tools/Customize menu in A:M (so converting renders from A:M to gif is a quick process). - Allows user to enter a name for the converted gif animation (pressing the enter key results in only the date/time stamp being retained as filename) -- If entered, the name will be added in front of a date/time stamp (currently no option to bypass the date/time stamp but this can be added) Disclaimers/Troubleshooting: *This is just a fun utility I put together to save me time in converting files to gif animation. No claim of any kind is implied. Use at own risk. *Imagemagick must be installed on the system. The exe simply automates what you'd have to input manually at the command prompt with Imagemagick The specific command used for conversion is: convert -delay 0 -loop 0 -dispose previous *.png %new_name%%fullstamp%.gif Do not use this utility on essential files (when in doubt use copies) *This executable must be in the same directory as the PNG files (I use these utilities with a static Renderfolder file system). The Date/Time stamp hasn't been tested on international systems (the date/time method might not work outside of North America) *I haven't had any issues with this utility but this is no guarantee that you will not. Attached is the first sequence of images I successfully converted with the utility via the Tools menu in A:M. PNG2AGif.zip
-
Mark may be on to something here.
-
Trouble with fire tutorial (After Effects transparency)
Rodney replied to dren0chill's topic in New Users
The Tiffs are just screenshots of what he is seeing. -
Thanks for the response Robert. Yeah, the issue is as I stated above where multiple Projects may have a material named 'Material1' but they are in fact very different materials. Only the names are the same. The same can be assumed for any asset that keeps the default name (Action1, Action2, Choreography 1, etc.. I had a little success with Transforming a Project into a Chor via a text editor and that could lead to an easier collecting via import of the Chors. I messed up though in that once I imported the Chor into a new (empty) Project I forgot to save and A:M crashed because of the little things that I hadn't accounted for. Saving the Project should allow A:M to automatically repair those as they aren't essential to any Project.
-
Trouble with fire tutorial (After Effects transparency)
Rodney replied to dren0chill's topic in New Users
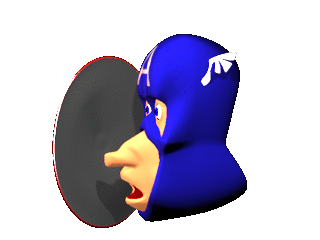
Here's an example of A:M particles (the resulting images that is) working in other programs. Note that I used Fusion to comp the particles because it takes awhile to open and setup After Effects (doing that now). This test also uses the PNG format (as as means to get the animated gif with transparency) so PNG does work... I just don't recommend the format if use can be avoided in the early stages. As you can see the transparency is maintained all the way through the pipeline. In this test, I rendered the particles out of A:M using the TGA format. Click on image for animation.
-
Trouble with fire tutorial (After Effects transparency)
Rodney replied to dren0chill's topic in New Users
I converted your Tiff images to PNG as Tiff isn't a browser friendly format and folks may not want to download to see the images. I'll have to refresh my memory here but... if you can supply one of the original images/frames from your sequence put into After Effects that will help. At a guess I'd say there is a setting you'll need to adjust in After Effects but there may be something you can do on A:M's side as well. Added: Make sure you are rendering out of A:M with a format that will properly save the Alpha Channel. I recommend TGA or EXR. PNG will usually work but is not as robust a format for use with compositing. Formats to avoid (unless you plan to add a mask to act in the place of the Alpha Channel) include: BMP and JPG. AVI doesn't store transparency and while the Quicktime format stores the alpha channel it's usually to use image sequences. -
Late night thinking here so bear with me... The term 'best method' is relative here but I'm looking to find a good way to combine a whole lot of Project files (hundreds?) into one single Project file. There are some difficulties in this. One of the primary obstacles: Same name assets (i.e. materials named material1 in more one project etc.) Those may have to be dealt with on a case by case basis. One method that works fairly well: Embed everything in the Project and then save as a Choreography Do this for each Project Import all the Chors into one Project (I tested this with good results but I believe an important step will be to rename all assets before exporting to Chor to indicate what part of the new Project they belong to. I believe this has the downside of not exporting any asset in the Project that is NOT in the current Chor. Those assets would not be transferrred.) I'm curious if I'm missing something simple here. For instance, can we import a Project into another Project? Going the text editing route is an alternative but with that approach the chance of breaking stuff increases dramatically. A similar approach might be to use a text merge tool (i.e. with Notepad++) and keep those parts of the file that are required.
-
I like. That one reminds me of your freezing effect. Now you've got me trying to recall how to apply an effector to one object without it effecting the other without resorting to compositing multiple renderings. For instance, effecting Thom but not the ground...
-
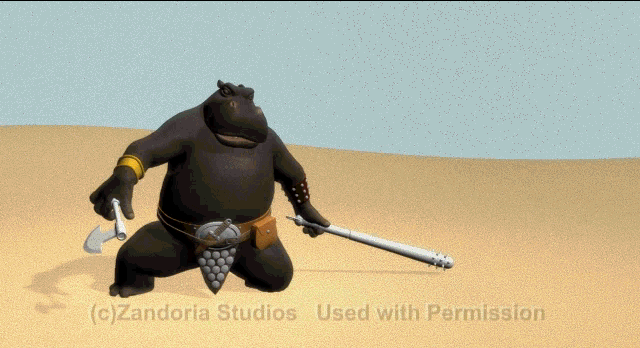
I'm embarrassed to post this but it's all I could salvage of my all-in-one sequence and I said I would post it. The feature I was testing was 'set camera from bird's eye (view)'. I like that! This was something of a no-frills approach. The scene setup uses: - The default ground plane (I wanted to see if I could make it into sanddunes) - Three lights (a sun and bulb/point light to light Tar and an additional point light to light the hyenas) - Not that you can tell from the posted animation but the entire sequence consists of one moving camera that moves around Tar and then zooms in on the hyenas -- I didn't manage to get a long enough sequence at the beginning to show Tar actually picking up the axe... although it's staged for that. I figure he's got a bunch of weapons laying there at his feet and he chooses the axe - I (obviously) didn't put much into the hyena's movement so it's mostly blocking the action out. I'd like to see a bit of reaction in the hyena leader's arms and hands that would signal that his brain stopped functioning upon impact with the axe. - The hyena sequence reminds me a little of the look of early 1970's japanese stop motion (like those Johnny Socko - Giant Robot reruns). Perhaps the lighting also has something to do with that. Edit: I should have mentioned that the herky-jerky look of the animation is due to deleting the majority of bad frames out of the sequence manually. When recompiled it resulted in a slightly better playback. Perhaps good enough to serve as a initial animatic? The big contributor to failure was my inability to control the constraints I placed on the axe. I had two constraints; one to Tar's hand and one to the hyena's leader's head. While they worked intially I had problems rotating the axe inbetween leaving Tar's hand and approaching the hyena's head. If I had it to do all over again I might constrain the axe to a Null and then animate that. Alternately, although not optimally, I might just manually place the axe. As it was a simple setup, I might just start this entire sequence over from scratch. But... there you have my attempt. Now it's time for someone else to post their axe throwing animation!
-
That's looking VERY good!
-
Thanks William, Interestingly enough I started to lose interest after establishing the key poses so you see my laziness on display here. I left space for an anticipatory intro and follow through at the end (the wall you speak of) as I started getting distracted by the dust effect of Tar's mace scraping along the sand (i wanted to see if I could use dust effect in A:M subtley yet effectively in the scene... didn't quite hit the mark there either but saw enough to realize it will work for me in the future if I need it.) I'm rendering out an extended sequence but already want to throw it into the trash can. I was struggling with constraints all the way. The successful parts might make a decent storyboard. I wanted to get more of a side arm swing to get some lift in the trajectory of the axe as it has quite a long way to go (as will be evidenced by the next sequence I post). Part of the issue with inbetweening is that I know what needs to be done but I haven't the patience to do it. Especially if the shot I'm working on isn't going anywhere anyway. Perhaps I should post keys until folks think it'll work and then go back and work the inbetweens? And... how do you cure someone of being lazy?
-
While typing my little excuse for not completing the assignment I figured out a decent approach to picking up the axe and then throwing it. It'll be a good test of one of the new features too. I'll see if it works.
-
Axe throw! I think this animation is big enough that you'll have to click on the image to see the animation. I know the assignment was "PICK UP AND THROW AN AXE." but my brain wasn't working well on putting those two actions into a sequence. What I'd probably opt for cinematically is two shots; the first picking up the ax (or simply a shot showing the character seeing it or reaching for it) and the second (after the cut) of throwing it.
-
The one thing that my current workflow lacks is a high end video editor that doesn't break the bank. Several companies may help to resolve that. Avid is on the move lately with some major purchasing of other companies and an announcement that later in 2015 a free version of Media Composer will be released. While I don't imagine the free release will meet all the esoteric requirements needed the entry point is priced to make the determination of how well the program can fit into a production pipeline and fit current needs. It is also worth noting that a company recently purchased by Avid (Orad)is known for their realtime 3D technology. Sign up to receive notification of the release and more information here: http://apps.avid.com/mediacomposerfirst/ Avid claims: Every 2015 Oscar nominee for Best Picture and Best Film Editing was edited with Media Composer. 99% of all network broadcast prime time television in North America is produced on Media Composer. Source: Avid Technology Inc., 2015. Prime Time is defined as between the hours of 8 p.m. and 11 p.m., commercial OTA National Networks Only (No PBS or Cable or Super Stations), excluding Live Sports. Note that on the music side Avid is also releasing a free version of their audio prouctiin software Pro Tools: http://connect.avid.com/ProToolsFirst-Register.html
-
As more and more collaborative teams hit the internet to bring their projects to life small and large services are popping up to address that need. In the past I've mentioned a few and several of those have since had significant upgrades. Shotgun (recently purchased by Autodesk) is one that gets the majority of press because they got a head start on their competition and have invested deeply in the features needed to bring projects through production. Frame.io is another of these services. Will it work well for your next project? Answer: It depends. On the low end (the space which most independent creators occupy) where a team of two or three work on a project services such as Frame.io may be well worth investigating. Frame.io's starting tier is free for 5 or fewer collaborators (although note this is not the same as 5 team members). http://support.frame.io/article/13-how-much-does-frame-io-cost There are a few getting started videos: http://support.frame.io/category/5-getting-started-videos At this time the Project Management/Approval part of the service appears to be limited to a simple toggle of a 'Completed' tab in response to comments posted by collaborators but this may be sufficient in many cases. Project/Media Management has improved significantly from the days of 'Tin Woodman of Oz' and DotProject**. A few other services that have been vying for attention that have been covered in the forum before include Shotgun, Sony Media Cloud Services, RGBNotes, and Tactic. All have their various pros and cons and associated price points. Related applications/services I haven't looked into: CineSync **While it started off with excellent potential DotProject seemed to have plateaued and hasn't been updated since 2013.
-
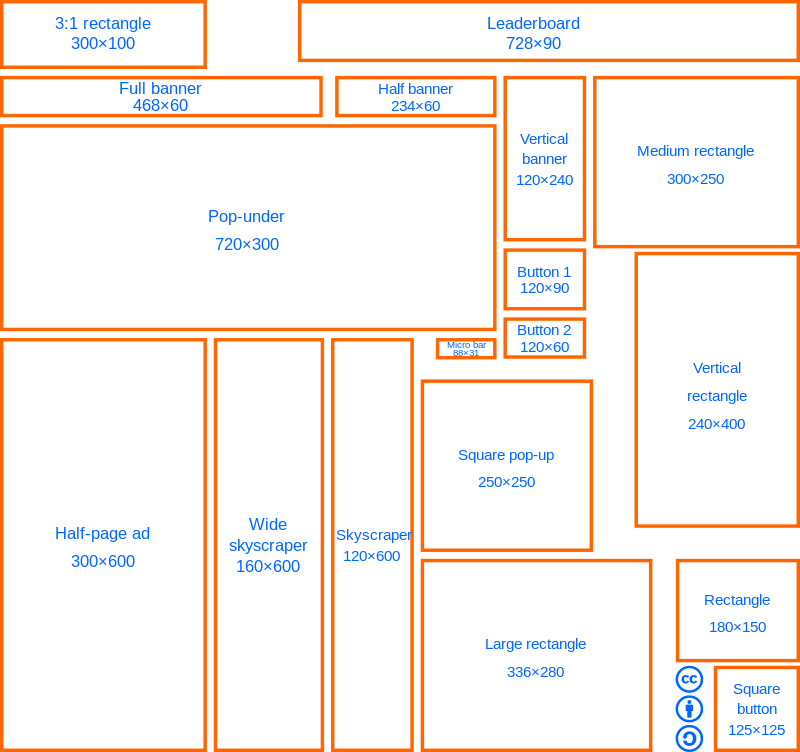
You would ask the tough questions. In order to preserve sanity and keep folks graphics looking as they intend them to be having a standard is an excellent idea. At present there isn't an optimal size nor optimal dimensions but I've attached what might be considered standard sizes for banners so that the banners might be repurposed for usage outside the A:M Forum. As there isn't a set standard at present, you (or anyone for that matter) is in a position to set the standard. And if what is submitted doesn't fit it can be scale appropriately. Barring better information I will propose the following: 1. Full Banner (486x60) This is very small and not ideal for detail. It may be best for animated graphics (gif animation) I understand this to be the standard banner size for the internet. The downside, the numbers are not easy to remember 2. Double Full Banner (962x120) This is non standard size but similar to Full Banner. Will work well for still images with greater detail. This size is not optimal for animation. Also not easy to remember 3. Basic Banner (1000x150) Easy math. Any resizing will be done via html to put it into proper dimension. 4. Small Banner (500x75) Smaller version of basic banner. Also non standard. I've attached a sheet containing the standard web banner sizes as approved by Interactive_Advertising_Bureau (IAB) not so much for this forum but for those who might find themselves creating banners commercially. When working for a client the standard sizes will be good to know. Viewing for mobile shouldn't be an issue because the mobile theme appears to remove all the graphics.in the headers of forum by default. In the olden days of limited memory the small banners made more sense. With modern memory higher quality with good performance can be achieved. I am open to other options! Edit: I'll have to check to see what size the forum automatically resizes image thumbnails to. This won't effect the original image but I've been known to link to thumbnails. A 1000x150 banner appears to get resized to 600 x 90 Pixels (6.67).
-
Alan Becker has posted a series of videos covering the 12 Principles of Animation (according to Frank Thomas and Ollie Johnston). The imagery is simplistic and actually enhances the lessons. (For those familiar with the principles make sure you get past the first few videos as they get better as they go) 1. (Squash and Stretch) 2. (Anticipation) 3. (Staging) 4. (Straight Ahead and Pose to Pose) 5. (Follow Through and Overlapping Action) 6. (Slow In and Slow Out) 7. (Arcs) 8. (Secondary Action) 9. (Timing) 10. (Exaggeration) 11. (Solid Drawing) 12. (Appeal) Well worth a look! He plans to continue with videos covering walk cycles etc.
-
I should have said... I'm always looking for creative content (especially customized to the A:M Forum) to add to these banners. For those interested in creating really short (and small) animation these banners are a great way to exercise those skills and feel the thrill of success. Avoid the failed project syndrome today with new and improved banner ads; 'You don't have to create the next Star Wars... just create a banner.'
-
I had to do this per Steffen's instructions in the changelog for release of v18k. Although I don't recall every changing the default keyboard acceleration. Because I tend to be a bit wary of deleting installed program files directly I usually rename the file, see if the new one works, and then delete the old file if all is well.
-
Nicely exploded John,
-
Thanks. A:M ain't no text editor. (and a special thanks to the creator of a certain doll appropriated to create the witch!) I should add that while occasionally I'll add some post effects or text with another program I try to keep all forum banners created in A:M exclusively. In this case all content (including all text) was created in A:M. The exceptions: - I decided to test/perfect a workflow of rendering every other frame in A:M and then use Fusion to automatically duplicate the missing frames. Rendering Step 2 in A:M (or other skipped framerate) significantly cuts down rendertime in A:M and fits in more with my classical animation sensibilities (I get more of a sense of animating on 1s and 2s for working with slow/fast sequences). - I used (and often use) Camtasia to render the finished video out to gif format (I haven't found another program I like as well for this conversion to gif although I have tested a command line converter to automatically convert to gif upon rendering from A:M... nothing to report there). I'm not using the video capture from Camtasia as the content is already there as a video rendered out by A:M. If these were feature requests they might be 1) Ability to render to gif animation 2) Ability to duplicate frames upon ingest of image sequence with missing frames. These are two parts of the process I can't currently complete with A:M. As these other two programs have the capability (and one is free) that makes short work of creating the banners.
-
Hehe. Like it could be kept secret. He's much taller than I remember him.
-
NIce detail! And (as always) very impressive modeling! I note that even the electric outlet is in the (proper) upside down smiley face orientation. (I've always wondered if designers didn't do that more to dissuade children from being too friendly with those guys)
-
I note that in v18L (and I checked this before on v18K when it was released) that the Number 9 (on numberpad) toggleds between Orthogonal and Perspective *only after* the view has been altered from the default camera view. In other words if you click in the Chor window and turn out of the camera view the Number 9 keystroke will work.