-
Posts
21,597 -
Joined
-
Last visited
-
Days Won
110
Content Type
Profiles
Forums
Events
Everything posted by Rodney
-
Martin is right of course. Its important that you know the basics first. Make every attempt to work through TaoA:M and you'll find it well worth the effort. Next thing you know you'll be answering other people's questions as well as your own.
-
I've used AI version 7 pretty exclusively since the AI Wizard came out. As its worked well for me I've never really attempted to use AI version 8. So... Don't forget...
-
Too small! Boo! I want to see more. Even John Lasseter had to start somewhere. Might as well be here with a Lion at the Door for you. I'm not sure it applies to you here but don't forget to turn off the Balance/Balance rigid constraints. We have some Exercise 6 gurus these days and if you post in the Exercise 6 topic they'll help you get through those rough spots.
-
It's great to see you in action again.
-
You did much better than me the first time I accidentally responded to a really old post. I think mine was a response to a question like: "Why doesn't this work?" My response was something like: "DUDE! That's been fixed for years! Where have you been?" ...and it had indeed been fixed for years.
-
Nice Rusty! I'm so use to seeing you with your sunglasses (from your avatar) that I almost didn't recognize you. Whats your daughter think of being recreated in 3D?
-
Own the CD.. read that part 'o the post... but thanks for the info anyway. Added: I highly recommend any and all of Anzovin's training CDs.
-
...and here I thought you were entering the 'Lost Worlds' Challenge. Looks good from here. I think you should enter the challenge and keep plussing your valley up! I can only imagine the adventures that might take place in that valley. You'd have to tell the tales.
-
Bill, I'm just now taking the time to look at your self portrait and I've gotta say that I'm impressed. I keep looking at your splineage... and getting lost in it. It's a bit like I'm saying to myself... "Self... now why didn't you think of that"? In particular I'm liking the subtle placement of hooks and curvature that hints at forms under the skin. The brow for instance... all of it really... and of course that ear. Looking forward to the eventual decaling stage!
-
Hey Phatso! (We've just got to get you another name Sir) Your project does indeed sound exciting and the educational side of it is definitely good stuff. I still remember my visit as a kid to the Electric Company. They had rooms set up where we could connect our own lights and switches. Boy was I relieved when my light switched on. Some poor kids probably still have scars from that defeat. Seriously though... I remember the folks that were there seemed genuinely interested in seeing us succeed at turning that light on. Its guys and gals like that that give teaching a very good name. I haven't visited your site yet... a bit busy at the moment... but I will when I can. Start up a WIP in the forum and you are bound to get some great feedback. ...and by all means complete TaoA:M too. You're never too old for TaoA:M. Note to the kids: Yes we had 'lecticity back when I was a kid.
-
Chris, I think you stumbled upon on old topic... but thanks for keeping the working Knight in circulation. Links to the working Knight and Keekat should be in the TaoA:M topics too. I haven't heard the problem reported for v14. Much appreciated.
-
Wow Marcos... your work just keeps on getting better. Nothing to critique here. I'm looking forward to seeing it in a live scene. Beautiful.
-
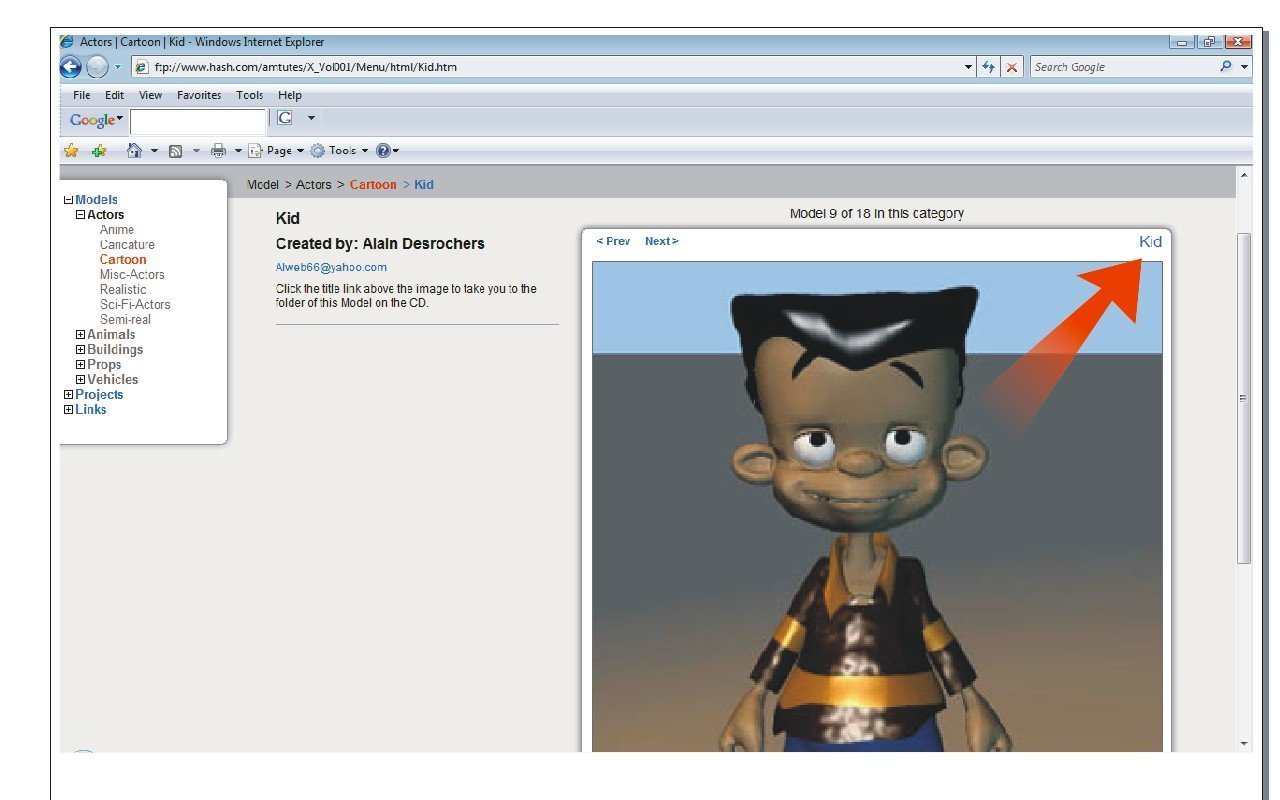
If you go to the models that I linked above you'll be able to download the files and open them with Animation:Master by clicking on the name of the model. See the attached image for the location. I've added the Kid.zip file to this post so you can just click and download it from here. Since you already have the DVD perhaps an easier way would be to copy the files from the CD or DVD to a folder on your computer. Once on your computer, open the zipped/compressed files in a folder (they'll have names like Coolmodel.zip, Othermodel.zip) Then use Animation:Master to open the Project files that were open by using the menu (File Open). You'll find models, projects, materials, actions and more to play with. Kid.zip
-
People do indeed share models here. What kind of model are you looking for? Assuming you've recently purchased A:M there are more than a few out there. There are many on your Extra DVD too. Here's a fine example that scratches the surface: ftp://www.hash.com/amtutes/X_Vol001/Menu/index.htm
-

Texturing Common Assault Marine By Dark_Jedi
Rodney replied to LeeAnderson's topic in Work In Progress / Sweatbox
Less to animate I'd say and a very economical decision. Looking great either way! -
Once you create it in the Chor you can export as a Model. Sweeper works similarly in the modeling window. Just select a spline on your surface as the path.
-
Drop me a project file and I'll post you some settings. Help me help you.
-
He asked for render settings and solutions Niels. I'd say these same high frequency image problems might apply to your jitters too. Hash Inc doesn't have all our solutions. Some we have to discover on our own. Most of them we already have at our disposal. Just gotta implement.
-
Its hard to say without reference or a project file. It sounds like your material is high frequency and generating artifacts. One way to defeat high frequency materials and cut render time is to convert your materials to decals. In some cases (problematic camera angles) you may need to explore more than that. To test it however and isolate it to your Darktee material try substituting a simpler, lower frequency, material. Adding one color back in at at time for best feedback.
-
There are several ways to get this done depending on the time you have to devote and your interest. The easiest way to change out a model is to redirect the shortcut from one model to another in the Project Workspace. Just make sure your other model is loaded and swap them out. (The bone being in the wrong place might mess you up) If this isn't what you are after here are a few more options: Probably the quickest method would be to place the models at the same location and just Activate/Deactivate them at the appropriate time. If you are looking at more of a transitional effect, as opposed to just cutting from one to another, you could just increase the transparency to fade one in and the other out. My favorite method of the moment would be to do it all in post (but all still right there in A:M). This is the most flexible way and you can do such things as morphing, scene creation, reuse and retiming of animation... really incredible stuff. Assuming you are just looking for the final solution in rendering a walk cycle I'd suggest rendering out and animating in post. I hope to post a tutorial soon on the image animating methodology.
-
Yes, I could. But *will I?* That is the question. ...and the answer is: "Yes". You are added.
-
What have you named your Groups in the Project Workspace?
-
While we are waiting for Elliot to make his choice I'd like to remind everyone that there is still one raffle left to go. If you haven't signed up... please do! EVERYONE who is an owner of the 2007 subscription of A:M (Thats the CD with Oz characters on it) is welcome to join in the raffle. Just respond to this topic to confirm and you are in. Here's where we stand at the moment. Rob Wilkens (the first raffle winner) has selected as his prize the 2005 SIGGRAPH DVD from Hash Inc. Elliot Clements (did I get that last name right?) is still trying to decide his prize... His choices are: - Take home a copy of A:M Paint/3D Painter - Give A:M Paint to the 3rd Raffle winner and go for that 3rd raffle prize (note: that prize remains unannounced at this time) - Opt out of the raffle with a SIGGRAPH video of his choice (this would leave the 3rd raffle winner a choice between prizes) The third raffle winner (or Elliot should he so decide) will get the third prize. What I'm trying to say is... If you haven't yet entered the raffle... now is the time!
-
While always a very remote possibility what I encourage people to be ready for is success. If in the process of creating a test run or short episode you hit upon success... what then? Success can easily take a difficult project and make it even more incredibly difficult. Thats the nature of success. If you set realistic goals and work toward them steadily but keep your eyes on the ability to expand your operations you could do quite well. It sounds to me given your situation that you might want to contract out a lot of work. Perhaps modeling and rigging and maybe even some of the animation. Most people haven't yet realized it but A:M now has some pretty amazing image editing capabilities. Once you have the Project files in hand you can do some amazing things. If you plan carefully you could be creating episodes for years with only minor additions. Design and produce a very simple project first then plan to expand from there. With each new success lean a little farther toward the goal. Consider emersing yourselve in projects like TWO to learn the process thoroughly. Get involved with the people you'll be collaborating with in the future. Learn the tools you'll need to use. Consider what happens when those most critical to your project leave for other personal projects? What happens when they succeed and reach their goals? Where does success take you and your team in 5 years? in 10? in 15? Can you chart achievable milestones along that way? Can you deal with both failures and successes as you go? All the more reason to keep things simple in the beginning. Think big! But keep it real.
-
*gulp* Well... at least Thom is getting a break. Thats pretty good John... nice animation there too. I thought you said you couldn't animate? John you should investigate animated patch images now that they are have more controls added to them. I fear what you might come up with but then we'd know.


