Rodney
-
Posts
21,627 -
Joined
-
Last visited
-
Days Won
113
Content Type
Profiles
Forums
Events
Everything posted by Rodney
-
I want to talk about one of aspect of serialization that we want to watch closely. I'd call it 'Bob Denver versus Gilligan' if I ever researched enough info to make a go at it. Although serialization is everywhere around us it is still very much underappreciated even in this day and age. Back in the early days of television however they were still trying to figure out what worked or didn't work. Gilligan's island was one of everyone's favorite serial shows long before TVs had remotes. It was quite literally the 'Lost' of the first TV generation. What Bob Denver and crew had no way of knowing was just how popular the show would become. Looking back on the episodes today can be pretty painful at times but when we were living it... we were hooked. We were hooked by many things. But mostly by our own imaginations. Who could have known how valuable those serial shows were going to be in syndicated reruns or once collected on video and DVD. Who knew that the internet was arriving soon? Bob certainly didn't know.
-
One interesting digression/extension from the cliffhanger can be seen in the area of previews. I need to research this area to escavate more history. Shows like Barnaby Jones and Kojak and a whole host of other detectives series used the cliffhanger to good effect. The mystery was solved at the end of every show. Ah... the feeling of satisfaction you got with every resolution. After the resolution of that days mystery/cliffhanger the audience was then treated to a hint at the cliffhanger for the next show. Who couldn't begin to guess at how the mystery would unfold? In this day and age, showing previews with scenes carefully calculated to draw the audience back has become the norm.
-
Exactly. Shows on television perhaps more than other media are structured with just enough change to keep the audience interested from show to show. Of course its been stanard fare for as long as TV has been around to set up the ultimate cliffhanger to make sure the audience comes back from season to season. (For those who experienced it live... think Dallas's 'Who killed JR' season ending episode here) There is also the realities of production that factor into it. Set locations. Casting. Character development. The use of serialization in today's media has grown considerably sophisticated.
-
During the late 19th and early 20th centuries serialization of storytelling easily found inroads into the new realms of radio and pulp magazines. The visual icononography of serialized comic strips captivated readers in ways that defied imagination. Readers could travel with their heroes into the worlds of fantasy and adventure and it was as real as what they could see with their own eyes on paper. The improvements in color and resolution in print and maturing of photography helped convince them. Publishers and artists discovered readers were more than willing to fill the gaps with their vivid imaginations. Eventually economic concerns would push many pulp and newspaper's comic strips into collections known as comic books. The popular heroes based on myth and legend were easily transitioned into the facinating new visual realms of cinema and television. Audiences traveled to strange and exciting places in the company of familiar characters. Characters who audiences most identified with made their way into the hearts and minds of wide eyed audiences and were recieved enthusiastically. Even before sound found its way to film, it was the serial stories that most held our attention. Serial Films Serial films were specifically designed to capture and keep the viewing audiences' attention. For instance, one of the hallmarks of a serial film used to keep audiences returning week after week; the cliffhanger. Who could resist returning to see if the hero could escape and live to fight another day. Of note in this paticular article is the line the author draws between serial films, series and sequels.
-
Who is the 3D computer animation equivalent Dickens, Edgar Rice Burroughs, or Steven King of our age? It seems those with serial staying power may be able to win that title for a day. Serialization has been a particularly capapable benefactor to creators of literature, film, comics, cartoons, and animation and other media over the past two centuries. No time to be idle: the serial novel and popular imagination, by Shawn Crawford (1998), is an article I propose may give a little insight into how modern day storytellers can control the passage of time and distribute animation through the internet to reach their intended audience. Its a historical look back to a future that is unfolding in this day and age. This article matter of factly states of pre-industrial age authors, "Everyone published serially', even those that hated it. As a storyteller serialization may be the most effective way for you to convey what you want to say. If you've got something to say in 3D animation serialization provides an effective means to say it. For additional thoughts on literary serialization see the wikipedia write up on serialized literature. The historical example used is 'One Thousand and One Nights' (Arabian Nights) where the heroine Sheherizade tells a new tale to the King every night in order to keep from being executed the next day. Is this not unlike the deadlines of our day?
-
That your film captures the language and times of these people of Slovenia as powerfully as it does alone would make it great. This would be just as true if 'Chicory and Coffee' never left the borders of Slovenia. But having escaped from that small region we all can share in part what it means to be Solvenian. Isn't it wonderful how language, sound and imagery can all come together to capture such things.
-
Hang in there David. Just drop us a note when you can. If you don't have a lot of time maybe you can just post a random pic of Bertram. We have yet to see him from every angle.
-
Stunningly beautiful.
-
Most definitely!
-
Chris, Glad to see you got it all worked out. I'm going to attempt to close a loop here: This is a misunderstanding of how A:M composites rotoscopes. My explanation won't be exacting but I'll stab a little closer at the heart of it. By selecting 'Include in Image' for the Rotoscope you are telling A:M to add the image into all the images channels (RGB,RGBA, whatever) with the Alpha Channel used as a transparency for the image that is being composited. The Alpha Channel is not rendered but rather is a mask that is used to determine what will be rendered. On its face the statement, "rotoscopes render in the alpha channel" is incorrect. Using the option doesn't render into the alpha channel. It just tells A:M to use it. I think it'd be correct to say, 'A:M does not render the alpha channel'. But it will use it to determine what to render if you opt to use it. Clear as mud? Hope that makes sense. I'd be glad to have the experts weigh in.
-
We could tell from the smoothness of your mesh that you had an optimized spline layout. Your wireframe confirms that! Outstanding modeling. He reminds me a lot of Barry Zundel's work. Do I detect an influence?
-
You are just full of surprises. Splendid. I agree. He looks... and moves... great!
-
Just checked out your modeling skilz. Very nice economy of spline.

-
Thanks Robert! Canna resist... Isyous gone give free geeta lessons wid dis?
-
The terminology differences has got us speaking slightly different languages but lets stick with this and we'll get it straight. If you are getting pure black renders this is most likely an indication that your Rotoscopes aren't set to render correctly. Images assigned to Rotoscopes (and pretty much everywhere in A:M) must be set to render into the Alpha Channel. If not they'll render invisible. With Quicktime this is more likely to render the background as black. You can test this out by rendering to another format. But... But... But... I'm not on a Mac but you shouldn't have to rerender those sequences. Once you have the sequence in A:M (which at this point we don't... we'll get to that) you should be able to Command Click (Right Click on a PC) and Save As Animation. JohnL3D has a lovely video tutorials that runs through this process (on a PC). I'm tempted to get a Mac just so I can troubleshoot these issues. Almost did last month. There is difference between Right Clicking and Command Clicking on your Mac is there?
-
Nicely done. Those are some great characters. I like the lighting of the set too. Especially how the buildings stand out from the trees. Its very easy to read this scene. I see a camera continuity problem here. The human eye can only focus on one thing at a time. The voices kept the continuity going for me but my eye lost its focus. It took me a little while to understand what I was seeing. As the sword is passed from character to character the camera moves 180 degrees. The brain tries to make the appropriate adjustment but can't for a number of reasons. Three characters; one on the left, one on the right and one in the middle. The middle one gets hidden by left one crossing over in front of him (that good as it keeps the focus on the two passing the sword) The middle one seems to drop into the shadows and when he reemerges he's a different character. The reason is that you've crossed the 180 degree line and the characters have switch places. So the middle character is a different character but the brain can't effectively process the change. Its still expecting to see the characters in their original order. There are several ways to address this issue. 1 - Flip the images in those shots so the characters stay in their assigned places. 2 - Track the camera around them as they come together and meet. I hope this makes sense. There are several discussions on the 180 degree rule here in the forum and many out there on the internet. Note to self: I need to learn these characters names. Do you have any character sheets?
-
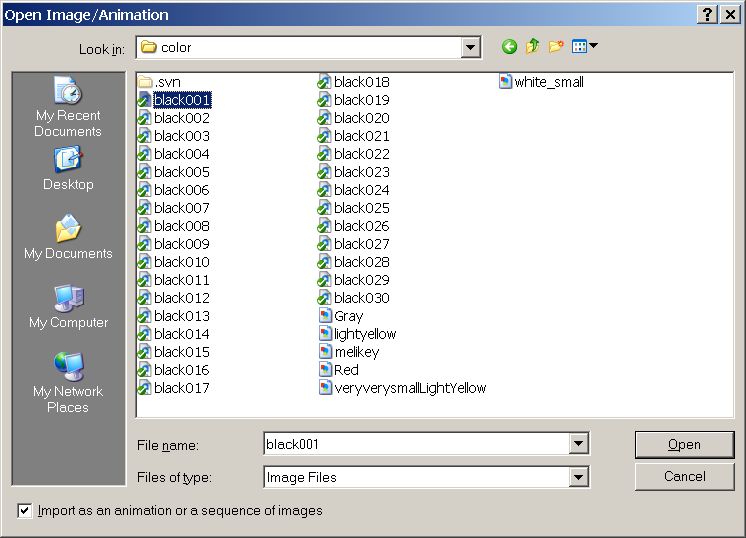
It sounds like you are after two different things. You start out by asking for a sequence of image as a movie. But you end with a request for all 300 images as one single image. For importing a movie you only need to select the first image in the sequence and make sure they are in sequence. Example: image0001.png image0002.png image0003.png image0004.png ... image0300.png A sequence like this will not come into A:M as movie for a number of reasons: image 1.pgn image02.pgn image3.bmp The best way to import your sequence is via the Project Workspace. Right Click on the Image container Select 'Import Animation or Image Sequence' Make sure the checkbox marked 'Import as an animation or sequence of images' is checked Select the first image of your sequence It looks to me like you aren't after a sequence of images but rather 300 images all showing up in one image? One image consisting of 300 layered images? Perhaps I'm just reading that part wrong.
-
Its not hard to separate splines at all. You just need to be introduced to the K, Y and Delete keys. K will sever the spline you have selected. Y will insert a new CP in the middle of the selected spline. The Delete key will delete the selected spline (but usually leave the spline connected continuously to the next spline) Apologies for the unofficial terminology here.
-
Stop doing those things! Seriously though. I'm not trying to make light of your frustration. But... Can you be just a little bit more specific?
-
Ain't no way I'm gonna stay away from this special topic. This project is off to a great start. I love the characters. They look hilariously fun already.
-
You may have good success opening a new model and copy/pasting your current model into that new model. This should automatically renumber the CPs and remove all repetition.
-
The splines don't appear to be in all the right places but you sure do make some very cool and expressive characters. Master those splines and you'll be unbeatable. I think its awesome that you are diving into a special topic of your own here. This'll be great!
-
Very nice! You know we will ask.... Wireframe please!
-
Sketching some reference or Googling for images that inspire you will help a lot. Then you can either use the reference as a rotoscope or general guide to build the structures. Keep it simple though. We tend to go in and just start creating stuff. Without a clear idea of what we are after we get lost.