Rodney
-
Posts
21,633 -
Joined
-
Last visited
-
Days Won
114
Content Type
Profiles
Forums
Events
Everything posted by Rodney
-
Thanks! I've taken a brief look so far and I like what you've done with him. Too much fun.
-
Nice! For a first animation... simply awesome! You've got some really smooth motion in there. Is any of that motion capture? Yes, I'd love to get a closer look at your model. From what I can see it's very cool. More than getting access to the model though I'd love to see more animated action with these guys from you! You said 'Lemme know what you think so here goes. I'm sure you already know this... A little more time on the texturing and lighting would really do wonders for this scenario. It wouldn't have to be too crazy an adjustment to take it where it needs to go. My suggestion would be to avoid colors that are 100% pure. The blue background is a good example of where a little variation in the color would work well for you. Whether that was my first or that was my 50th I'd be really happy with that if I were you. More please!
-
Have yourself a wonderful day!

-
When your final render turns out black this is usually an indication that you've got your Alpha Channel setting on. (Its not black... its transparent... but to the eye they look the same) There are two ways to attack this: 1) Turn the Alpha Channel setting to Off You do this on the Render Panel. Look for it at the bottom. This is the best way to do it if you don't need the Alpha Channel/transparency in your images at all. 2) Go into your Rotoscope Properties and set the Image to display in the Alpha Channel. Then you can render with the Alpha Channel on and the image will appear in the final render. If the setting isn't on A:M things you just wanted to use the Roto as reference and not have it render at all. Note: There is another setting there in the Rotoscope Properties; 'On Top'. Don't set the Roto image to be 'On Top' unless you want it render over the top of everything. Where you would want to use the Alpha Channel would be if you wanted to render the CG object separately and then composite it over the Live Action. This can be a useful way of organizing a project if you've got a lot of individual images/layers. The quickest way is to turn the Alpha Channel setting off.
-
 Impressive tests. I was going to point out my favorite but that seems to change depending on which image I'm looking at.
 -
I haven't seen anyone banned for such a post so I think you may be exaggerating just a little? (very few people have ever been banned from the forum) The title of the topic 'alright.... dood' should clue everyone in that they aren't dealing with someone very mature. So... note to self, titles are a clue. Looking beyond all of this there is an opportunity here for everyone to learn. Lesson 1: Don't blame the program for user error As this is the Newbies forum its okay to cut the kids a little slack. This may be the only way they can get past themselves and learn. If someone comes off as overbearing and pretensious or down right rude... they won't get much help anywhere until they learn to be a little more mature. There is a very good chance a short leash will be taken advantage of but then... the delete key is always handy too. Edit: Forum members added some useful information for those who want to use Wav files in A:M so thats a good reason to keep the topic too.
-
I think I have an idea of what you are after but can you point us to an image of what it might look like?
-
Hehe. Cute! If you could adust the sides of his face by pulling back the splines just a little his eyes would be more expressive from the side and angled views.
-
I believe you are looking for the Ensharpen codec but that's not usually for .AVI. As I understand it all of the exercises (and the codec) are for quicktime. The Windows version of the ensharpen codec is the last link here: http://www.techsmith.com/download/codecs.asp Rather than mess with the (possibly corrupted) AVI I'll suggest downloading the exercise from here: http://www.hash.com/2007web/vm.htm (Right Click on the exercise's link on the page and choose Save As) Note: You can download all four parts of the exercise in one 94MB zipfile here.
-
Nice one Vern!
-
Looking good!
-
I'd say its common enough that there should be some information on it on the game forums. You keep moving the target but I think we are seeing your end goal a little clearer now. Keep in mind that the solution won't always be the same for every encounter. I do think an animated image applied to a grid could account for these variations to some extent. Still imagery doesn't show the effect animated so that piece of the puzzle still hasn't been filled in. While these are similar effects I don't think they all use the same methodologies (short of a distortable path grid of some sort). As you are looking for a one-size-fits-all solution that may take some considerable R&D to reach the goal. Is your project a swishing sword, spaceship or object advancing through the frosty morn? Is it a still image or animation? Is it for real time or youtube? The desired end-state is important. Out of those thousand moves how many use the same 'trick'? Are there one hundred different setups? Is there only one. This is important. Why? Because this most likely how many setups you'll have to recreate to match the effect. (I think Holmes was suggesting the half circle only as a test. Keeping the tests simple helps you achieve the basic effect. Then you can move to the next level of complexity.)
-
For a variety of reasons we must save our Project before we can cosolidate. In short, saving ensures the Project knows where to find every resource associated. So, save first. Then the option to Consolidate should be available to you. (Don't try to use the same name as your saved Project for your consolidation though as that won't work. This may seem silly but it keeps us from overwriting files when we don't want to)
-
Attached is a failed attempt at the sword effect. I learned a lot by trying though. It would be useful to know how the game creators designed the effect. I suspect what they have have done is create a circular animation which was applied to a single image. If you can imagine the sword being like the large hand of a clock the movement of the sword would advance the images in the animation leaving a trail effect as it rotates. The image follows the sword wherever it goes regardless of whether its transparent, animated or whatnot. For ease of implementation I'd guess the animation is grayscale (black and white) with the ambience color and intensity adjusted as necessary. In my test I modeled a sickle-like object and rotated it in the Chor. Transparency is by decal and surface properties. The gaff at the end reveals my attempt to use cloth to get a little free flow movement too. Ah well... back to the drawing board. swordflashzz0.mov
-
Nice detail Gene!
-
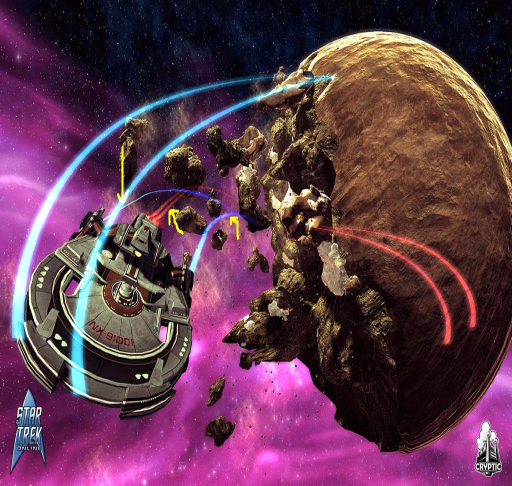
Not to preempt John but this is ideal FX for splines. Draw your path... extrude... and adjust to taste. Add glow and ambience. Adjust settings in the model and chor as necessary. I've added two instances of the model over the top of your image as a camera rotoscope showing the effect. In the second model (the red trails on the right) I've changed the blue surface properties of the model to red. The model surface has 90% transparency to let the underlying image show through. For an animated effect, particles may be the easier approach.
-
Nice one Mark! Sorry to hear you've been under the weather. Take notes of how miserable you feel so you can apply that to a character later. Seriously, take time to take care of yourself! Now that you are sick is a good time to think of how important that is. Regardinging your cover: I imagine you'll need to add the title of Volume 2 somewhere in there. My first thought would be to shrink down the Logo a bit but I really like the layout as is. BTW - That water looks pretty real! Edit: As I took another look I saw the black spot on Flemm's chest and was trying to figure out what it was... I didn't realise it was his eye patch! Perhaps it could be flipping up and around instead of down? (Not sure)
-
It's great to see your site live again Will! Pixelplucker, Don't miss the link Will posted. His tutorials are there: http://zandoria.wordpress.com/tutorials/uv-tutorial/
-
Something to add to the trash can besides the fire (sprite emitter) would be a light or two used to indicate the intensity/color of the fire. I don't think the particules are going to be able to do the job alone. Depending on the scene (which I assume is at night) this will greatly aid in creating the right atmosphere and project flicker effect shadows.
-
There are a lot of ways to reduce render times. Which do you want to choose? Note the lack of options there to choose from? This is very similar to your question too. There isn't enough information from which to pick and choose. Its easy to reduce but not if we don't have an idea of your goals. The easy answer to 'how can I reduce' is 'cut stuff out'. In loading your project one thing was very obvious as I clicked through the missing files (and there were many): You've got a lot of materials in this project. The first thing I'd do is limit the number of materials you use. Now I hear you already say, "But I need those materials!" Therein lies your answer to rendering improvement. One technique to render materials faster is to convert them to images. You can do this by creating a single patch, applying that material to the patch and rendering out an image. Now the question becomes, 'Do you want to spend your time converting the material or waiting for the material to render?' There is an option there and the answer will vary on how you'll need to use the image. If you plan to use that image extensively consider converting the material. If you need the infinite resoluation of the material (i.e. the camera will be zooming out/in) consider using the original material. Which materials do you need versus which will work better as images? Can you more effectively decal an object rather than apply a complex material? This represents one way out of many that you can reduce the time it takes to render. Another way would be to convert your JPG images (you have several) to another format. Knowing more about the images/compression/quality of the formats will help make that decision. In the end there is a lot to consider but scheduling your renders is an important consideration as it may eliminate your need to reduce the render times at all (thereby saving you time in the setup and concern with it all). Consider setting up your renders for when you go to bed. Work at your scene during the day... at night render. As you wake up in the morning you'll be able to assess and adapt your projects to futher optimize and improve your images.
-
Finally getting around to viewing some of these 'Pass the Ball' animations. Here's my verdict on this one: WONDERFUL!!!
-
Here's something you can do with a process that is giving you problems: Make your change Save your Model/Project Make another change If something is interfering in the process the act of saving the file locks all the changes up to that point down. Then its easy for a program to make additional changes as one change doesn't have to compete with another. If you've gone a long time without saving anything you may have stored up a lot of unsaved changes. In other words; Save Often.
-
Jeba, Here's where you get to put those exercises together and really make them work for you! Remember that Exercise where you put the Rabbit on the path? (Exercise 5: Take a Walk) If you put the Particle Emitter (that you created in Exercise 16: Smoke, Wind and Fire) on that path it will emit those particle sprites along the path. To have the particles launch a rocket the same basic ideas are used. You can make part of the rocket an emitter and then drop the rocket on a path. Or... you could have both the rocket and the particle sprite emitter travel down (or up in this case) the path. You have the tutorials (from the manual) and you have the knowledge. Now you've just got to put them together. Ask you questions and post your tests here. Note also that in the last topic you posted to there is an example of a rocket with sprite particles attached. I believe there was even a project file for it. P.S. Are you the Jeba? If you are you've got some pretty impressive skills.
-
Kellie, I'm sorry. I don't fully understand the question. If taken literally I'd say the answer to your question is 'render the fire sprite action out and use the resulting image in your material'. What is it you are trying to do? Can you clarify? The classic fire sprite tutorial is in the manual: Exercise 16, "Smoke, Wind and Fire".
-
Somewhat related... Don't forget that when importing basic 2D Cad images the DXF importer works really well. Similarly, 2D outlines saved in .AI format (Adobe Illustrator) can be imported via the AI Wizard.