-
Posts
21,627 -
Joined
-
Last visited
-
Days Won
113
Content Type
Profiles
Forums
Events
Everything posted by Rodney
-
Now that is just too cool! I think you are on to something here. Edit: My only suggestion would be to tone down the specularity over all so that the entire character doesn't look of plastic. Of course if something is suppose to be plastic... specularize the heck out of it! The words 'matte finish' come to mind but I'm not sure if that's what I mean. Anyway... Press on... press on! Disregard all of this... you are doing great. Scoot on down to the next post for more praise...
-
There is a site out there that has a whole lot of animation made in the early days of computer games. Some of those little animations are especially cool because they use only a few pixels only four (4) frames! (I believe the site in question included a historical look at the game 'Lemmings' because the artist responsible won a bet that he could animate them successfully in those four frames)
-
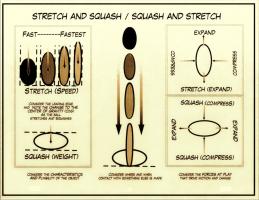
Hope I'm not spending too much time in your topic David... if I am let me know and I'll post this stuff over in the "Drawn to CG" WIP. While considering the Bouncing Ball I was surfing through sites looking for good timing charts when I happened upon a university site with a pretty decent animation curriculum. One little graphic grabbed my attention but I felt it could be expanded on to encompass more animation principles. Every time I thought I was finished with the graph I discovered something else missing... and it still could use a lot of tweaking. I then got distracted for entirely too long adding some uselessly strange weathering effects to the image. Pending feedback, I've settled on this chart as something of an introductory for setting the stage to the whole idea of ball bouncing with the added element of Squash and Stretch. Looking at it now I really am tempted to change each of the arrows so they are pointing outward on both ends but for now let's settle for that indicating the direction of where the object came from or the source of forces causing a change in shape. I'm also a little bothered by the fact that I didn't get all the terminology I wanted into the graph. For instance, there are many words that should be incorporated along with their opposites; expand/contract, compression/extension, push/pull, etc. Of course trying to incorporate too much will just make a mess. Please let me know if it makes sense!
-
We need to find you guys a flash mob to park on that site for a few days. Voted.
-
There is now a forum area for the Technical Reference if anyone feels the need to use it. I plan to post/move technical subjects there that specifically apply to the Tech Ref as they occur. In theory there could be at least one topic for every page of the updated book where the experts all weigh in heavily on each subject for the updated reference. For more specific information and the background behind Robert's Group Project proposal to update the Tech Ref recommend reading his pinned post at the top of the Tech Ref forum: http://www.hash.com/forums/index.php?showforum=19 For a subject such as Fluid that wasn't yet added to A:M when the Tech Ref was last updated a new page/topic can be inserted.
-
This'll seem silly... I just used the green jumping ball emoticon [ ] in another post and a question immediately popped into my head, "Why is this bouncing ball animation so successful?" It's got Clarity. (it conveys the theme of 'excitement', hence it's filename 'yay.gif') It's got Squash (on contact). It's got Stretch (both to and from contact). It's got Eyes (so we recognize it as a sentient Character). It's got Secondary Action, Overlapping Action and Follow Through (in both the Eyes and Hands). It's got Symmetry (which works to augment the character's movement physically and emotionally. Note: Usually our goal is Asymmetry). It makes use of Negative and Positive Space/Changing Shapes (Negative space is further enhanced by the layering of transparency). It's upward Progression works as an Anticipation and conveyor of a sense of propelling Energy It does this all in only eight (8) frames (because they are cycling frames we can easily focus until the message is received without a chance of missing anything). Note: There is not enough time for (effectively) blinking. All of this proof positive that it takes so very little to entertain me.
-
Very impressive. That represents a whole lot of modeling and animation. ...and you made your deadline too! Color me impressed. Congratulations!
-
Thanks Robert. I was questioning my memory on whether the Bounding Box was always empty like that but thought I'd just forgotten how it worked! Seeing your example and now knowing this will be fixed in v17 convinces me I should take full advantage of this feature and use it!
-
It was! I still have some of the resources you shared from this project that for some reason failed to make it onto the Extra DVD. If you are still willing they can be added to the A:M Exchange cue. (Well, at least the smaller assets that aren't huge) That film is something of a cult classic now!
-
I think you've got this one.... GO FOR IT!
-
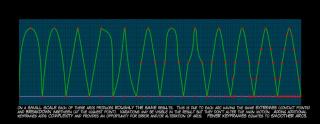
Ouch. I just realized I left off perhaps the most important example in the above arcs... the one where there is no Breakdown but the entire motion is dictated by the Vector(s) of the Arc! To my way of thinking this one represents the essence of Path animation. Update/Correction attached:
-
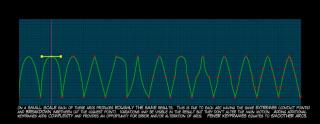
Sounds great to me David. I appreciate your effort to do this as sooner or later every animator runs into the Bouncing Ball. What I did (and still do) is that every time I see an interesting take on the Bouncing Ball exercise on the internet I grab it and save it to my harddrive. If I was more organized I'd have hundreds upon hundreds of examples to share with you. Looking at it from another perspective... every animator has at least one Bouncing Ball exercise in them... those who are apt to teach animation usually will have a collection of fun examples to share with students. To some extent these examples provide the artist's/animator's signature while demonstrating their approach to the Principles of Animation. Of course, the most important aspect of the Bouncing Ball exercises is TO DO them! Something that looks like it will work on paper might not work quite as well as expected in execution. Here's the most important thing regarding the Bouncing Ball exercises: In my experience there is one common problem aspiring animators run into with the Bouncing Ball. They get bogged down in the details of it too early. When it is a lesson that they should be... will be... frequently returning to whether they want to or not. On a completely different note. Something to consider when putting together exercises for CG is the number of keyframes used. Why? So that the exercises/setups are easily readable and editable. See example below: (All this is... for what it is worth)
-
David, After staring at various Bouncing Ball exercises for the past few years I've come to something of a conclusion regarding them. Namely, that in order to get a good result one must start with a good beginning. What I mean by that is that usually it's not enough to tell someone to Bounce a Ball in animation... you'll get as many variations on that Bouncing Ball as there are people bouncing balls at you. It will always help to state up front what kind of ball it is that is supposed to be bouncing. - A bowling ball - A tennis ball - A ping pong ball - An intelligent ball - An angry ball - A ball that thinks he's a rabbit. Etc. etc. Without this motivating factor (implied weight, force, intent or intellect) we are left with pure physics without all the required inputs to be measured (if we fail to give them) and (forgive me here) if that is all that we are bouncing balls for then we might as well use Expressions or Newton Physics and let the computer bounce them for us. This isn't to say bouncing balls isn't fun. It's a heck of a lot of fun and it's always educational. But I don't think subtle movement and reciting physics isn't going to get us to the goal in this (unless you are in fact teaching Physics with this). I never get tired of seeing variations on these bouncing balls (so I'm really enjoying your Project) but the best of the best and the most useful always have a clear purpose behind them. I played with several of your Actions and thought I had fairly good success. Then I played with another (The no squetch distance one) and the darned ball started bouncing against A:M's Action window!: Too much fun this is! Bouncin.mov
-
In the Tech Ref (page 236) there is a little write up on these as follows: Note that these drawing modes are still quite useful especially if/when animating and real time response times seem to slow down. Also, some objects can still be easily animated via Bound mode. For instance, vehicles or aircraft that are constrained to a path. As far as I know A:M will ignore this setting on final rendering and will render full curves regardless of what has been set as Draw mode in the Chor.
-
Jason, Thanks for reminding us of this. It's been so long I'd forgotten. This was used more back in the days when memory was an issue. I tend to equate it with 'Proxy' mode. There are three basic views you can have an Object display as in a Chor: Bound (Only the Bounding Box around the Object will appear) Vector (Curved Splines are straightened and not computed) Curve (Default Mode - Displays the full curvature of an Object) The shortcut keys work for each of these Object viewing modes as follows: B=Bound V=Vector C=Curve Select an Object and toggle through them with B, V and C in the Chor and you'll see them at work. Technically these are 'Draw Modes'. These are similar to but different than using the Page Up/Page Down buttons to adjust a Model's Resolution. (At a guess I'd say the later is more for graphics cards and the former for CPUs?) One of the benefits is/was that you could have a whole bunch of Objects in Bounding Box or Vector mode while still having the primary Object you are working with remaining in Curve Mode. You can see in the attached the effect of these three modes on the display of Keekat in the Chor:
-
That's a pretty slick update Steve. I like it! It's got some snap to it too. For what it is worth, here is a link to the outline of the 'workflow feedback' I was going to suggest: http://www.hash.com/forums/index.php?s=&am...st&p=360816 This was/is my effort to better understand not just an optimal workflow by YOUR workflow. For my part, a goal would be to properly test my workflow and publish it in a video. Then using feedback to refine it more.
-
The following is the general workflow I was going to present for consideration to Steve over in his WIP on 'Pharmaceutical Man'. My goal was to put together a small video illustrating the process.. I'm working on it. In the meantime here is the general outline for everyone's perusal and commentary. The goal of the workflow is to limit the amount of keyframe adjustments while maintaining a set of clean and easily readable keys in the Timeline/Channel Editor. The fewer the better IMO. This workflow is something I am trying to lock down myself and I do occasionally discover new angles to the approach. For instance what works really well for one rig may not work at all for another. A General Outline for Blocking: - Where possible animate Pose to Pose (The specific action will dictate of course but generally Primary and Secondary Actions are animated Poses to Pose while Overlapping Action and Follow Through are animated Straight Forward) - Where possible animate on adjacent sequential frames first (by keyframing all Poses on frames 0, 1, 2 and 3 so that A:M doesn't dictate inbetweens. This is important in the early stage of blocking because A:M doesn't yet know enough about what you are doing to just 'go with the flow') - Spend the majority of time locking down these Key Poses (of all of the Poses one is generally the most important... the Storytelling Pose... the animation will often not read clearly without this Pose and all movements generally flow into and out of this Pose. Remember to design/maintain an especially strong Silhouette for this Pose) - Stretch all the Keyframes out to their full Timing (Timing is usually dictated by the director or the dialog/audio). - Sync the Key Poses with the Key Beats and Timing cues. If you've got an Xsheet filled out... use it and refer to it often! - Snap all of these Keyframes to Frames (Sometimes they get positioned between two frames and this can cause problems) - Peak all of the Keyframes in all the Channels (This builds some snap into the animation automatically for those you don't adjust/smooth) - Determine where current Key Poses miss or do not properly Anticipate the Major Beats of the action and/or audio (adjust and then force a keyframe on each of those) - Consider compressing the Keyframes back down to where there are no Inbetweens and refine these Poses (This places the keyframes back on sequential frames again such as 0,1,2,3,4. Optimally when these keyframes are expanded there are is more than one Keyframe for every four frames of animation) - Turn on Onion Skinning and Refine the Blocking by looking for Arcs, Exaggeration, Line of Action, Weight, Opposing Forces, Straights versus Curves and Curve Reversals (Note: By focusing on the Extremes you are setting these up for success after the Blocking is over) - Look for the amount of change in each Pose from one to the next (If there is a keyframe there generally there will be a major change in Pose) - Expand the keyframes out again and make sure you've saved your progress at this point. You are (essentially) done Blocking at this point. Step away from the computer and take a break. You've earned it. When you return to the animation the fresh perspective will have done you good. The Key to Blocking is to keep things rough/raw yet capture the essence of the scene while conveying it's primary emotion. Where possible name the intended action or emotion. This will help you maintain the shot's focus. Of course all of this is a lot easier to read than execute. I will be most appreciative of any feedback that either confirms this outline or suggests better workflows.
-

trying for a space shot ...did not save oops
Rodney replied to johnl3d's topic in Tinkering Gnome's Workshop
I like them! It may be still imagery but they are both mesmerizing. They draw me in. In a way its not unlike those old 'Lost In Space' episodes where they adventure to a new planet every other show. It's a shame you didn't save those. -
Will Sutton's collection of outtakes from the 2004 film 'Miss Castaway' is now playing at the top of the forum. http://amfilms.hash.com/video/68/Miss-Castaway-effects
-
Nice update Steve. I can see this is going to be a fun character! I've got some notes and I'll try to refine them and add them to a post. Most of my thoughts I need to just put into practice in my own work first before suggesting them here!
-
I didn't realize there were so many styles of this type of bus until I googled for it. And the fans of the bus appear to be just plain crazy for it! Incredible detail on that wheel hub! I hope you copy/pasted most of that! (or would that be C/F/A?) I assume you used your standard methodology and modeled this in a Chor?
-
Jubal1 appears to be on your side... but will he get a crunchtime vote in... Due to the time difference I may be able to place one more vote.
-
Made me want to play Sonic.
-
Marcos, This is just a note to let you know I haven't forgotten your Perpetual Motion Machine. I should be able to get into the project this coming week! Edit: I watched your video tutorial and the one thing that pops into my mind is... How in the heck does someone come up with this stuff!?!!? After the fact I see the simplicity in it but setting it up for the first time... Impressive stuff Marcos!


