-
Posts
21,649 -
Joined
-
Last visited
-
Days Won
119
Content Type
Profiles
Forums
Events
Everything posted by Rodney
-
-
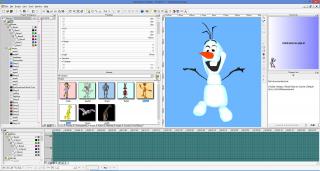
Today's random doodle is of a sunny disposition. I stopped here because I started breaking things... His eye sockets and mouth are cut out via boolean cutters. P.S. The cold always bothers me by the way.
-
Nice tests Dan! Keeping the fun factor high is important. I just want to point folks to methodologies that will keep them from pulling their own real hair out. Particles hair can work and it can work really well but mostly it keeps projects (in any software) from ever being finished. And if particle hair will keep success from happening I'm more than happy to suggest reasonable alternatives to that. If you apply a transparency map to that I'm thinking that will almost BE hair.
-
This is a slippery slope but it's inevitable that comparisons will be made. What we want to avoid is faulty comparisons. The biggest danger with false comparisons (and I am not suggesting detbears was one of these) is that many folks see something pretty elsewhere in the world and immediately think, "Why can't A:M do that?" when the real question is "Why can't *I* do that?" The primary answer to that dilemma is education. What did the folks at Realflow do when they saw a need for realistic water simulation? They pooled their resources and invested in it.
-
I believe folks are missing the point here and we've moved into feature request territory. I was under the impression Robert's request is more about "It can't be done in any software but can A:M do it?". Am I mistaken there Robert? The request for Octane-like rendering is an example of this. If Octane can do then Here in the community we would just have to understand the process to get the data from A:M to Octane to do it. The request in that case would be perhaps better termed, "A fluid transfer method of assets from A:M to Octane". Which is probably a bit outside the scope of doing 'it' in A:M. The only thing that would have to be demonstrated to accomplish this original task would be demonstrate how to export assets out of A:M that can be rendered in Octane This is something easily demonstrated. IOW it can be done. For those that are using other software: Are you ready to demonstrate the process you are currently using to port your assets to the other software? It's not going to be enough to look at something that looks great from a distance and dream of someday doing it. We have an Open Forum. Please feel free to use it. Surely someone has rendered an A:M asset in an external renderer before and can document their workflow.
-
I had a chance to speak with Keith Osborn a few years ago. He was involved in making the new CG version of Warner Bros 'Roadrunner' shorts with Wile E. Coyote. These shorts featured several segments with the stylistic mutliple arms and legs that you are working toward here. He used the multiple model method to create the fast moving appendage effect. In A:M You could basically do the same thing by saving several copies of your model and either deleting or hiding the unnecessary parts of it in the various models. Then place them all in the same location in the Chor and go to work. One thing I recall Keith saying is that the multiple models really slowed down his system which I think wouldn't be quite as much of a problem with A:M due to the lightweight spline tech that we enjoy. Once in the Chor we could even export out a new character that had the multiple appendages... although you'd want to make sure you rename the various duplicate named bones! You can see the multiple model method used on heads, feet, arms, etc. on Keith's website. The shots are at the latter part of his reel and primarily consists of one shot with roadrunner (multiple heads) and coyote (multiple hands).
-
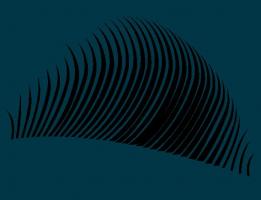
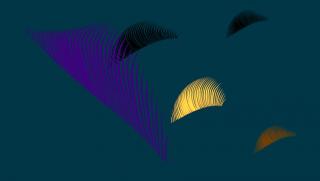
I don't want to steer you in another direction needlessly but I sure do think you could take advantage of A:M's spline tech to create that hair and especially eyelashes. There are two approaches I would consider before particle hair. The first being splined hair and the second a patch image (or decal) based on that splined hair (or alternatively based on a render of particle hair). I've attached a project file hinting at the methodology. The model is pretty straightforward. In color image all eyelashes are the same image. The color of the eyelash is driven by the patch color (in particular the ambiance color and ambiance intensity. The patch images are applied to a patch with dangling splines (the dangling splines are just there to deform and shape the eyelash. Because the image is black and white the white lets the color through while the black cuts the image out when applied to the patch with the Transparency setting. While particle hair is useful in many situations it carries with it an enormous drag on productivity and should be planned for use in final rendering (but what then to do during short term rendering?) Using geometry in place of particle hair until that stage will save many a brain cell and alleviate frustration. Ultimately, if you can achieve the same look or even better with geometry then I recommend it. Then at all instances possible supplement that with particle hair. SinglePatchEyelash.zip
-
Yes, much can (and probably should) be suggested by texture.
-
Heck, I think you could sell that to people if customized with their initials. (The first one with the initials that is) Of course you might run into a few issues with usage of the soundtrack... That's the kind of digital valentine cards that folks would love to send to their sweetheart. It might help if their initials begin with A and M of course otherwise they might scratch their heads a bit: "Okay Armando, I can see where the "A" comes from but last time I checked my name was Sandra... so who is the "M"!?!?! What is really neat about this animation is a catch myself actually trying to see the hands that are manipulating the strings. Am I the only one that is reacting this way?
-

Sports Day (2014 Open Games) February
Rodney replied to Simon Edmondson's topic in Contests/Challenges
Nope, it's not just you. Same problem here. I was able to see it in the one version however. VERY NICE! -
I ran into an interesting problem when scripting Cameras and Lights. In my current approach, I don't see any direct way to script Cameras and Lights because they are not exposed in the same way that Models, Actions, Materials and such are inside A:M (I'll have to investigate this because I'm sure to learn something!) The solution is rather simple (and provides solutions to many other things unrelated to scripting): Create a Model that contains Camera(s) and/or Light(s). (Newbie Tip: Camera's and Lights in a Model are treated as Bones, so after creating them go into Bones mode to modify their position or alternatively adjust those settings in the Project Workspace manually) This leads back to an earlier thought with regard to scripting. Within any given scripting environment it is good to start from something known and then move into the unknown. What this means is that a script would be best optimized if it refers to a known environment. One thing this might suggest is that a common scene would be used for all automated scripting (although the scene could be easily modified (i.e. via scripts). We might think that the default Chor might supply this environment however, consider the issue with Cameras and Lights. In order to use the Dopesheet methodoloy my current approach might have to replace the default Camera and Lights with a (single) Model that replicates (and theoretically enhances) the current default Chor Camera and Lights. This seems an appropriate move because the Model can be easily changed in the Project Workspace (under Choreography) to a different setup by changing the shortcut to point to a different setup/model. This would have the added benefit of allowing a user to remove/replace all the Cameras or Lights in a Scene with one change versus iterating through all assets (equating to saved production time). All officially approved Sets for use with scripting would then simply have to have the minimum elements required by the scripting environment. Please recall to memory as often as possible (ToaA:M page 49) where the paragraph begins: " Reusability is the foundation of Animation:Master." You aren't required to believe this but it will help tremendously in understanding and leveraging A:M's scripting environment.
-
Here's an example script that can be easily interpreted/automated through A:M's Dopesheet: (Scroll down via mouse or scroll bar on the right of post to see remainder of the script) [script] Name=Dope Sheet Test 1 Name=1 Jump StartFrame=1 EndFrame=16 HasTranslated=FALSE ChorStartFrame=1 ChorFrames=16 Name=2 TurnToRight StartFrame=15 EndFrame=1:26.14 ChorStartFrame=15 ChorFrames=1:26 Name=3 TipToe StartFrame=1 EndFrame=2 ChorStartFrame=1 ChorFrames=2 [/script] P.S. Is it not fitting that my signature has the following line in it at this exact moment:
-
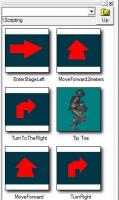
Me too! Here's a view of the script elements used to drive the previous animation. They were each dragged and dropped into A:M while scrolling through the Timeline. Note: Cheezy arrows were also created in A:M. In hindsight I should have used the Font Wiz!
-
Awesome. You continue to amaze Serg!
-
Attached is a rendering of a sequence created without changing anything in the animation*. All movement was created by dragging and dropping commands onto the character on various frames of the Timeline. All script commands where dragged from the Library window into the Choreography. *Minor adjustment to action lengths, repetitions was performed (example: A gap between Moving Forward and Turning Right was created by moving the Turn Right Action slightly to the right in the timeline. This allowed A:M to blend the two actions rather than create an abrupt turn. Repetition of the walk cycle was increased from the default setting to meet the general requirement of 'quickly' walking. Icon's were created for Turn Right, Turn Left (not used) and other movement for easier identification in the script library. These apparently were not saved because they are no longer in the script library. Other script elements such as "Dim Light" were tested and worked but not used in this example. EnterStageLeftMoveForwardTurnToRightTipToeForward.mov
-
Within this generalized script a few things stand out as variables that will need to be defined: Example script: 1. Enter stage left This appears straightforward enough. Assumption: The command "Enter" means to move within the renderable view of the camera. Assumption: The stage is the scene in front of the camera which may or may not extend beyond the view of the camera. Assumption: The direction "left" is to be from the view of the camera. 2. Walk quickly to point "A" The command "Walk" is a general term which needs to be further defined. If not defined it will default to a preassigned sequence of walking. The variable quickly is an attribute that must be user defined. If not defined it will default to a general fuzzy logic value of 66% or more on ease channel (as required). The position of "Point A" must be defined by the user. If not defined the object or character is assumed to be at Point A. 3. Turn toward camera The command "Turn" is assumed to mean rotate with no movement in lateral position, elevation or inclination. It requires an attribute to further specify direction. If not defined a default turn of 360 degrees will be initiated with the character returning to the original position. The attribute "toward" specifies a target which must be user defined. If not defined a default target is supplied. Recommend default target be a immovable Null placed at or neat 0,0,0 axis directly in front of camera in center of viewable screen. In this way the object or character can return to original orientation and location based upon this (non rendering) object. The camera is assumed to be in the scene but a check should be performed to ensure a camera exists. If no target (camera) exists the command is ignored. Enhanced scripting could supply a means whereby objects not in view at the origin are ignored because they cannot be directly seen. 4. Sneak to point "B" The command 'Sneak' is assumed to mean the Preston Blair sneak unless otherwise specified. The command "to" implies a relationship with another object or character. "Point B" is assumed to be a position other than that of the origin (default Point A). If not defined a default may be supplied (example: Nearest object to origin) 5. Wait for next command It is assumed that any object or character is always waiting to execute the next command.
-
Let's break this one down before we move on. Apply a "script" describing the (desired) actions of a character Example script: 1. Enter stage left 2. Walk quickly to point "A" 3. Turn toward camera 4. Sneak to point "B" 5. Wait for next command Desire: Via the application of a script, instruct an actor how, when and where to hit their mark.
-
Disclaimer: The title of this topic may change as the subject matter is refined. This is a spin-off topic from Robert Holmen's 'It can't be done' topic. The target appears to have moved a little but here's a beginning: Paul Harris:
-
She's really starting to shape up. I'd exaggerate the upper line over the eye more to really capture the Disney eye look. By this I mean thicker and black. Over do it and then (if necessary) you can always scale it back. You captured that thickness rather nicely in your anime thread here. That extra thickness is present in almost all Disney characters regardless of gender, age, species, style...
-
I like the offset versions best. And in particular the last one with the legs. Oh yeah... that's the stuff!
-
I believe Robert's point is that there is no place to do that without programming a new plugin/feature. When going into the programming world 'it' (i.e. anything) can be done with the appropriate amount of time and commitment. So, I'd say no to the feasability thing. Coding new functionality for tags and dropdowns is not feasible. Now if you know how to do this with A:M as it is... say on! Edit: Note that technically this can be done via dopesheets but... you've got to set the tags (via creating a pose) and then enter those tags into the dopesheet (via the dropdown menu in the dopesheet). So in that sense not only is it feasible, it can be done and just needs to be demonstrated.
-
Looking very good. That environment is hot! (in more than one way) I can almost feel the heat against the rocks.
-
One of the obstacles of rolling out a scripted animation method is to know which path out of several to investigate. It could be that more than one or a combination of several would work best. Here's the basic approaches to scripting: Plan 1 (Using what works already) This is the Library of actions approach and the most likely scenario to get a working script editor Advantages: Drag and drop scripting workflow. Unless desired, users would not have to type any of the script in. They would select from available options instead. This is likely to be the most successful because it been demonstrated to work already... and works quite well. It does need to be fine tuned, optimized, documented, etc. for use with the majority of resources A:M Users will create. This is a powerful approach and can produce rough animation very quickly and adheres to Martin Hash's philosophy, namely; "Reusability is the foundation of A:M." Downside: Script elements need to be created/defined/declared before they can be used by a script. This is however easily offset by sharing modular elements of the script or restricting script function to lowest level activity (to account for differences in rigs). Challenge Example: If the script were to say "Do the hokey pokey" the term 'Do' is understood as a request to execute an action. The obstacle is the action and subsequent variables. Until created, the script has no way of knowing what 'the hokey pokey' nor the criteria for determining success. Plan 2 (Enhance what works already) This is the dopesheet approach which is the likely approach to script animation within a Model That is to say that if the resource cannot be pose driven then this approach would be ideal. Note: Plan 1 works externally as well as internally and as such can use most elements of Plan 2 The Wizard approach (Extending currently available tools) This involves a longer term goal of mine which would begin with a minor update of the Font and/or AI wizards. Phase 1 would be to create the initial scripting pathway (for font generation from an external textfile) Phase 2 would be to create variables that all positioning and orientation Phase 3 would be to extend the wizard beyond fonts to Models, etc. The issue with this approach (other than it requires a considerable amount of programming) is that it might be better just to create everything in a language like Python, Qt or such in the first place. Other options not considered here (such as using other programs in conjunction with A:M). So Plan 1 and 2 are currently operational but would need to be refined. The Wizard and Other options would most likely need to be programmed.
-
I believe that is the type of task (the unsolvable) that Robert is seeking.
-

Sports Day (2014 Open Games) February
Rodney replied to Simon Edmondson's topic in Contests/Challenges
Nice opening! Very impressive Mark.


