


Caroline
-
Posts
1,248 -
Joined
-
Last visited
Content Type
Profiles
Forums
Events
Posts posted by Caroline
-
-
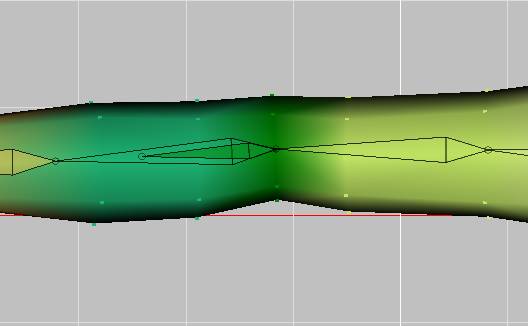
Stage 5 - Pivot Joints
Pivot Joints are wrist, ankle and head.
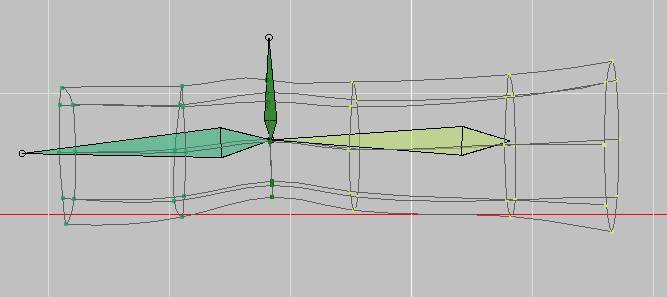
Even though I want to keep Gala as low spline as I can, I feel that the 3 spline action with fan bone is the most elegant, so I have added an extra spline for her wrist.
Tip - Brilliant Shortcut Key. I thought that the wrist was a bit elongated, so wanted to bring in the hand closer to the arm. This involves moving both cps and bones. In Bones mode, click on the Hand bone. Press the "N" key (Translate). Hold the Ctrl key down, and move the hand bone. This will move the hand bone, all bones under the hand bone, AND the CPs.
1. Click "1 right lowerarm2" and add a fan bone pointing towards the hand, and call it Right Wrist Fan.

2. Enter the values exactly as the bone on top of the fan bone, ie in this case the wrist fan bone's Start values and Rotate values will be the same as the hand bone.

3. Weight:
Spline A - 75% hand, 25% fan.
Spline B - 50% fan, 25% hand, 25% forearm
Spline C - 75% forearm, 25%fan.
Remember that if you assign one of the points in bones mode to each bone, the bones will appear in the list when you edit the CP weights in modelling mode. If you do not assign the bone to a cp point, you have to hunt it down in the drop down list.
4. Edit your Setup Relationship (right click it and Edit), and create an Orient Like Constraint, orienting the Right Wrist Fan 50% to the Right Hand.
5. Check the wrist movement in an action, remembering to turn the Setup Pose on

-
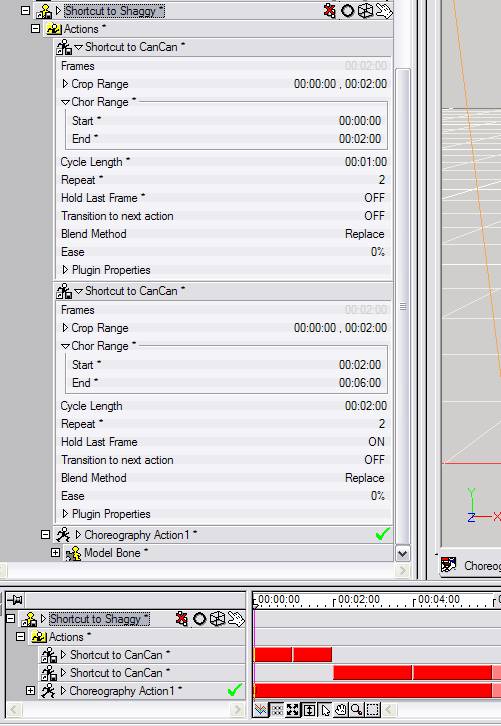
In the choreography, you can set the length of the cycle.
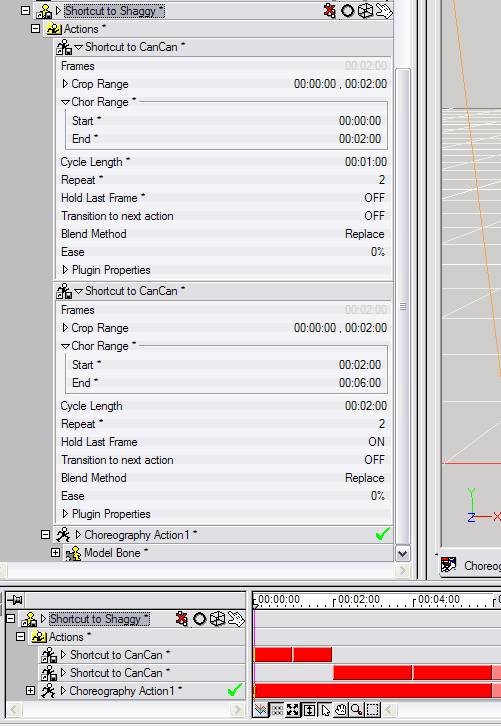
In the above example, I have put Shaggy into the Chor, dropped the CanCan onto him. Then changed the cycle length to 1:00, repeat 2. I then dropped the CanCan action onto him again, this time just changed the repeat to 2, and left the cycle length at 2:00. I think I had to drag the 2nd chor into the right place - those red bars at the bottom indicate the time when chor action is performed.
You can see the chor length is now 6:00, made up of 2:00 of the first cancan, and 4:00 of the second cancan. He does 2:00 of fast, and 4:00 of slow.
So I think you have to drag a second action to change the cycle length.
Anybody got a better idea?
-
Fixed for next section.
Thank you, Mark (and David and Robert) - I (and hopefully those who come hereafter) much appreciate it. It is fascinating to get an insight into a real rigger's mind. It's a totally different art form than modelling & texturing & lighting.
-
Well done, Brad - you can get a much smaller file size by changing the compression of the .mov. Under Advanced Render, click Set, and in the drop down choose Sorenson Video 3, or mpeg-4, or H.264, on Medium settings.
I don't know why you would be getting render errors, though
-
5 point patches won't work with hooks - are they hooks in the patch? You could take the spline a little further and hook it lower down.
-
Nope, smartskin needed more splines to make the squash right. The middle section needed one spline to go with the end joint, and a second to go with the middle joint, and it only has one to do service for both. So I'll save the smartskin tute for a bit later.
Going with B.
This is for those who eyes have not yet glazed over
 - fixed some splineage issues in the right hand, and completed fan/constraints/weighting in right fingers and thumb..
Still to be done here - knee and centre of hand / base of fingers.
Moving on to Pivot joints - wrist, ankles, thumb base and maybe head rotation.
-
[smacks self on back of head] - you are right, Mark - the movie B is the one with the splines further apart.
I'll edit that post to put them right. And my saved models are all up the creek too. My next post will be, as you suggested, to put it back to no splines, and just fan with smartskin, because that may be the way to go on this one. I'll have a look, and post the result, then choose between that and B.
[Thinks...I wonder how much processing overhead each one has.]
-
I tried it, and could not get it to work in v15

It did work in v13.
You could try baking the material into a decal and using the decal to colour the hair.
-
add a little more weighting to the underside of the finger
Aha. This gets interesting.
I added splines each side of the joint. I thought they should be fairly close, but the joint got squished.
So I moved the splines away from the joint, weighted splines A & B 90/10 main/fan - looked fine.
Then read your post, and moved splines back in, and weighted the bottom cp of Splines A and B either side of each joint 50/50 main bone/fan bone - because of the contraction of splines A & B, the joint does not get squished.
A multitude of possibilities, depending on how you want your fingers to be modelled. (Gala has extra long unreal fingers.)
Tips on adding splines:
Add the splines in, create an action for the movement you want - here's the action I used:
Move the splines in modelling mode. Check the spline movement in the action in modelling mode (so the bones don't hide your view). Check it in front view, and hide the fingers as you complete them.
Something it took me a long time to find - It is much easier to switch windows using the Workbook mode. View Menu > Tick Workbook. You now have tabs at the bottom of the screen to change windows. Also, Window Menu > Tile Vertically allows you to have two windows next to each other.
-
Thanks for looking out, guys - yes, that weighting does look better. Although I'm not certain about the weighting the elbow spline - when I overlaid in Photoshop, it makes the elbow ring contract (albeit with 5% each way, not very much) - is that a good thing?
Using the same principles, we can now rig the right knee, and the end two joints of the fingers.
For the fingers:
This movie is weighting the central splines 50% between the two bones (bad)
This movie is fan bone only (bad)
Sadly, this is the only one I could live with, which has the extra splines stitched in - you were right about that, too, Mark.
This movie is fan bones and weighting those A/B splines (90/10), almost like the elbow - I looked at less weighting in the top of the finger, like the elbow, but in this case I could not see any difference.
Remember to create the constraints for the finger fan bones - right click your previous Relationship (I called mine Setup), choose Edit Relationship.
Short hiatus while I stitch splines into all those fingers
- I noticed a comment in another thread about rigging before texturing. I guess this is why. -
Thank you, Robert - I went

 for a while - so I will bear your hacks in mind, but I think I will investigate them after we have discovered what TSM brings to us without any hacking. I am sure that these will make it all faster in the end.
 -
Always on Top
Learn something everyday, Holmes - or it seems that I am learning 10 new things before breakfast these days
Fan bones won't distort the geometryArgh - you're so right, Mark. So would I add fan bones even in the fingers?
Rigging Gala - Stage 4c - Fan Bones and CP Weighting in Hinge Joints.
1. Revert to your Fan Bone model from stage 4 - Updated Fan Bone Creation.
Or load this model - GalaDM_RigStage004a.zip - this has a group to hide all but the elbow, and all bones except the ones involved are hidden.
2. Select the fan bone, and assign a couple of cps to splines A & B in the picture.
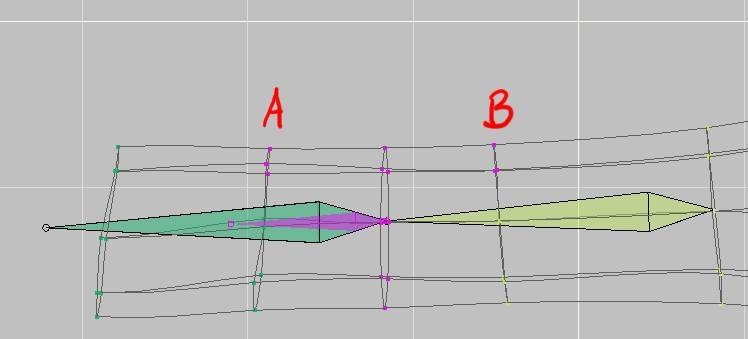
(You will see the reason for this in a moment)
3. Create a new action for the model. CP Weighting can be done in modelling mode, but if you do it in an action, the result will be the same, and you won't accidentally move the model's cps or bones.
4. In Muscle Mode (F7), highlight spline A.

Right click it and choose Edit CP Weights.

5. Click each bone in section A, and change the weight in circled section B.
6. Change "1 right lowerarm1" to 80% and "Right Elbow Fan" to 20%. Click Done. The reason for assigning a couple of CPs in step 2, was so that the bone would show up automatically in the list, and you would not have to search for it in the Bone dropdown.
7. Repeat for Spline B, and change "1 right upperarm2" to 80% and "Right Elbow Fan" to 20%. Click Done.
8. I moved the elbow joint towards the back of the arm, because that is where the natural rotation of the elbow is, and it looks better In the animation. (It may stuff up my mirrored bones though).
Tip:
For a great video showing CP weighting (and other bone stuff):
David Simmons - Rigging a Face
Experts - are we at elbow perfection yet
? -
2 - not 3 - splines should almost aways cross, so you should never have that mess of lines just above the nose. If you just got rid of those, as Fuchur has marked, you would be left with a 5 point hole, to be filled with the 5 point patch tool.
To bring out the profile - did you know that you can tile windows? Have your window in front view (2), then click Window Menu > New Window, click Window Menu > Tile Vertically. Have the second window in side view (4). You can now see what you are affecting when you move a CP.
You could also try magnet mode on the cheeks and chin. Click the magnet at the top, and when you click a cp, you should get a circle indicating the sphere of influence. You can resize this circle to influence more/less cps. Then pull a cp in the middle of the cheek forward. Other ones will follow.
Remember to turn off magnet mode when you are finished!
-
Stage 4 (continued) - Intro to CP Weights
Save that Fan Bone project under a new name, and revert back to the RigStage003a model (before the fan bone).
This is the same action using CP Weights instead of Fan bones.
1. In Bones mode, click the "1 right lowerarm1" bone.
2. Open its properties and click Has FallOff ON. You can see the bone's sphere of influence in this picture. (We will look at how to change this sphere of influence later on)
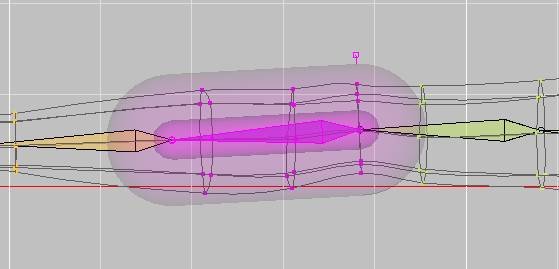
3. Do the same to the "1 right upperarm2" bone.
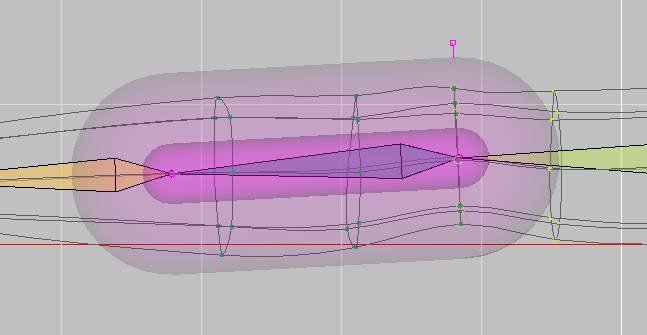
4. Right click away from the body and choose Compute All CP Weights.
Clicking one of those two bones, and notice that the elbow spline CPs have circles around them, showing the other bone's colour. This indicates that the CPs are weighted.
Now go into an action and test the rotation of the "1 right lowerarm1" bone.
Question for the experts - for simple hinge joints like this one, I prefer the CP weighting method. Smartskinning appears easier. Is there any reason why I should use a fan bone here?
-
Talking of compensates, coincidentally, v15.0d is now out, and you can choose whether to have the compensates offsets on or off.
Hold the shift key down while you are selecting New Constraint etc, and the bone will not have compensates. This is equivalent to clicking the icon at the top that looks like a microphone, to the left of the magnet.
-
Cool! - I had to do that one to believe it - I thought for certain I knew how to do fan bones
In explanation - 'Compensates' are used when you create a constraint to offset the constrained bone from the other bone. (Just to add to the confusion, it works differently from about 14.b (?) onwards.) For example if you were to create a Translate To constraint, in v13, the constrained bone will immediately do a Translate To and leap to the other bone. After 14.b (?), the constrained bone will stay in its position, but do a Translate To relative to its current position - If the other bone moves the constrained bone will also move, but at the distance defined by the 'compensate'.
Updated Fan Bone Creation:
(At the end of all this, if we are all still here, I will do a pdf of the correct parts, and put it into the first post. For the moment, I think it is good to leave all my mistakes there, as I can't be the only one making them. Can I?!!?)
1. Click on the bone "1 right upperarm2". This selection will ensure that the new bone will have this bone as its parent.
2. Create a small bone with the same orientation as "1 right lowerarm1", and call this bone "Right Elbow Fan".
3. Assign the central Elbow spline to "Right Elbow Fan"

4. Right click in Bones mode, and choose New > Pose > On/Off. A special Action window for "Relationships" (poses) will open.
5. In top view, right click on the elbow fan bone. Choose New > Constraint > Orient Like. With the eyedropper, choose the lower arm. A new constraint appears in the PWS.
6. In the PWS, change the constraint to have an enforcement of 50%. Ensure the Rotate Offsets are all 0° - these are the compensates.

-
This was the tutorial that give me that lightbulb moment of what 3d actually is:
http://www.hash.com/users/jsherwood/tutes/SkyLark.pdf
It's very old, but the concept of making a flat face that you then move into 3d made me appreciate 3-dimensional space.
When I saw your face, it looked just like this one, and the tutorial shows you how to go about joining the parts.
And a quote from it: if your a perfectionist like me, you spend hours on just moving the control points just millimeters - that is certainly part of modelling
Have you tried the TaoA:M exercises? 11.5 is about making a face - a bit differently from this way.
-
Stage 4 - Intro to Fan Bones
There are several types of joints in the human body:
Hinge joints - elbow, fingers, knees
Pivot joints - head, ankles, wrists
Ball & Socket - hips, shoulders.
We will first look at hinge joints, being the easiest of the joints, as they only move in one direction.
You can see here that our elbow movement is very unpleasant.
Create a small bone at right angles to the upper and lower arms at the elbow.
Call this bone "Right Elbow Fan", and make sure it is under "1 right upperarm2" in the bone hierarchy. Assign the elbow spline to this bone, as in the picture.
Right click in Bones mode, and choose New > Pose > On/Off
A special Action window for "Relationships" (poses) will open.
In top view, right click on the elbow fan bone. Choose New > Constraint > Orient Like. With the eyedropper, choose the lower arm. A new constraint appears in the PWS. Repeat creating the constraint, and choose the upper arm.
In the PWS, change each of these new constraints to have an enforcement of 50%.

Close the action relationship window.
Create a new action to try out our pose. In the pose sliders, turn Pose1 ON.
Using the R (rotate) key, rotate the lower arm. The movement is much better. (Not perfect, but better.) You can see that the elbow spline, that is assigned to the fan bone, is aligned 50% between the upper and lower arms.
-
[
 Party noises off - celebrating 1000 posts ]
It's certainly an interesting render.
I shall have to try and remember that technique.
-
Technical Terms
A Rig - the entire bone structure, by which you control moving the model.
Geometry bones - bones that are directly assigned to control points
Constraints - limitations to bone movement, set up in Poses, usually either on or off - eg. Orient Like, Aim At
Fan Bones - small bones that are assigned control points, but are also assigned constraints. For example, a fan bone assigned to the elbow ring spline would be oriented 50% like the forearm, and 50% like the biceps. This prevents the elbow spline from moving too much either way when the arm is bent.
CP Weights - a CP can be given a weight. So a CP on the elbow spline can be weighted 50% to the forearm, 50% to the biceps. The CP will never be pulled too far in one direction.
SmartSkin - created in a special action window, and defines what happens when a bone is moved in a particular way. Can eliminates creasing and stretching.
Null (or Target) - something for a bone to point at. For example, you could create a null for the eye bones to follow. The null is much easier to move than the eye bones would be. A null can also be created in an action or a choreography. For nulls on steroids, if you have a rainy weekend, look at this mushroom cloud tutorial.
I'll add to these as I think of them.
-
Thank you for catching that - I've not found the manual very useful up to now, but I am now studying it VERY carefully.
In summary for the roll handles (so that's what they are called)
Arms back
Fingers up
Thumbs go away from the direction of the curl
Legs in the same direction as the foot
Body bone down
After auto-assigning bones, make sure:
Chin is fully assigned to head
Body bone has nothing assigned to it (they go to the spine)
IK Foot Controls have nothing assigned (they go to foot and toe controls)
Finger control points are assigned to fingers, not hands.
However, don't be too fussy, we will probably change assignments as we go through weighting each joint.

-
I'm on a PC, and you are right, I get that result, under those conditions.
I'm going to nut this one out - and be really embarrassed at the end of it, probably, to find out I'm working on 2 different images or something.
Just to prove that I am not entirely deranged, these are from the very same project, with everything embedded.


And .... (to use Vern's punctuation to add to the drama) ....
in v15 ... she's.... WIDER.

But don't worry about it, I'll track it down. If you don't hear from me in awhile, it's because I've gone to bury my head in a deep hole in the paddock.
-
Thanks - I think it's just the Gala model.
I can't get her to render bump maps in v15, but they do in v13. I've experimented with removing/adding transparency maps, specular, multiple/single stamps, and they do work as long as the mesh is not Gala.
So I'll keep working on it a while and see if I can come up with something. It's probably something really obvious.
-
Nancy replied while I was taking screenshots, and her way is by far the best (doh).
Just because I have screenshots, I will put them up for completeness
This way is probably quicker, but actions are reusable, so go with Nancy.
1. View the splines along the Timeline.
2. Drag a selection over the last cps.
3. Right click them and choose Curve > Post-Extrapolation Method > Repeat
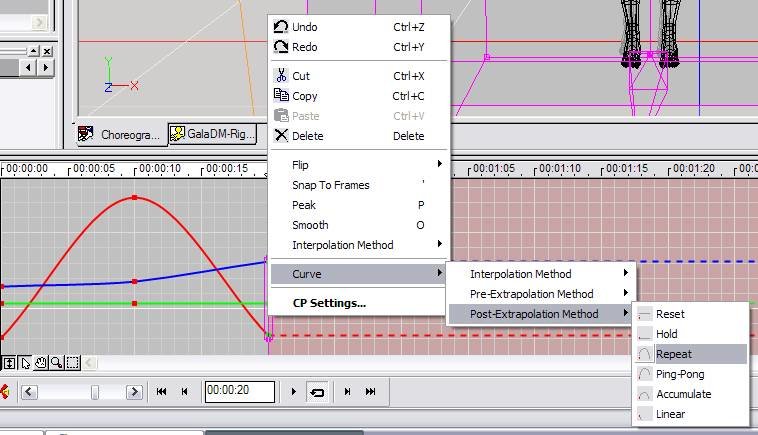
4. You will see them repeat. Notice the nasty jump in the blue channel - this is because my last blue point was not in the same place as my first blue point.
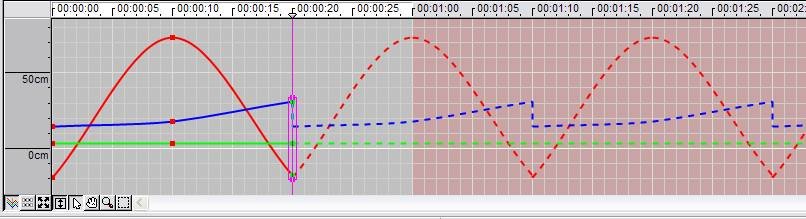
Also, the sharp point at the bottom of the red will result in jerky motion.
(Use Actions
)


Rigging GalaDM with TSM Workshop
in TSM2 - Rig
Posted
Wait till you see the mess I'm making of the shoulder
That's going to take a couple of days.....