


Caroline
-
Posts
1,248 -
Joined
-
Last visited
Content Type
Profiles
Forums
Events
Posts posted by Caroline
-
-
I haven't a clue what to look at
 . Sorry.
 My initial reaction is that I prefer to animate it more than the TSM rig, specifically the arms, but that would probably be true of the 2001 rig too. I love your feet. They are a big improvement. I would like fingers to roll, but could not test that.
I could not find the Back and Back2 bones that are in 2001, the Chest Controller does not seem to bend him sideways as well as the two bones together.
And I could not work out how to go about installing it
And now I'm going to ask a really dumb stupid embarrassing question, because I really don't understand the nuances of rigging.
Why don't I ever see a rig just made up of Euler constraints? Is it that it's for much easier control or best for FK/IK?
Like my arm model here seems to work OK for me, with no extra hidden bones, or complexities.
I'm not saying it would be best for animating, but just for simple stuff, or a character that doesn't come on very much?
And I would love to see simple reviews of each of the rigs, even from other people, because I'm sure they each have their place.
eg TSM - simple to install, but you need to keep the version before final installation. Squetch - total control over every least twitch, but you need many undamaged brain cells to install.
-
Another refinement, as we're going for perfection
 . I think this is true.
As Rodney said, it's best to flatten it all before hiding any mesh. Because splines have a memory. If you decal them in an action where part is flattened and part is not, then the part that is flattened won't flatten completely.
This is my tee flattened and spread out in an action - to be able to do this, I had to hide the sides first. So all splines (except the ones attached to the missing sides) are flat.

This is my original as up top:

You can see that the splines are bent in the second one.
I guess the splines that were next to the missing sides would be stamped a second time, after flattening those, and surrounding splines.
Nancy, I think the reason why I rotated it, was because I was stamping the shoulders so they did not have a seam, rather than the sides, as that was more important. If you rotate the points in the stamp, rather than the whole model in the action before stamping, then I think the spline 'memory' comes into play, and the splines go a bit odd.
I could be completely wrong about this all though
- thank you all for humouring me.Thanks for the map, Eric - if you desaturate it a bit, it's easier to see the control points. I'll be really interested know how the technique goes with your ship. Can't wait.
Al, you're right - I'll edit that step 8 to read a bit better.
Edit: 'Spline memory' - it's not really a memory, but an 'awareness' of curvature of the neighbouring control points, even if they are hidden and not decalled.
-
I'm glad you are considering coming back - it's a great software. But like anything worthwhile, it takes a long time to become a master. Despite what it says under my avatar, I've been learning for 2.5 years, and am still just gradually grasping the complexities.
And definitely worth $49 (and no shipping costs).
What you get for $49 is the full program for twelve months. After one year the program will not work any more until you renew. It is a subscription based software. No CD in the drive.
For $299 you can buy a CD, which will give you updates for one year (I don't know if that is Jan-Dec or 12 months). But the program will still work after one year. As long as you have a working CD in the drive.
As for your V8 tapes, I came in on V12, and there were a lot of V8 tutorials floating around the net. I found these very useful, as long as I remembered that some things have changed. The principles are still the same. Splines are the same.
You can go to the Hash site and check out the manuals too. The first thing to do after purchase is to do The Art of Animation:Master course, which will take you through all the basics.
One other thing. Even though this program is solid, it will occasionally crash. Not as often as Internet Explorer, or MS Office. But with anything, A:M or not you should get used to making different versions rather than saving over the same thing all the time. That's advice not only related to A:M, but to all software.
We look forward to seeing your contributions in the forum.
-
Great pitch, David.
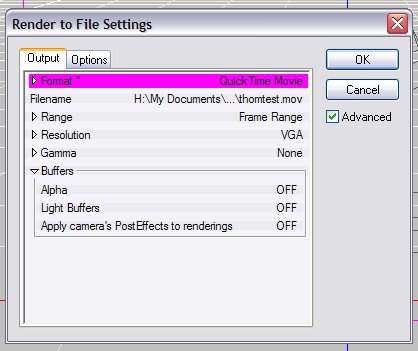
In the future you may be wanting the sky to be blue rather than black. In the Advanced Render to File Settings, under Buffers, you will see an Alpha option. Just set this to be OFF, and your sky will render blue.
The reason why the ground renders, when you have Alpha=ON, and not the sky is that the Ground is an actual model that you will see in your PWS Objects section. The sky is just the Background in the Camera options.
-
The magic part for me is actually managing to get a decal that does not stretch all over the place.
To you, being a master at it, it probably isn't such a big deal, but I struggle.I guess the 'magic' is achieved by a combination of the checkered pattern and the UV editor - ie moving the points around on the checker while watching the change on the model in real time.
I did this to this same teeshirt, with transparency map and colour map in Photoshop Elements, taking a texture from www.sxc.hu:

-
Perfect decalling - I know there is no such thing, but I'm pretty excited about this, and wanted to share. Decalling is pretty easy. Perfect decalling with little stretching is hard, and I have struggled and struggled for it seems like, and probably is, weeks.
I haven't seen it shown this way. If I am creating a mountain of a task out of a molehill of a chore, as I usually do, please let me know
- I will bury myself under a mound of  emoticons.
1. Separate out the model into different colour groups, as in William Sutton's classic UV tutorial
2. Flatten the model in an action. Depending on how complex, a scale to zero on the Z axis might be sufficient.
3. Leave the action window open, but select a group in the PWS model section, and Hide.
4. In the action, apply the checkered decal.
5. Repeat steps 3 and 4 hiding different bits for all the front section. Reapply the same checkered decal - make sure you apply stamps in different areas of the decal, so that you can move the stamps around more easily in step 10, as in William's tutorial.
6. For the back section, I rotated it upside down, and went into back view (key 8) in the action, but that would depend on your model.
7. Now you have all your stamps on the checkered decal.
8. Close the action window, and have the checkered decal window open (right click the decal name in the PWS and click Edit), and the model window, and no other.
And here comes the magic part:
9. Click Window Menu > Tile Vertically.
10. Watching the decals on the model, move the points around in the checkered decal window until they no longer look stretched on the model.
11. When the checkered decal on the model looks OK, replace the decal with the proper full size decal to be painted.
In the picture I have fixed up under the arm, but the points I am about to line up are arrowed.

In this picture, I have mostly fixed up the right hand sleeve, but not the left.

Edit: in case anyone wonders about the row of zeros, there are supposed to be numbers in every square, but I got bored
. If anyone wants the checkered picture - I couldn't find a good big one on the net - I'll post it after I have finished those numbers. -
Works for me too.
Whole forum about materials:
http://www.hash.com/forums/index.php?showforum=46
and here:
http://www.hash.com/forums/index.php?showforum=130
This one will keep you going for a while:
http://www.colins-loft.net/free/mats/Demon_Skin_Material.htm
The TaoA:M one is the best to get you started, though.
-

Another great way to find out if all your normals are facing the right way is:
Tools Menu > Options > Rendering Tab. Change Quality to Shaded & Wireframe. Change Show Back Facing Polys to OFF. This makes normals that are facing away from you look transparent, so they are easy to pick up.
One warning though, if you leave that setting on and forget about it, you will get the transparent areas and wonder why

Useful Shortcut keys:
Shift 1 turns on and off normals (same as going into options)
and Shift 6 turns on and off back facing polys as above (I just found this out myself, so thank you).
(Those numbers are the ones above the letters, not the num pad)
-
I didn't know it had changed - every page I've looked at is the same, except for being b&w
I guess that's because personally I always refer to my printed copy, which I would so recommend to people. It's available in the Hash Store.. And, gosh, Eric's image looks good on the front page.
-
:blush:
All I ever do is point people at your tutorials, Holmes
My mind is exercised over what to do with those links - it was supposed to be a stopgap while Vern's site is down. They are not easy to access in that format, so I shall have to think about it some more.
-
I always link to this one:
http://www.hash.com/Technical_Reference/Te...l_Reference.htm
Then I find the page I want, right click the index reference and open in a new tab.
Then I copy the url like so:
http://www.hash.com/Technical_Reference/Cu..._WO_CREASES.htm
For some reason it does not work for me in Firefox, though, so I do it in IE.
Do I get the prize for doing it differently?
(Eric, I was going to suggest you go back on the meds, but if that Visual Texture Walkthrough is what happens when you're off them, then I say stay off!)
-
Using hair for grass is a fairly advanced usage of hair.
This is the manual page for hair:
http://www.hash.com/Technical_Reference/v110/Hair.htm
Scroll 3/4 of the way down to find a smiley face.
Instead of the Smiley face photo, replace that with a photo of grass to give you the varying colours that grass has.
That's what I did for this image:
http://www.hash.com/stills/displayimage.ph...um=58&pos=4
Exercise 20 in TaoA:M also has the technique for colouring hair by decal.
-
I'll have that cookie, thank you.
To make your black sky blue is here (under Buffers):

-
I've spent a few hours looking at compensate. Remember vectors and matrices and quaternions and radians? I don't.
That will be fun for version 2 though. But first I want to get some nice clothing put together to prove that this is useful. (And fun. Let's not forget the fun
 .)
.)Scaling I think could be better done through the scale manipulator, or a pose. Because if I did it, it would only be scaling the bones, not the mesh.
-
I started in 3d only to help my son through grade 11 & 12 (turns out they didn't do any 3d), and I knew absolutely zilch, so I know where you're coming from.
Even though I still feel I know nothing compared to all the greats in this forum, I have learned so much this far, mostly by doing tutorials, and reading everything I could at internet cafes while hanging about waiting for people.
Just understanding 3d space on a flat screen is something completely different.
Take baby steps, and study one part at a time.
For example, with materials, go read everything in the old material forum, search google - other programs refer to materials as 'shaders'. Check out links for 'Materials' at http://hashlinks.wordpress.com/.
And of course, ask questions here.
-
Great explanations by Robcat, and the best advice of all - do The Art of Animation:Master exercises. There's a whole forum dedicated to it.
This helps you be able to articulate specific questions - it's really hard to understand or ask questions when the whole 3d thing is so shadowy.
Further reading:
Layers (with examples of alpha channels)
Texturing for Dummies (generic, not A:M specific)
Yves' learned tutorials on Skylights/alpha/materials
But first of all, and most important - work through all the exercises of TaoA:M, and if you post your work in the TaoA:M forum, we may encourage you on the way
-
Sorry, Nancy - I was editing my post while you were posting.
Edit: and the second time
I have to go to Murwillumbah now - teenage daughter's unusual request for "family day", so unavoidable.
I truly appreciate your input - I wish we were in the same room sparking off each other.
-
Thanks, John.
Nancy, mine don't scale:

I tried to do a wireframe render with bones, but the bones don't render.
The shirt looks smaller, because the moved bones ruck up the cps.
I looked at your pictures in that post, and to me they weren't scaled, just each moved to the base of its equivalent bone. But I am spatially-challenged.
But it could be another addition, to scale the bones to the same size. So that it would work with whatever size of the same rig.
Busy weekend ahead.
Keep those thoughts a-flyin'!
-
Thanks, Steffen - you probably recognise your finishing touches, I couldn't do this without you.
 (Is there not a less silly icon that expresses admiration and respect rather than 'wub'?)
About expressions, in 2006 you said this:
"I think it is not possible with the current sdk , you need a ::New to construct the object (driver) for HExpression and this is not avaible ."
in this thread:
-
Looks like this plug also scales the bones to the targets?
It just looks like that because every bone is translated to - I think if look closely, the bones are still the same size. This would be sorted by that compensate option.
-
Thanks for the nice comments - it is such a joy to re-experience that programming high.
Vista (in)compatibility thingI'll have to see if it works on Vista, I did not think to try.
Looks to me like this plug-in takes the bones in the "clothes" model and does a translate to & orient to constraint to the equivalently named bone in the "body" modelThat's exactly what it does - very simple.
Nancy, you are a blast - keep those lateral thoughts coming - I'm just travelling down the clothing line, and my thoughts are way ahead of my ability - interchangeable heads, multiple textures on one model, so you can change the clothes by pose or action. I'm testing a teeshirt changing to a string vest to a waistcoat. I'll post pics of that later.
The 'compensate on' option is a good one.
'Puppet' or 'Marionette' is possibly a good name to call it, although, when we went broke, I did puppet shows for a few years to small ones, so tend to freak out at the words 'puppet' and 'children'. We have a room full of scary marionettes.
Or 'Coat' or 'Dresser'.
For the rigging, I had just assumed it would be easier to take the model and copy the rigging, but it does not test for any hierarchy. That half teeshirt thing happening I am doing with transparency maps.
-
Create your own clothing
How to create Thom’s Tee Shirt is described in this pdf. Hard to make, easy to reuse.
-
Clothing to try.
—————————————————————
Important Note About Copyright.
This is what I believe is true:
You may not redistribute anything that you have not yourself created.
For example, if you take an underlying mesh of a model that is not yours and scale it up to create a shirt, even if you rig and texture it yourself, that model is not yours to redistribute.
If you fully create the clothing, but use the model’s underlying rigging, you may not redistribute the clothing.
To be able to redistribute, you must have created the mesh, the bones and the textures yourself.
—————————————————————
Having said that, here is mesh of Thom. And also Gala and some clothing.
This project contains a Tee Shirt and TSM rigged Thom (no CP Weighting or Smartskin
)This project contains a long dress, Tee Shirt and trousers for Gala - basic undressed version of Gala included. She has a non-standard rig, but maybe I will put in the TSM, or learn Mark’s 2008 rig.
If you want to use the beautiful Gala with textures, she is included in the A:M v15.0 subscription download available at ftp://ftp.hash.com/pub/misc/Data.zip. To remove her current clothes, click a CP on Gala’s dress, press the / key to select all CPs in the dress, then press Delete. Repeat for her petticoat.
These clothes are very, very basic, but I hope it gives the general idea. Before general release, I would like to create some more attractive clothing for people.
-
FitTo Plugin
Beta testers wanted! Windows only. I don’t know how to make it work on a Mac. I would welcome any testing on this plugin, and comments, and suggestions on how to make it better. (A better name for a start!)
What this plugin does:
Conforms clothing to a figure. Give your model a change of clothes easily.
Before:

After:

How to install:
Unzip FitToBeta.hxt from the zip file.
Exit A:M.
Place FitToBeta.hxt in the Hash hxt folder. This will probably be C:\Program Files\Hash Inc\V15.0\hxt on Windows.
Start A:M.
How to use it:
1. Place a figure and an article of clothing in a choreography.
2. Right click the clothing, and left click Plug-ins > Fit Clothing.
3. Choose the figure to wear the clothing from the list
4. Click OK
The clothing will then jump onto the figure, and move with it.
You can create your own choreography action on the clothing if you want it to sway in the wind.
Technical details
A new choreography action is created for the clothing called CRNClothing using Blend Mode “Blend”. (Should this be Add?)
The clothing is rigged with the same geometry bones as the figure. The plugin goes through each clothing bone, creates both an Orient-Like constraint and a Translate-To constraint for each bone, and sets the figure’s equivalent bone as the constraint’s target.
To remove the clothing, delete the choreography action CRNClothing.
Cost:
Free!
Why?
(Mostly for fun
 )
)Trying to make A:M accessible to people who are not able start from scratch all the time. and make their own models. There are people out there (truly, there really are) who just want to combine elements, render and postwork. From a beginning like this, people can grow into A:M, and it does not seem quite so intimidating. This plugin is the easy bit. Next bit is to make models…..
.Comments:
I would like to get pose sliders on clothing to move with pose sliders on the figure. However, I don’t think that the SDK supports creating new expressions. (Please tell me I’m wrong!) I will have to research this for version 2. For reference, the expression to add on each clothing pose slider is: (..|..|..|Shortcut to FigureName.User Properties.PoseName).


AM 2008 rig
in 2008 - Rig
Posted
Thanks, David, I think I get the euler rig idea. And I guess you'd still have the problem of CP weighting to make the joints smooth anyway, and being such a small rig it would not be worth spending all that time unless you were going the whole hog.
Sorry, that was tongue in cheek - even I installed it once a long time ago to try it out. I was trying to give an idea of the huge complexity of it.