-
Posts
1,248 -
Joined
-
Last visited
Content Type
Profiles
Forums
Events
Posts posted by Caroline
-
-
I think you copy weights using the MirrorBone plugin available from Steffen Gross's site:
http://www.sgross.com/plugins/index.html
I guess I will be using and describing this shortly, but I am still catching up the bits I have covered, but not completed yet (toes, knees, copying mesh to the other side), before hitting the spine and hip, so as yet I don't know much about it.
Search for "+mirror +weights" then there are a number of threads covering it.
-
This is a landmark for me... an actual shot from the movie!
Congratulations - it looks fabulous. It really caught the sea swaying movement.
-
Window Menu > Tile Vertically
That will tile all the windows you currently have open - you can click Window Menu > New Window to open a second window of your current view.
Then when you have the two windows you want, click Window Menu > Tile Vertically again.
The great thing about that, is that when you select a CP in one window, it is highlighted in the other window.
Another thing you might want to try, is View Menu > Workbook - this gives you tabs at the bottom of your screen, so you can easily see how many windows you have open, and easily pick one.
-
I got a few moments:
1 right hand control
1 right hand (this is the original culprit)
1 right hand attacher
1 right inter hand
Oh, I think there were only 4 - it seemed like more before

All these bones need their roll handles turned towards the back, like the lower arms. I believe that the rigger would have worked out OK, if the right hand had been pointing back first.
One of the great things about diving in so deep like this into a rig, as that I've lost my fear of the unknown. I've always been terrified before of touching a completed rig, in case it breaks, but the TSM rig (and any other, I supposed) can be changed after it has been completed.
-
It's all to do with the hand - I suspect when you rigged, the hand's roll handles were pointing forwards (I could be wrong though
 ). I set all the hand bones (lots of hidden ones too), so that the roll handles pointed backwards, and it works.
I have to go out now, and work tomorrow - if you don't figure it out, I can detail all the bones I changed.
-
Oh is the the right place to post ,Im sorry to mess up your thread
Not messing up, this is a "workshop" - only too glad to have you in it. I plan to gather up all my corrected posts into a pdf at the end, and put it into first post, so feel free.
Are you sure about the roll handles? That fixed mine - can you zip up the model and post?
interchange the face aswell as clothesI'm thinking about head interchanging. I think it would be better to interchange whole heads than have a complicated mesh. That would entail having a neck that widens in a pose to accept the new head, but that would be really easy. Just have a bone on the main model where the head should be, and treat the head as clothing.
Alternatively you could have a really complex mesh, and use pose sliders to rearrange the head features. Depends on whether you are doing realistic, or cartoon, I think. Cartoonish = less splines.
-
Stage 8 - the Head
Jaw first.
I have not yet covered 'Easy CP Weighting'. So here it is. I'm not quite sure why I haven't been doing this as a first step, and then finetuning. Is this what you other riggers do, or do you just weight each CP from scratch?
1. In modelling mode, create a group called "Jaw Weighting", which includes all the CPs that will be affected by the jaw movement - take out the top lip, teeth, tongue, etc.
2. Hide all but this group. Hiding the other cps means that they will not be weighted, even though the weighting falloff might include them.
3. All head CPs should be attached to the head bone. In side view, click the head bone, and add a bone for the jaw (clicking the head first ensures that the jaw is under the head in the hierarchy).
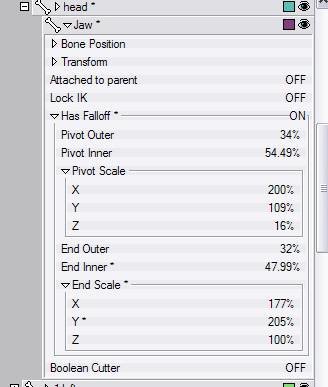
4. Rename the bone "Jaw", and in the properties, change Has Falloff to ON.
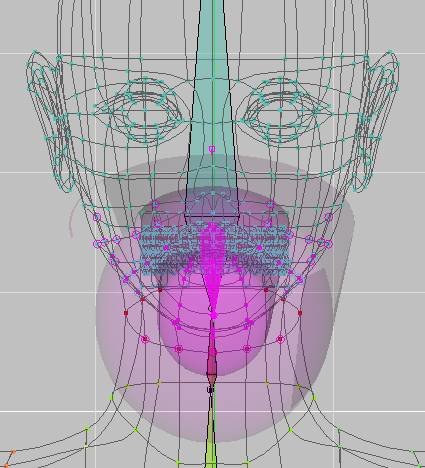
5. The aim now is to have the inner 'pill' cover all cps that should be fully weighted to the jaw, and the outer 'pill' cover all cps that gradually fall off to the head.
Put your mouse over the percentages in the PWS, and click and drag to the right and left to change the percentages. You will see the pill size change. Remember we are working in 3d, so any change to X is visible from the top view.
6. When you have the inner and outer pills positioned, right click the Jaw bone, and choose Compute CP Weights.
WARNING - if you do not click the Jaw bone, but right click and choose Compute All CP Weights, then any weighting you have done so far will be lost.
7. Create an action, and test out the jaw movement in the action. Return to bones mode, and fine tune the positions of the pill. Remember to choose Compute CP Weights (just for the jaw bone) before testing in the action.
These are the values that I have used:
And this is what it looks like from the front:
8. This is mine, but there is one neck spline CP that I will fine-tune using Edit CP Weights in modelling mode.
And spot the deliberate mistake
 The lower teeth should be included.
9. In modelling mode, control click the tongue group and the lower teeth group to choose them. Hide other CPs, and in bones mode, assign all the cps to the jaw.
It is easier to do the teeth after the rest, because there is no falloff with the teeth.
-
Funnily enough, I was just watching the "Pigeon Impossible Podcase #8", thinking how much easier it is in A:M just to swap out the lo-res and hi-res models
 - there's one of those telepathic things happening.
 -
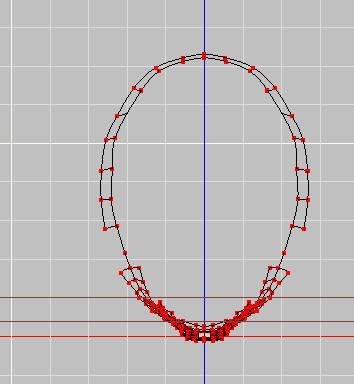
This is the mouth area of something I'm attempting to model at the moment:
This is the top view:
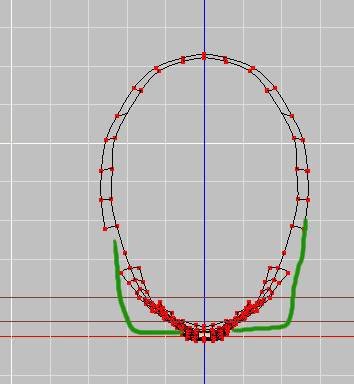
The green splines on this top view is a possibly exaggerated position of your splines:
Try hiding areas and looking at the one area from lots of angles.
It is very difficult to make a face without a front and side view. It is also very difficult to take photos of front and side, because they never seem to match up. I have never understood why the bit between the nose and the mouth can be one size from the front and totally different from the side.
Look at all the A:M models you can find, and analyze the splines in them. In this forum, especially in WIP, there are heaps of pics of faces with splines. Research.
It all takes a very long time. If it were easy, everybody would be doing it

-
I've recently learned Shift 1 and Shift 6 (not num pad keys), which I do quite regularly.
Shift 1 puts the spiky things on patches so you can see the direction, and Shift 6 makes patches facing the wrong way go transparent.
Use the patch tool to select a transparent patch, and press F. Doesn't take too long.
-
Are the leg bones hidden? I just had that problem where I could not select a bone because it was hidden in the PWS under the model's bones.
Also, depending on the hierarchy, I don't think you can select bones where you might get a circular reference. Do you have a screen shot of the hierarchy and the bone you are trying to constrain to the other bone? (I'm a bit hazy on that one though.)
My question to anyone who has used TSM advanced fingers - did your thumb constraints get created on the Rigger? Mine didn't.
-
And Cooper - have you tried this tutorial? (11.5 in TaoA:M manual)
http://www.colins-loft.net/CoopFace.html
I've been trying to analyse why your face looks so flat. I think it is partly that the eyes are very big, and the nose is very small. Are you going for realistic or stylized?
Also, if you look at the side of your model's face to the left and right of the mouth, there is no curve. It's like the mouth continues flat and does a 90 degree turn to go to the back of the head.
You can't tell from a mirror, but feel your own mouth, and you will note that there is no flat bit on either side. None. It is one curve to the back. And the mouth itself is not flat, from the corner to the center of the mouth, it is a curve forward. (OMG maybe I am a freak, and nobody else looks like that
 )
)It is certainly better than it was before, keep trying.
-
I did not realise you had started on it until I clicked the picture and it resized big. That's a HUGE number of splines, especially coming out of the bottom left of the nostril. Still, I guess it's easier to take them out than put them in

She's got a very interesting asymmetry - she looks like Sandra Bullock on her left.
-
Thanks, MMZ

Jason - When I've finished rigging, I'll have to do a test to see how well she animates. I would think some smartskin would be necessary, although she will be quite heavily weighted. The way I see the difference between Smartskin and cp weighting, is that Smartskin watches the rotation of one particular bone and interpolates between the rotations, whereas weighting is more 3-dimensional, and follows all bones that are weighted. Anybody got a better differentiation?
Thanks for the link, excellent overview of my first few posts - I will include it in my first post. I got overview movies on my CD, but I don't know if they are part of the freeware distribution.
-
Would that be better? Is there anything wrong with where I have put mine?
I found that if I moved the fan closer to the biceps, the rotation of the arm at the shoulder looked wrong.
Perhaps it's this mesh.
-
I don't pretend to know what I am talking about, but isn't that what they did in this thread?
-
That's right - Mark says that he doesn't use shoulder fans at all, but I could not get the weighting right without it.
Each CP when it is weighted will follow the bone that much percentage. So if it is not weighted at all, then the CP will follow the bone assigned to it 100%. On a shoulder, you want it 50% with the arm, 50% with the shoulder. But when the CPs are weighted like that, then they will at certain rotations sink too far into the mesh. Weighting them to a fan bone that does not sink as far, keeps the CPs from sinking.
At least that's the way I'm understanding it

-
Stage 6 - Shoulder Joint
This is the hardest joint so far.
 I have created a special model of just the shoulder area. I have autoassigned bones, and done a full TSM rig without any fan bones or weighting.
 GalaDM_RigStage006Shoulder.zip
I would not suggest this 'in the real world', but I have not done a full shoulder before, and I wanted to make sure that the full TSM movements correspond the way I think they do.
You can see that as soon as we turn the constraints on (remember that TSM constraints have to be turned ON in the Pose window), the chest become deformed.
This will take some working out

One of the complications of the shoulder is that it has movement around, plus the arm rotation.
First movie of arm rotation with no fans and no cp weights
Click on one of the shoulder's cps. Even though the model has been fully rigged with the TSM rigger, and new control bones created, the geometry cps that we assigned earlier stay as they were. Clicking on one of the cps selects that geometry bone. Click on the eye in the PWS to show the geometry bone.
Add a fan bone and call it "Right Shoulder Fan"
Edit the Setup relationship, and create a constraint for the fan bone - make the fan bones children of "1right arm", and orient like the "right upper arm1" 50%
These are the actions I used for weighting:
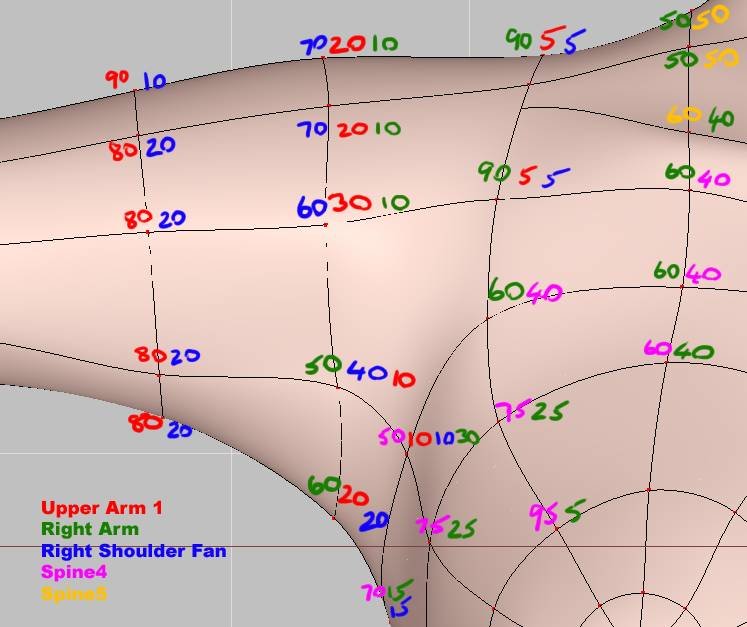
Using the shoulder rotation action, weight the CPs. This is how I weighted the front (actually I may have fine-tuned a little bit more after this picture - even a 2% weighting can have some effect on skin that looks too static during the movement):
Then run the shoulder movement action, and correct the CP weighting.
To do my weighting, I moved the timeline slider to a time where the CP looked in a bad position. I corrected it in the action, clicking Apply until I could see the CP in the right place, then OK, and I could immediately see the results by dragging the timeline slider.
Every so often, you will get a duplicate weight with a 0%. Delete this weight when you see it, or A:M will 'repair' it for you. Always click Apply before clicking OK, because occasionally A:M will override what you have done, and you may get weighting you don't expect.
More on the theory of weighting. In this picture I am fine-tuning the weighting in the action window.
You can see the selected CP is out of centre, because the action has pulled it and the CP on the right towards the right. Two choices here. I can weight the CP on the left of it slightly, so that it is pulled too, or I can weight the selected CP more to the left.
I am going for the last one, and adding more to the spine (on the left) percentage, which means that the centre CP will not move so far to the right.
Remember that when you decal the surface, where the patches are stretched, the decal will also be stretched.
Just to illustrate this point:
You can see that the stretching on the back is OK, but on the top of the shoulder, the CPs do not move towards the arm enough, and the decal is very stretched.
'Finished' shoulder (I don't believe weighting is ever 'finished' - when coming to animate the whole body, some refinements will probably be needed).
GalaDM_RigStage006AfterWeighting.zip
Resulting movies - they don't differ too much from my previous four fan weighting. Maybe a little less subtle movement.
I will now transfer these weights to my main GalaDM model - anybody know a quick way of doing that?

-
So happy you are there, Jason - it's a long haul
 .
.For me there are no downsides, except time and ease of picking the right fan at the right time, but I did get a pretty good version with one fan, which is more efficient. I'll be posting that in a few hours when I've documented. it.
-
Gerry, I should have put this here, not in the other thread:
Have you turned your constraints on in the Pose window?
TSM Constraints has to be turned ON, and also your own pose where you created your own constraints has to be ON. You can set them to be permanently ON in User Properties under the model's properties.
-
Are you sure you turned your poses ON in the choreography, Gerry?
TSM Constraints has to be turned ON, and also your own pose where you created your own constraints has to be ON. You can set them to be permanently ON in User Properties under the model's properties.
The easiest time to add fanbones (or weight CPs) is before you run TSM RiggerI have been weighting my shoulder joint after the final TSM Rigger, and that seems to be working well, so you can fine tune it after TSM Rigger. I have been doing that to make sure that the actual TSM visible bones are working on my extra bones in the way that I think they ought to.
-
Aargh. I read too much stuff. Everybody else uses a gazillion fans. I've got it down to one - it does not hold the mesh out quite as well as four, but this is supposed to be an uncomplicated model. No fans made the shoulder sink in too far.
So, Mark, is it your work process to put the usual bones in, then weight, review, weight, review, weight, review? I have been doing each CP individually around the shoulder - is that what you would do? (I find it quite restful and satisfying, actually.) Or do you just ---know---?
-
I tend to do it this way (but not so organised and more wonky):
http://www.nvcc.edu/home/nvportg/Art%20279...ore_details.htm
And it does show it in TaoA:M Exercise 11.5, which is taken from here:
-
I'd like to make sure I'm on the right track before I document.
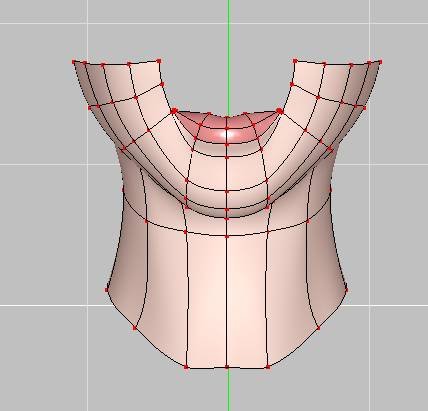
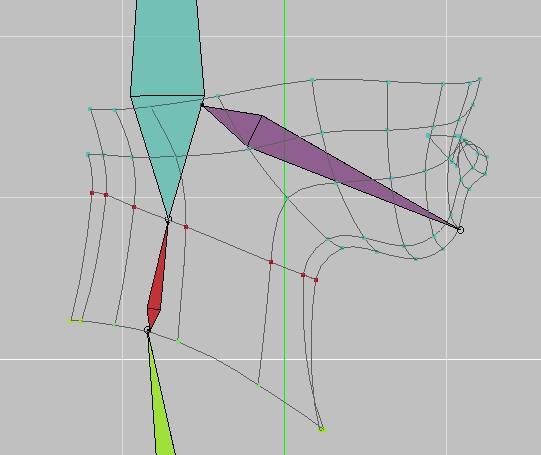
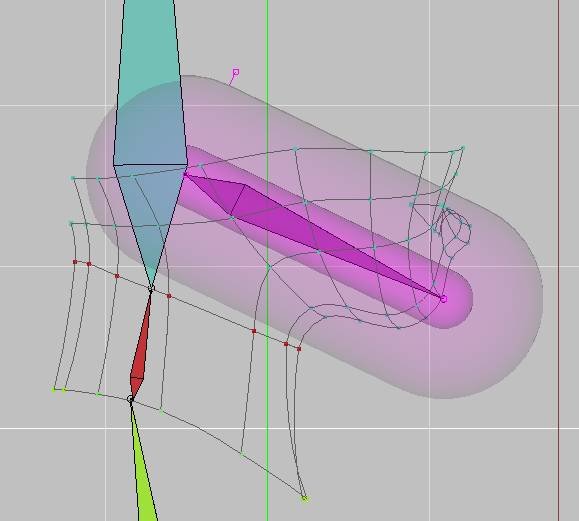
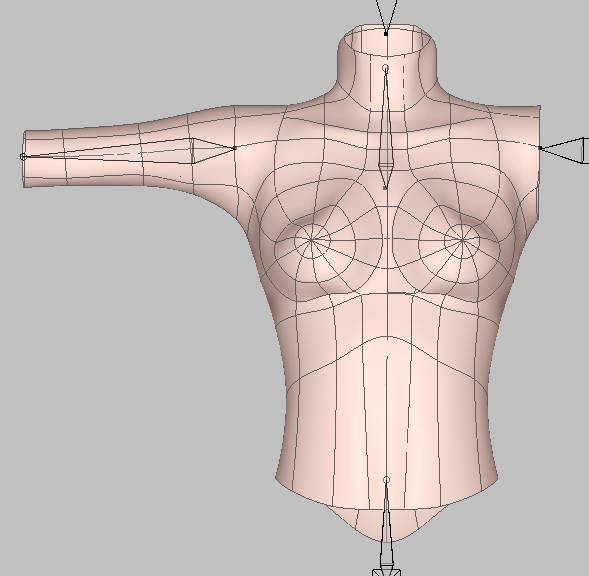
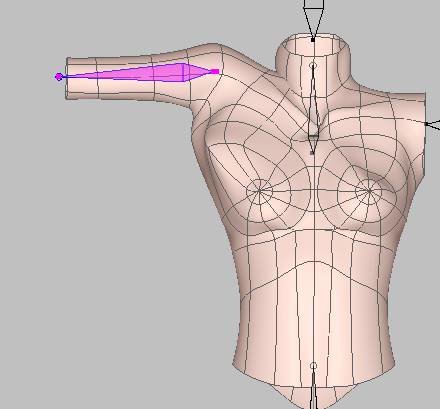
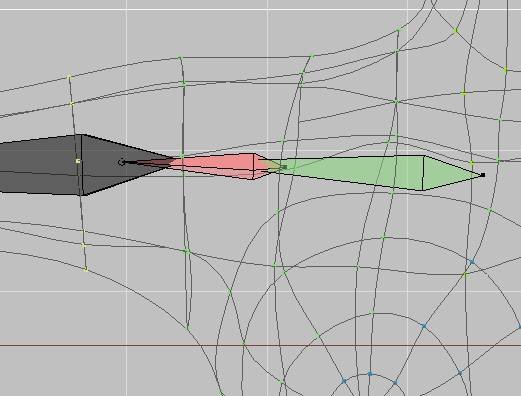
I'd like a nice simple shoulder, and I've been analysing heaps of shoulder rigs. This is what I have come up with for the fan bones (4 of them):
Front:
Top:
And I don't know if you can tell from these front on movies - the rotation is circular - this is after weighting:
Arm Rotation without shoulder:
Shoulder Rotation without arm:
It looks OK to me - but have I got the fans in completely the wrong place?






Rigging GalaDM with TSM Workshop
in TSM2 - Rig
Posted
Catching up
There should be nothing new here.
Knee - see Elbow rigging.
I rigged the knee like the Elbow, but it seemed to need less weighting.
Ankle - see wrist.
Ankle with fan and some weighting
Toes - see fingers
Toes all weighting, no fan.
These are the numbers TSM has assigned to the toes:
Little 4
Ring 2
Middle 1
Index 3
Big toe 5
Each toe consists of toe -> toe2 -> toe3, with toe being embedded in the foot.
These are the weighting I gave them:
Center of toes 50% toe2 and 50% toe3
Spline connecting toe to foot 50% toe2 and 50% toe
One CP above and below foot 80% toe 20% toe2