Kelley
-
Posts
768 -
Joined
-
Last visited
Content Type
Profiles
Forums
Events
Everything posted by Kelley
-
Xtaz: I think you're right about the volumetrics. I spent last night [and into the morning] trying to make them behave. No luck. But your 'Train' example is great! Holmes: I've just downloaded and printed out your tutoriasls on Sprites and Streaks. [When are you going to collect these in a book?] Here's the latest on the train. Got a little [?] spurious movement in the foliage at the very beginning. It's fixed now and will render out tonight. CHASER_FINAL_BIRDS_12sec..zip
-
Pretty slick the way you morphed the Cap't. into the ne one.
-
Nice cannon smoke. What version of A:M are you using?
-
It's happening in an Action window.
-
Yup.
-
I'm down to the point where the "Opacity Over Life" attribute has to be set. I click on the 'Smoke' emmitter in Materials and the Properties table opens up. But when I try to click on "Opacity Over Life" and open the box to type in a new value, the Properties closes. How do I get around this?
-

Why does my light shine through walls?
Kelley replied to edlundart's topic in Work In Progress / Sweatbox
I suspect you're right. Here's a demo I cobbled together: a cylinder with a hole, and four 4-point patches stacked inside. A spotlight directly above shines all the way through, while a spotlight behind the cylinder is blocked. [tho' it can blow around around the edges.]
-
Can I limit volumetric haze to the foreground only?
Kelley replied to Kelley's topic in Work In Progress / Sweatbox
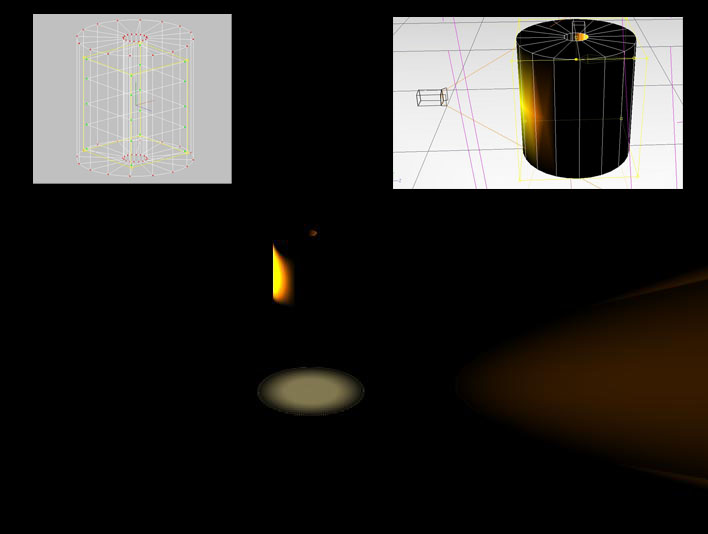
Thanks, Holmes. I'm struggling with your Volumetrics Tutorial right now. [the struggle being with the 'futz factor', not your excellent toot.] I also want to try a simple white panel with a gradated Transparency screen. We'll see what we see. -
Can I limit volumetric haze to the foreground only?
Kelley replied to Kelley's topic in Work In Progress / Sweatbox
I was afraid that was going to be the answer. A black sphere? mayhap. At the moment, I have taken the Ground Plane, colored it black, nrotated it 90 degrees and installed it as a background. I was hoping that if the fog was set to a far distance of 8000cm, the Ground Plane would obcsure the worst of it. -
I'm trying to add some haze to a night scene, but all settings convert it to daylight [camera background color being white] I tried other colors, but they don't look right. I tried black, which preserved the 'night-ness' but loses the sense of haze in the fore ground. How to get a light haze with a night sky?
-
Rendering Overhead: an assumption...
Kelley replied to Kelley's topic in Work In Progress / Sweatbox
Touche'. -
Rendering Overhead: an assumption...
Kelley replied to Kelley's topic in Work In Progress / Sweatbox
Could it be your turn soon? -
Rendering Overhead: an assumption...
Kelley replied to Kelley's topic in Work In Progress / Sweatbox
OK. The returns are in. The envelope, please. If objects are turned off, the CPU apparently doesn't see them and does not have to hold their CP positions in its thoughts. In the first anim., "Bare Bones and Red Lantern" the rocks and trees are turned off. It took 59 minutes to render the 10 secs. In the second, "All the Foliage", it took an hour and 43 min. Almost twice the time. It is true, the foliage isn't very visible, even for being a night scene, but I intend to punch up the specularity so the leaves highlight mo' betta'. The object ahead of the engine is a handcar [being chased] and here's the little guy who will be driving it. The two animations are rendered from different cameras. BARE_BONES_RED_LANTERN_10sec..zip ALL_THE_BONES_FOLIAGE_10sec..zip
-
Why does my light shine through walls?
Kelley replied to edlundart's topic in Work In Progress / Sweatbox
I think what Rodney was getting at is: If you have [let's say] a single four-point patch as a wall [we'll assume it's a large one] the light will pass through. But if you have a cube, the light won't. If you just put another four-point patch in front of the first, both will pass the light. I've noticed when texturing, some times I can go to the top view and select only the right-hand side of several objects. When I go to the Front View, they frequently overlap each other. However; I can apply a decal to the group all at once, and the front patchs don't mask the ones behind. So the question is: are you walls only single patch thickness? -
Rendering Overhead: an assumption...
Kelley replied to Kelley's topic in Work In Progress / Sweatbox
That's encouraging. I'll put it to the test. Thanks. -
To speed up render times [in a multi-frame animation] am I right in assuming that objects that are turned off in the Properties no longer exist are far as render times and computing effort? I have a situation in which I've built jungle foilage. The individual 'leaf units' are light in CP's, but there's a lot of units. I'm thinking it would be nice if I could have them turned off before they enter the frame, and turned off again after they leave.
-
Not bad at all. Next step, 'far as I can see, would be to put a person in the uniform...at least hands, face and legs. Then it's just a matter of texturing. You're probably closer than you think.
-
Hit a snag on installing 2001 rig...
Kelley replied to Kelley's topic in Work In Progress / Sweatbox
OK. Thanks a lot. -
Hit a snag on installing 2001 rig...
Kelley replied to Kelley's topic in Work In Progress / Sweatbox
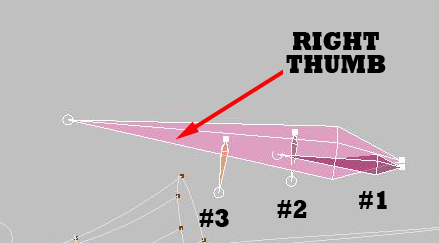
Does the large 'controller' bone sit on top of the three smaller ones inside the thumb geometry? -
It is greatly appreciated. Thank you much.
-
So...I scale the big bone to the length of the thumb and put it in place, and the small bones ride along in the same space, but have CP's attached to them? This will clench the fingers/hand without making a Pose?
-
Mayhap this is where I should have posted this query. I'm installing the finger bones in a character. I find a "Right Thumb" in the list. But it's a large single bone. Slightly below that, there's three more thumb bones. How do I bring these guys together, especially since 'Right Thumb#1 is at the same level in the heirarchy as "Right Thumb"?
-
You're 'way past boring. Might as well tell us what you're up to.
-
I've got everything in place except the fingers. When I started opening the hidden bones, I discover that there's a single bone labeled "Right Thumb", but below that there are additional bones for each joint. What do I do? Do I put the "Right Thumb" bone in place, and layer the other three joints over it? Or...
-
I'm for it!