Kelley
-
Posts
768 -
Joined
-
Last visited
Content Type
Profiles
Forums
Events
Everything posted by Kelley
-
Last night I modified the demon sprite by selecting some of the mesh in the head and extruding it up to form a helmet, then added the lenses. When I looked at him in the Choreography, the helmet was there. as expected, until the head section moved away from its default posirtion. 'Looey' runs down a length of road and the helmet follows behind. How is it that the model can come apart? I've never seen this before. I closed out, did a re-start...but it didn't help.

-

Can groups of keyframes be duped and moved?
Kelley replied to Kelley's topic in Work In Progress / Sweatbox
OK. Done. This is brand-new ground for me, and I was [am] nervous about deleting those first four seconds. But since they had already been saved as an Action...here goes. Thanks. -
Can groups of keyframes be duped and moved?
Kelley replied to Kelley's topic in Work In Progress / Sweatbox
Robcat: What I'm trying, hoping, to do is build a 'run' action on the same timeline shown above. What you see there is 4 sec. long. If I build an additional 2 sec. of 'run', can I select those two seconds and save only that as a new action? Or, are you suggesting that I can select the last two seconds in the choreography, and save that? -
Can groups of keyframes be duped and moved?
Kelley replied to Kelley's topic in Work In Progress / Sweatbox
Ken: I take it then, there is no 'lock' function for a bone? As you say, the movement is probably inherent in the rig, which is simple, if not primitive. Just a 'messin' around' rig. But I did think the root bone would resist drifting out of place. I did solve it as you suggest, by watching the Translate table on the Hips Bone and any time a number chaged from default, I manually corrected. In the Timeline shown, the toned area is where he drops to the runners stance. Now I want to make a sprint/running action. I opened a new Action and attempted to paste the final keyframes into it. Doesn't seem to want to happen. Everything on the timeline now will only happen once, by the run needs to be a repetitive/re-usable action. Can I continue to build on the same timeline, then select only the running keyframes and save only those as a new action?
-
Can groups of keyframes be duped and moved?
Kelley replied to Kelley's topic in Work In Progress / Sweatbox
Ken: the shift/control did it. Paul: To escape the Key Model filter, another choice has to be made. [there being no simple CTRL_D 'deselect' as far as I can see] I chose Key Branch and things look fine. But there is also Key Bone. Is one preferable to the other? Also, is there a way to put a lock on a bone so it can't move? In this case, the hips. [which is the root bone] In the process of moving arms, and deleting unwanted key frames, the whole character wanted to float upwards a few pixels, then down even though I never moved the hip bone. -
Using the little Mignola demon faerie, I have an eight-frame wingbeat cycle. I'm trying to build an Action in which he arches his back [chest out] stretches his arms out to the side, brings them front and claps his hands twice. Then drop into the 'ready-set-go' runners position. I want the wing cycle to happen sporadically as part of the warm up...but can't find a way to dupe the keyframes as a group. [in previous apps., I could Select>Alt>and drag copies] You'll see in the timeline where I duped the action one keyframe, one channel at a time. But is there a faster way? Second, when I paste the new keyframe in, it inserts a keyframe in every channel. Then I go in and delete. Is there a way to put the new key into one channel only?
-
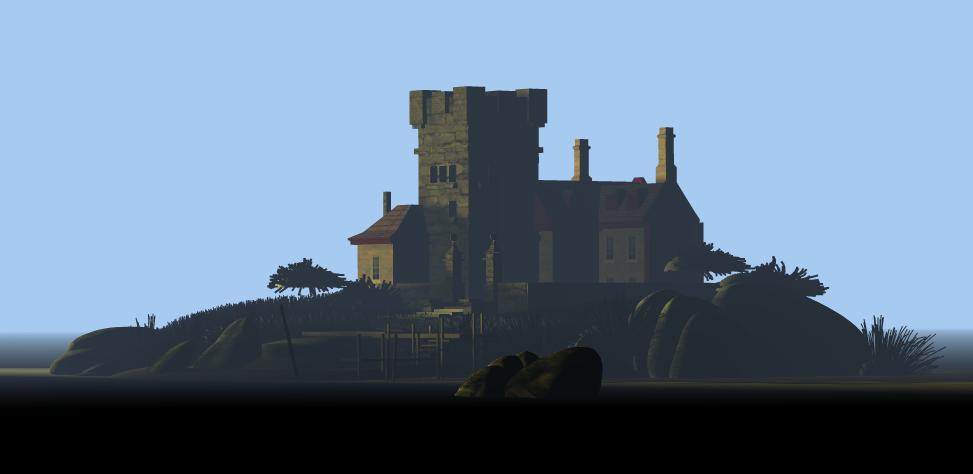
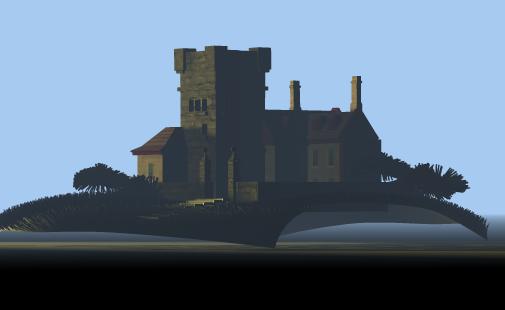
Thanks guys. Here's the final. The little flying sprites are Mike Mignola again. [as was the drawing that was the impetus for doing the house.] I've been delving into the Hellboy graphic novels and every coupl'a pages I see something that's drawn so tight and sculptural, that I want to model it. I think I will look back on this as my Mignola Phase.
-
Black Mage: When I replied to your textures posting, I failed to notice your second one with the 'Room & Tree'. Nice tree. Here's the final on the lake house. Tonight I'm going to try to build a water plane with lake ripples. We'll see what we see.
-
Today's efforts. It's a start. Texturing the hair/grass, etc. tomorrow. [castle modeled after one found in a Mike Mignola 'Hellboy' story.]
-
Thanks. Looks like some very interesting stuff.
-
I've been away for a bit. Had a near lightning strike near the house and it fried my tower, both monitors and the cable modem. [no surge protector] That's all changed. Picking up on this thread this morning, I find that Ken's got it. To change Density, you go to the parent setting under Materials. All else seems to be modifiable on the model itself.
-
Looking at Wm.Sutton's Mr.Dodo, in which he used the hair function for feathers, I'm wondering if anyone's used it for masses of vegetaion. Seems an umbrella-like dome could be duped and stacked to form treetops. Smaller ones with dodo-like 'feathers' could serve as bushes.
-
Moving a camera from the Choreography window...
Kelley replied to Kelley's topic in Work In Progress / Sweatbox
Ooops! The feeling of being an utter simpleton is at least balanced by the simplicity of the solution. -
Moving a camera from the Choreography window...
Kelley replied to Kelley's topic in Work In Progress / Sweatbox
Ken: I have three cameras at the moment. Let's say I'm looking through #1. If I move the camera's view using the Turn tool in the Navigation toolbar, can I lock the camera to the new view? When I use the NumPad_1, it cycles me to the next camera. Holding it down cycles thru the series. At the moment, the Turn tool is the only choice for moving the camera. -
Moving a camera from the Choreography window...
Kelley posted a topic in Work In Progress / Sweatbox
Frequently i see angles I like by moving the Choreography window, but find it difficult to re-capture it exactly when adjusting the camera in the Side/Front/Top windows. After moving the camera, is there a way to tell A:M to fix it in position? -
Sgt.Tubs was built in V.11, but worked on and saved in V.13. On the test example, it's V.13 from the start. There's no image, and it's a brand-new hair material. Until 'Density' turns up again, there's no way to go forward. I can adjust Length, and Thickness, but the hair that's there is all I can get.
-
WOW! That shook it loose! Also, opened up Sgt.Tubs to check the moustache settings. 'Density' is still not showing under 'Cap Ends'.
-
Your pics. are a little dark, but the killing claw seemed off. I dug these pics. off the 'net. You'll see that the digits on the killing claw are much shorter, and the claw much larger and sickle-shaped. Looking forward to seeing it move!
-
Ken: Poking around in some of the manuals, I see that Shift+8 is the keyboard's way of telling A:M to set Draw Particle/Hair...ON. And I had that already turned on in Tools>Options, and Render to File Settings>Options. Sometimes it works, sometimes not. When I opened the Hair Test this morning, everything was there. I also had found the controls in the PWS. Again, sometimes Density was there, sometimes not. I even re-opened Sgt.Tubs and checked the settings for his moustache in which I used Density to good effect. It wasn't there. I suspect if I opened it right now, it would be. Here's another question then: I tossed the first model and made a new one. Made a new Material and dropped it onto the model. All the hairs [except two] want to point toward the inside, contrary to expectations. And only those two outward Guide Hairs appear in the PWS. Can the others be flipped outward?
-
Back to the well one more time. I've been trying to play with the Hair function some more. But, the Grooming tools are usually missing, or greyed out. I go to Tools>Customize, and check Grooming. I can see them appear in the Tool Bar along with Model, Bones, Muscle, Skeletal, etc., and the [ 5, or so] individual manipulator tools appear in their own tool bar, but when I click 'OK' to close the Customize window, they disappear. And the icon in the Model, Bones, etc. goes grey. How do I hang on to the tools? Also, in the Properties [when any of the Material>Hair Systems>Hair Emitter are selected] some times I see 'Density' available [right under Cap Ends] and sometimes I don't. Is there something special that needs be done to bring this control up? Thanks.
-
Go to www.renderosity.com...a site largely for Poser people. They are hand-in-glove with DAZ, a company that now owns Bryce, Carrara, and several other 3D apps, currently in decline. Among the figures, clothing and props for Poser devotees, you can find photo albums of people [nude] shot from various neutral [not in motion] angles. You'll find faces and skin textures there.
-
Yes hair always seems to start out pointing away from the centre of mass of the hair group. If you ever find a hair guide that will not do as it is told just look for the 5 point patch that is emmiting it and replace it with a 4 point patch, or remove the hair from that patch. Nice 'tache! Good advice, all. Thanks again.
-
There it is. The other problem I was having is that the hairs radiate in all directions. It would be worlds easier if they followed the normals to begin with. I'd shape, and shape again, then look at it from the top and find that I was moving Guide Hairs on the reverse side. Eventually I twigged to the 'Reduce Density' trick. I pulled it down to 11% so I could see the mid-point CP on the GH. 'Made it possible to turn up the tips of the moustache. Also made him look a bit like Joe Stalin, but wot th' hell, he's carrying a PPSh anyway. Thanks all.
-
Once again, Ken...thank-you very much. I tried a second, 'just-for-the-helluva-it' render last night. 'Went to bed and just let it chug along. Somewhere in the middle of the night, A:M went belly-up again. I'll back up and take another shot at it from the beginning. As a final note...is it possible to select a Guide Hair in the PWS and see it selected?
-
I dug out my Sgt. Tubbs character [the guy in my avatar pic.] and am trying to work with hair. After massaging it about [ in V.11, about six months agao] I discovered that even if I hid everything except the moustache, the hair applied itself to the whole model. Tonight, I copied the moustache into a new .mdl and applied the hair to it, thinking to bring Tubbs and it together in the choreography. The b/w pics are from the modeling window. The hairs are overly fine and I think I could do with fewer if I made them thicker. It's the choreography that has me boggled. It doesn't seem to have anything to do with what I see in the model window. I tried to do a screen render [shaded quality] and it brought V.13 to its knees. A:M quit after nearly two hours [ approx. 80+% done]...so I don't know if the final would have approximated what I did on the model. A few questions then: [1] can hair be applied to just a portion of the mesh? [2] I note in V.13 that individual guide hairs are numbered and can be manipulated. But how to tell which is which? When I move a guide hair, its name doesn't highlight in the PWS, or vice versa. [3] If my render had gone to completion, would I have had a moustache as in the model window, or the enormous furball that looks about to happen? Thanks.