nerrazzi
-
Posts
374 -
Joined
-
Last visited
Content Type
Profiles
Forums
Events
Everything posted by nerrazzi
-
One more, I'll post some others as they become available...

-
work on his head...
-
MAN! This is the first time I took a gander at this WIP... EXCELLENT WORK!!!!!! Yeah the adults' eyes are a bit hazy & the baby looks... well, plastic. Think it needs a bump map... othern'at, your modeling skills are up there with Mr. Talbot's and I consider him to be the best of the best.
-
Sweet... I like that shader!
-
I don't know... they both look cool but I think that since the character has such huge eyes, it kind of puts me in the mind of anime. I'd say it would look better rendered using the toon feature. Nice work... Oh, if you're a newbie to A:M and having problems keeping your surfaces smooth, I'd stick to extruding and using the "maintain curvature" feature like crazy.
-
Hey Rodney... had to put it down for a moment to take care of some business, should be posting something in a few...
-
The point behind what rob was doing was to learn "how" to create effective 5pp. I don't think he was shootin' for a tight model at this point. Learn how to use the tools and then apply that knowledge to the creation of a seriously phat model. Looks like zacktaich was more or less supplying pointers for the model at hand which is cool too...
-
I guess I'll start working on the hand next...
-
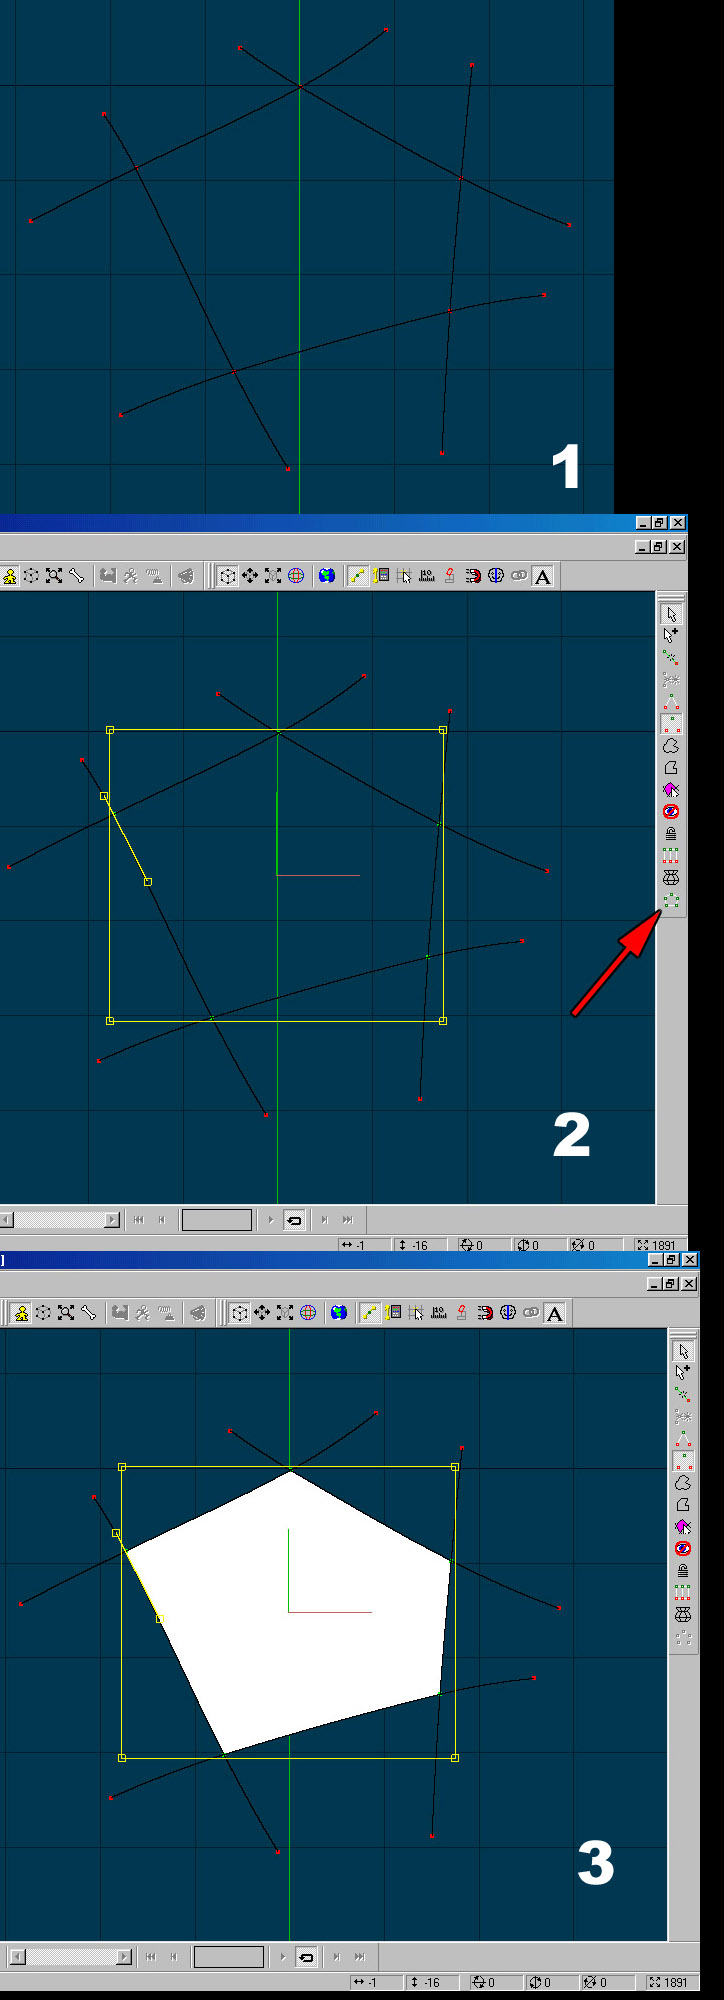
okay, basically if you create and connect some splines like in the first image, you will create what is called a 5 point patch... simple Press the 0 (zero) key on you keyboard. The one above the letters..., you get nothing. Now, if you shift-select just those five points in the center of those splines, a little green & white hoop will light up on the side of the interface. (See red arrow in image 2) Click that little hoop and that gap will fill in. Congratulations!!! You've just created a 5 point patch!!!!
-
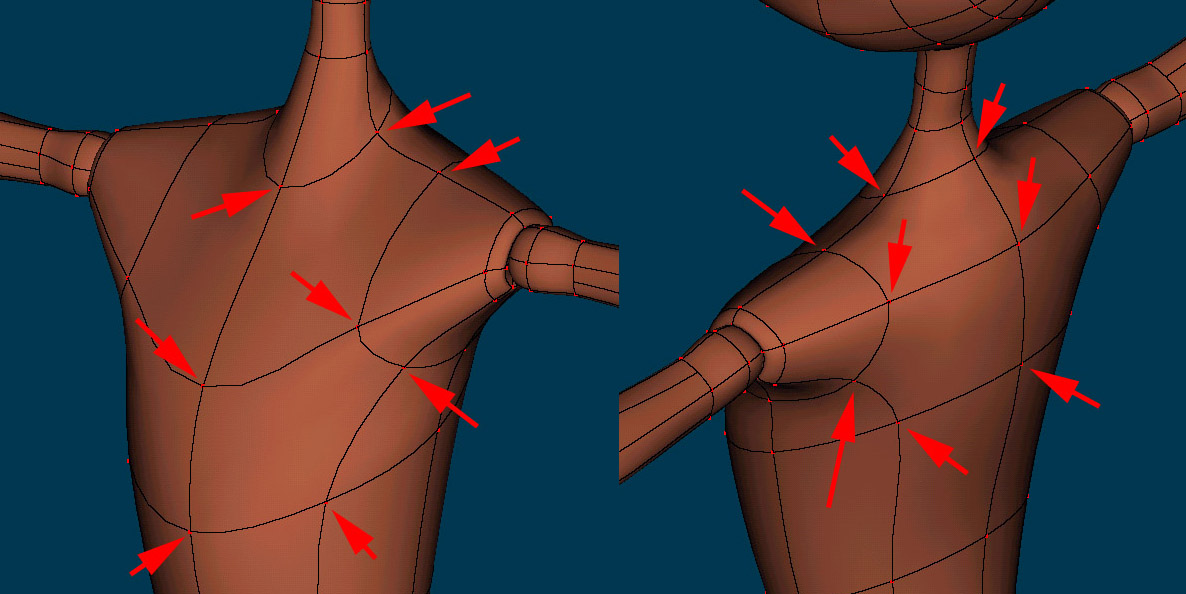
Here's a simple character I made a while back. Notice how the torso contains a small series of 5 point-patches so that from that, you can extrude the shoulder from regular 4-point patches. Take some time and study the image because a lot of times it doesn't start & end with the arms... it works into the neck region as well.
-
Looks reeeeal good man! Where's the rest of her?
-
Still developing...
-
Thank you your honor... All right... I think the shoulder area is pretty much in the bag.
-
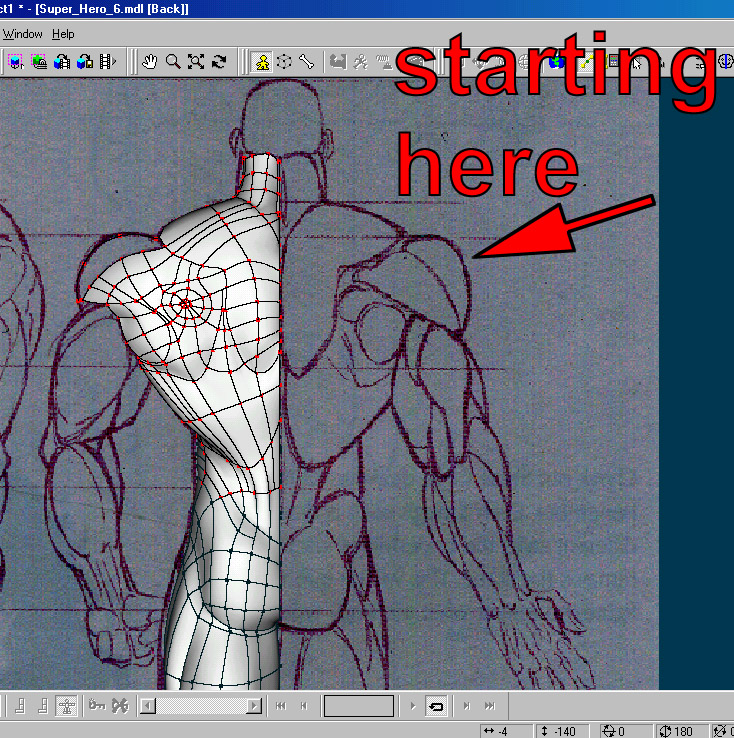
I think so, only thing is it takes forever to build a halfway decent model and you run the risk of creating too many patches in the process. Oh well, I'm finished with his back and now I'm ready to start building his arm. I'm going to start splining the outline of the arm on the opposite side because it's straight and his hand is open. After that, I'll flip it over to the other side and attach it to the exsisting mesh so that he's in the traditional da Vinci T stance. Naa, changed my mind. I'm going to model his left arm because there are good front & side views available.
-
Yeah, he's going to be lot of fun to animate. I'd like to put him on some sort of flying machine like what the Green Goblin had but I guess I need to be more creative. I'll do some smart skin tests on every moving part (even breathing) and post the results in wire-shaded mode.
-
back area
-
Hip region
-
Three pointers rarely behave themselves if inappropriately used... which most of mine are... I'm glad you like the model but I don't know how to explain to anyone why I model the way I do except to say that I like to define my models' "form" first before I add detail. REMEMBER (extrustion just doesn't cut it for detailed models) Certain areas that appear questionable due to irregular modeling practices "usually" are that way purposely prior to detail being added. Again, we're shootin' for form first. Key areas of this model will change before it's completely finished particularly in the joints. Since Hash has incorporated the "maintain curvature" feature, modeling in A:M has changed big-time. (for me anyway) I'm no longer limited to just extruding (or the "old school" style of modeling) to achieve a nice smooth surface. Now, after I get the general form of the model looking the way I want it, I simply go back and add or fix splines in problem areas without changing its form... much. It's the closest thing to sub-divisions A:M has and the principle factor in how I made this superhero model you see. I plan on modeling veins in the top of his hand & forearm using this feature & technique also. So..., if you see problem areas..... they won't be when it's finished.
-
thx for the comments all. here's more work on the waist i've recently completed. his arm is in the way on the rotoscope so looks like i'm going to have to do some ad-libbing...
-
Looks good. How long did it take to create & render?
-
Ummm.... sort of. For the vast majority of my models I first create an outline of whatever it is I'm modeling. I think it's a good idea to get the general shape down first and then fill it in as needed, this gives you more control over your model than just extruding.
-
Hey... you know your stuff! It's Andy Smith Yeah, I was thinking that too. I might mix it with some cheezy Alam FX. I take that back, Alam is pretty good. Are you kiddin'? John's a machine!!!
-
Well, superhero's seem to be the thing these days so, here we go....
-
Looks good. One crit... I'd round the legs out a little more around both the thigh and calf area, right now they have a sort of "vertical edgyness" to them. Other-'n-at...
-
Nice modeling Javier and cool pyro/afterburn FX. I bet that would look sweet coming from an imports exhaust... The whole Fast and Furious NOZ thing.