littleandy
-
Posts
227 -
Joined
-
Last visited
Content Type
Profiles
Forums
Events
Everything posted by littleandy
-
I can't really see with the lens flare, but if this is the thing on your display picture, it looks very cool. Maybe more like pills full of ball bearings than a robot, but who am I to judge? Can you put up a screen capture from just the modelling window? -Andrew
-
Ok, I guess i'm about a day late, but I spent all yesterday doing Easter stuff and starting and restarting my orc face because I was never happy with it. So anyway, what you see here is only about 6 hours of work. Any crits or critiques are more than welcome! -Andrew

-
Thanks for the tips! Hey Ross, I just went to your website and found you started on RayDream too! I didn't think anyone knew about that program. Oh, I seem to have trouble with the porcelain material. Whenever I try to use it in my own projects, the program interface starts to mess up so badly I have to shut it down. Does anyone else have trouble bringing the porcelain into your own projects? How can I do this? Anyway, porcelain or no porcelain, I'm going to try to have my progress on the face up by the end of the day. -Andrew
-
Ok, I'm still modelling, so I have a modelling question. sorry if this is vague, but how do people like jim talbot and macb make such smooth models? They all seem to have tons of faces in them, and whenever I put lots of faces in my models, they just get rumpled and wavy-looking. and the more I mess with them to try and make them more smooth, the worse it seems to get. I wonder, do really good A:M modellers out there start out with such dense mesh? or do they do some basic outlines and then fill and fill and fill and fill? And how should I use my bias handles? It seems like the problems always get worse when I use them. -Andrew
-
Hoo boy! I'm getting a headache. Let me see if I have a grasp on this. Just correct me where I'm wrong, ok? Alpha Channels are Transparency channels. An alpha channel is basically a grayscale image that tells the program how opacical...istic? different parts of the color image are supposed to be based on how dark or light the alpha channel image is at different aresas of the corresponding... um... color image. Am I repeating myself? Anyway, if I have that right, that makes sense to me. If not, I'm very confused. But, oh hey. In any case, will I basically be saving a multilayered file (color, transparency) as a targa? I don't flatten? Help!!! -Andrew
-
What about some leaky oil barrels and stuff? That'd make it eerie! Or would that interfere with your setting idea? -Andrew
-
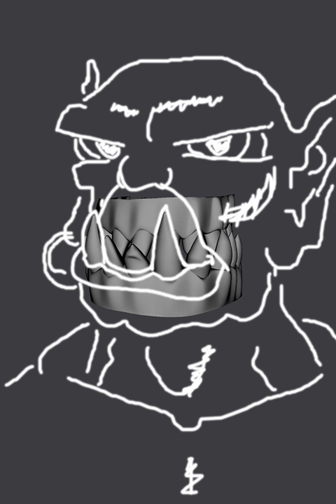
oh, and just to give some idea of what I'm shooting for, here's a little doodle I made on the computer. Please don't make fun, I don't have a wacom! -Andrew
-
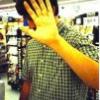
looks like an interesting creature! seems to me though that you might have trouble moving the hands around. you seem to have enough splines in the wrist areas, but the way it's built, you're going to have trouble when you start moving them, because one side is going to want to fold in on itself. that's the mistake i made building my avatar character. it always has a weird effect when I move the hands. And yeah, are you going to let him open his mouth? -Andrew
-
Hmm... so an alpha channel is DIFFERENT from having an area be invisible? Maybe I'm not understanding photoshop as well as I thought. Ok, what exactly is a channel? Maybe if I understand that, I'll have an easier time with this. Whatever you can send me or elaborate on would be much appreciated! -Andrew
-
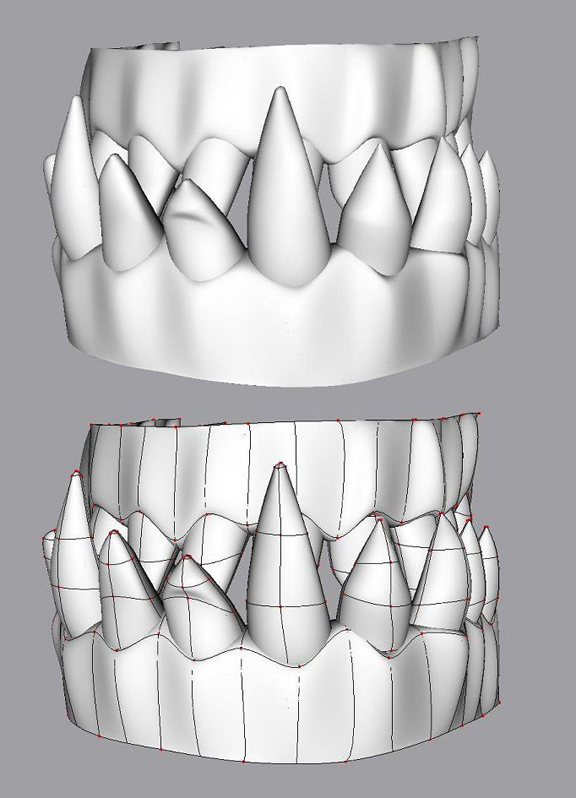
Alright, so I have this orc that I want to make. I haven't really sketched it out- I'm pretty much winging it this time. But that's ok at this point, because I know how I want the teeth to look. So that's what I've modelled so far. Problem: How do I texture them? I've done the basic geometry for the teeth and gums, and I've used naming conventions pretty carefully, so each tooth is it's own group and all that. Does anyone have suggestions for how to go about texturing? Do I need to do each tooth seperately? Ay, this is going to be a painful process if so... And if anyone has suggestions for the modelling at this point, this'd be a good time to tell me. P.S. I hope you can tell what direction it's facing. The big canines should help with that. -Andrew
-
Hey John, I know this is probably a little off topic, but I really like that skycast lighting your company uses. I went to find it, but how much does it cost? I couldn't find that info anywhere. -Andrew
-
wow!, that's really smooth! how about a wireframe? -Andrew
-
Yeah, and maybe do the eyebrows all big and dramatic like the picture... but I suppose you're already on that. The cheekbones seem like they need to be a little higher or something. The angles they create on the face are almost the opposite of what they are in the rotoscope. Nice job! -Andrew
-
Well, decals are actually faster to render than fancy procedural ones, so don't worry about that too much. I don't know what speed your computer's at, but when I have a project or a model that's loading slowly or the tool that lets you rotate around your object to work on it, I generally switch to wireframe, or lower the resolution (on Windows computers it's page up=higher res., page down=lower res.) Hope that helps -Andrew
-
This is totally a personal thing, but I would work a little more on the areas i circled. The place around where the jaw meets the rest of the head just looks a little too clean to me... or something. And maybe you could add some more geometry in that thin bone in the middle of the nose area to make it look more decayed or jagged or something? The whole thing looks awesome, though so don't let me rain on your parade. Just the things I noticed. Can't wait to see it textured! -Andrew
-
That's awesome, man! Are you turning this movie in for the space contest? (And yeah, how long DID it took you to put all this together?) -Andrew
-
Actually, these are seperate poses. I've got one for eyes, a couple for eyebrows, and maybe two or three for the mouth. I've just mixmatched them. :D But thanks for the advice, I like that rule. I'll get to work this weekend on some better expressions. I don't think there's any way I'll ever fit my animations under 1 MB, unless they're too tiny to see. But if you have a suggestion for a website service that has around 20 MB or more, I could sure use it. -Andrew
-
Wow. You're a lot more organized in your work process than I am. :blink: The clay approach is cool- think I might try it myself now! Looking forward to seeing this guy in splines. Keep it up! -Andrew
-
Wow, you're a genius! -Andrew
-
Thanks for the crits! I will make more expressions, and yeah, I suppose they could be a bit more exaggerated. I did the freckles on his face with photoshop, thanks to the tutorials that Mr. Talbot put up recently :D I'll smooth out the mouth... My original goal was to have 20 different expressions done by the end of yesterday, but I got sidetracked and spent most of the time doing the first 3.5 seconds of a test animation. As far as that goes, I have some questions: -I've done the hierarchy right, my bug's eyes translate with the head control bone, while aiming at a null object. The only problem is that when the bug's head is tilted in certain ways, the eyeballs want to peek out from behind the lids just enough to really agitate me. Did I not put my eyebone bases exactly in the middle of the eyeballs, so they're not rotating right? Or could it be something else? -Is it possible to delete percentage poses? I've made some that I don't like anymore and I want to get rid of them so I can clear up my pose slider window. That, and at one point I imported KeeKat into my model so I could cut off his hand and examine it next to my bug's hand and redesign it. Now I have a bunch of KeeKat poses that don't do anything, since the KeeKat geometry is long gone thanks! -Andrew
-
wow. Just when it seemed it couldn't get scarier... Nice work! -Andrew
-
Well, since no one replied to my texturing, I hope that means it's an ok job ;) Ok, here's some expressions. I'd like to hear any positive feedback, or criticism- shoot, even destructive criticism would work for me. Feel like I'm talking to myself here! :D And does anyone have any suggestions for how and where to create a nice, (cheap) website for the sole purpose of showing movie files? I'm about a third of the way through a test animation and it'd be cool to get some critiques on that too... :( -Andrew
-
I agree, unless you are going for a sort of "Olive Oil" type character, which would be fun too. Depends, I guess on whether you are shooting for realism or cartoony- At this point I'd guess you're going for cartoony, so if that's the final goal, then I've got no complaints. :rolleyes: -Andrew
-
Haha, looks a little malnourished! :lol: Seriously, looks good. Kind of anime proportions, it seems... I agree with the others though: fingers should be longer. And personally, it seems like the legs could be closer together. Not to encourage a lot of staring at that region on people, but I don't think there's quite as much space between the thighs... ;) Anyway, I can't wait for the head... that'll tie it all together better... well, unless you're going for a headless character... hmm... well, then it could use some blood, maybe. Oh, I'm up too late again! -Andrew
-
I'm still working toward my own first short, so take this with a grain of salt, but it seems that it might be useful to find pictures of wireframes of other models that have been used to animate the same sort of thing you're trying to do. i.e., to do more cartoony animation, look for cartoony models that you like the animation of, and try to track down the wireframes of the characters... in your case, maybe find some wireframe pics of the models from the final fantasy games? I don't think there's a specific NUMBER of splines to use- Just don't use more than you need to make the expressions or actions you want to make... extra splines can just make things look lumpy. So plot out your animation in your head (or on paper first) and figure out what your model needs to do, and then add or subtract geometry to let it do that. Hope that helps! ;)