HomeSlice
-
Posts
4,676 -
Joined
-
Last visited
Content Type
Profiles
Forums
Events
Everything posted by HomeSlice
-
You aren't supposed to move the entire stride length widget, at least I don't think you are supposed to. Your model should be centered near 0,0,0 in the Model window and the bottom of the feet on your model should rest at 0 along the Y axis (they will appear to be standing on the X axis line in the Model window). Then when you make a new Action with stride length, all you do is move each stride length indicator horizontally to the point where the foot pivots in relation to the leg.
-
Try setting a keyboard shortcut for "Attach Control Point".

-
Try this one and see if it works. This is the one I had in my v13 hxt folder. (I keep all my old hxt files in their own folders by AM version) OBJ.zip
-
I often get these kinds of errors if I apply a displacement material or hair material, then delete the material from the group or model while in shaded mode (displacement material) or while Hair is turned ON [shift-8] (hair material). A quick fix that often works in this case is to switch to wireframe mode and/or turn hair OFF. Then close the model window. Save your model under a different name (mymodel_v2.mdl) - always a good idea nomatter what - then open the model window and switch to shaded mode and/or switch hair display back on. If that doesn't work, close the project and reopen. If that doesn't work, quit and restart AM.
-
You're going to have to get OS 10.4 or higher. One of the things about Apple is that it changes it's operating system almost every year. Apparently OS 10.4 introduced some core changes that were incompatible with OS 10.3 and earlier. It's just one of the things about being a Mac owner you have to be aware of.
-
You seem to be acknowledging that our present health care system resembles a communist philosophy. "From each, according to his ability. To each, according to his need." Why the conservative sector (of all people) wants to maintain this is beyond me.
-
In addition to all the other excellent suggestions, there are also tutorials on: Sprites: http://www.hash.com/forums/index.php?s=&am...st&p=249010 Streaks: http://www.hash.com/forums/index.php?s=&am...st&p=249011 Blobbies: http://www.hash.com/forums/index.php?s=&am...st&p=249004
-
Ya sure. It's obvious you just took a photograph and drew some lines on it for a "wireframe" look. Nice modeling job
-
Is he related to Ross Perot? Perhaps a long lost brother?
-
I've been using this program for about 8 years, almost daily, and I still don't feel like I've mastered every aspect. "Easy to Learn. Hard to Master" - exactly like learning how to draw with a pencil. Thanks George! I'm glad some people find my tutorials useful
-
LOVE! the products. Where can I get some Drunkin Pumpkin? It think a transparency decal will work. Copy your decal/label and paint the parts you want to see white and the parts you don't want to see black, then apply it to the same geometry as the glass material. Don't forget to change its Type to "Transparency". I just tried it and there is one tricky bit. The black part of the transparency decal will turn the geometry under it 100% transparent. That isn't a problem if you want a 100% transparent bottle, but usually you don't want it totally transparent. I turned the "percent" down on my transparency map to "75%" and it blended perfectly with the rest of the geometry, which had 80% transparency. So I think a Transparency map is the way to go.
-
That looks really really nice Mark. In addition to the grass, the landscape itself makes me want to look at it. Great job all around.
-
I've never had AM create the sinfo files but not the regular render. But I know what the sinfo files are. They are used to sync up the sound with the frames or video in the AM NLE editor. The sinfo file allows you to render out TGA, JPEG, or whatever, then import the rendered frames and the sound file (if there was one) and AM will sync up the sound to the frames like it was in the original project files. This way, you can import several different renders into AM's NLE and move them around, crop the ranges etc while keeping the sound in sync with the frames. Then you can render out a Quicktime movie or whatever from all these different renders and have a single movie with all the sounds perfectly in sync.
-
I understand your rationale. It sure makes sense to me, especially if you can get Photoshop 6 or 7 for cheap on eBay. Experience with some kind of Paint program is essential in creating 3D art. As you are realizing, you eventually get to a point where you just have to buckle down and learn some kind of paint program, whatever it is.
-
This probably doesn't help you with UT, but there is also an AM exporter for the Torque game engine. I can't remember who wrote it, but you can try a forum search to dig it up.
-
An alternative is to construct your set in an Action window, instead of in a chor. It is a little more work to do all that in an Action, but the upside is that if you need to change something in the set, you can change it once on the action and all the sets in all your chors are updated automatically. Also, I've found that is is good to do your lighting in a separate action as well. The way you would do that is: Make a base model for the set, whether it is a bare room or a barren landscape. Create an Action for the base model and drag all the extra stuff, furniture, trees etc. into the Action as Action Objects. This action will have keyframes only on frame 0. It is essentially a 1 frame action Drag the base model into a Chor and drag the "set assembly" action onto the base model shortcut in the chor. Important! - Make sure the "chor range" for the action shortcut (in the chor) starts on frame 0 and has "Hold Last Frame" set to ON. A lighting action is made the same way. Create a new action with the base model. Drag lights into the Action as Action Objects. Then drag the lighting action onto the base model shortcut in the chor. If you need to alter some items in an action ONLY for one particular chor, I think you can click on the "show more than drivers" button for the base model shortcut in the chor and all the action objects will show up in the "bones" folder under the base model shortcut. You can move an Action Item around in the chor by selecting the bone that controls it. I'm not 100% sure about this, but I think this will only affect the current chor. It will not change the original Action, so your other chors will be unaffected.
-
I don't think you are supposed to "open" atx files. When you make a new Material, right-click on the Attribute under the material and choose "change type to -> Plugin" and your atx files will show up in the context menu as various texture plugins. At least that's how I think it works.
-
I managed to find a full version Photoshop 6 on ebay. http://cgi.ebay.com/ADOBE-PHOTOSHOP-6-0-FU...t=1218670254531 I just noticed it's for Mac. You'll have better luck finding Photoshop CS2 on ebay.
-
Check out the Hair tutorial. It covers different ways to texture the hair. http://www.hash.com/forums/index.php?showtopic=29738
-
In addition to Rodney's suggestion, make sure any non-movable models only have keyframes on frame 0. Delete all the other ones. If a model is supposed to move at some point, but you don't want it to slide around between moves, set it's Interpolation Method to "Zero Zlope". You seem to be a good artist. Why don't you just draw the extra buildings and bring each drawing into the chor as a Layer?
-
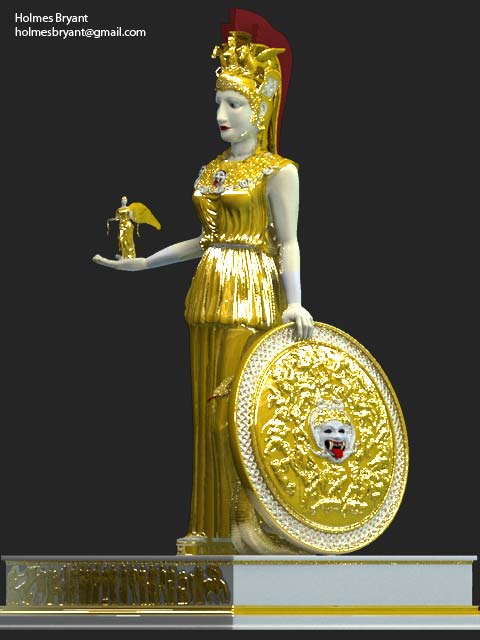
Here's the final version. It took 14 days to complete. I might have been able to do it faster if I had worked on it full time, but 14 days for something like this is pretty good for me nonetheless. The dress alone took about 7 days. Whew!
-
Thank You! The outer shield was a displacement/Bump map. Modeling that would have taken me longer than the dress Luckily, I had a rough sketch of the shield design to start with. (shield_design) Then I divided the design into areas depending on how much each area lifted off the surface. I painted the base a neutral gray (128,128,128) I painted each of the areas (castle, rocks, ladders, and figures) with a slightly different shade of gray, each on a different layer in Photoshop. (Shield1) Then for a little more detail, I extracted just the lines from the original drawing and cleaned them up a bit. Then, on a separate layer in Photoshop, I filled certain areas with white, then selected all the lines (the lines were on a separate layer), and deleted all the white areas that were behind a line, so what looks like lines is actually just empty space. (Shield2) Then I blurred the layer so the white areas bled into the places where the lines should be. Then I saved a displacement map of the blurred white layer and the layers painted with different shades of gray. (Shield3). Then I made just the layers with the lines visible,blurred them a little, and saved that as a Bump Map. (Shield4). The displacement map is applied at 400%. The bump map is applied at 100%.
-
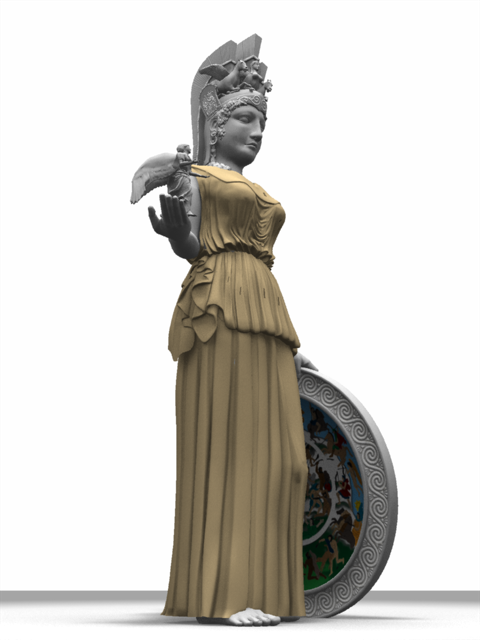
Well I didn't finish it by Sunday but I gave it a good effort. This is my 46th model that has some kind of crazy Greek cloth in it, and even though I underestimated the amount of time Athen's dress would take me (it's still not done), this is the fist model where I actually feel like I know what I'm doing. Everything I've encountered in this model so far are things I've encountered and solved before. On the 45th one I still felt like I was figuring it out to some extent. I've tried all kinds of different modeling techniques and combinations of bump, normal and displacement maps in the past to try and save a little time and work, but the results from simply modeling every fold are soooo much better than trying to fake the folds with displacement/bump maps, especially on something like this that will be the center of attention. The downside is that modeling every fold is SLOW and HARD when you are trying to at least come close to another source such as photos or a live model. I estimated 2-3 days on the dress and it will end up taking me 6 days (just for the Dress).
-
Day 7 - more cloth I'm almost done with the cloth. Man that left leg was a challenge. Holy cow. ... but it's done now. Whew! I have to add a doo-dad on the other side and make some adjustments here and there. Then I can move on to the Shield
-
OK, you convinced me. Thanks Nancy. I'll try to add a touch of asymmetry if I have any time left at the end.