HomeSlice
-
Posts
4,676 -
Joined
-
Last visited
Content Type
Profiles
Forums
Events
Everything posted by HomeSlice
-
Hash goes wherever: 1) its fun 2) they sell units. San Diego Comicon, I've heard, fulfills both those requirements.
-

Moving to A:M from another 3D software, what to expect?
HomeSlice replied to Path other's topic in New Users
You will find many more expensive suites, but I don't think you will find many (or any) that are larger. A:M's depth is hidden in a relatively easy and intuitive UI. As you get more familiar with the program, you discover more things. For me, it took eight or nine years of constant use before I felt I had reached the outer limits. Then, of course, they added a couple more features .... so I'm behind the curve again. -
Yep. She looks like one of their cousins.
-
the Adobecards thing could certainly be done in AM. The ad doesn't actually say the creators didn't use anything but the stock versions of the software in the Creative Suite ... so maybe they did, or maybe they used some 3rd party plugins for the physics. The creation of the bridge looks like it was probably done in Flash. I don't have the website open now, but I don't remember the perspective changing all that much, so it very well might have been a 2D, or pseudo 3D, animation with perspective. The creation of the castle is a great example of distracting the eye, giving the impression that magic is happening. The main focus is the vortex of cards which eventually forms the main tower. In the background, there is a lot of noise happening, but essentially it seems like they simply faded bits of the castle in slowly, behind all the chatter. The fight between the ship and the castle was fun. AM's Newton plugin could handle that quite well, but you would have to spend some time on it. I wonder how Adobe did it? I like the presentation concept most of all. It's like a looping DVD menu on steroids ... only there is no menu ... when you pause the movie, whatever is happening at the moment just loops until you advance it. Pretty neat.
-
If you don't want to create a muscle pose for the ground to create an indent, then your best option is to apply a displacement map at the place on the ground model where the motorcycle makes contact. After you apply the displacement map,create a new percentage pose for the ground model. When you create a new pose for the ground, a new temporary action will also be created in the container in the PWS. In that new temporary action, click the "show more than drivers" icon beside the model shortcut. Then drill down until you find the properties for the displacement map. Set the Pose slider to 0 and set the "Percentage" property on the displacement map to "0". Set the Pose slider to 100 and set the "Percentage" property on the displacement map to "100" - or whatever you want the maximum percentage to be. Don't forget to close the Pose window when you are done.
-
Hey Mark those look really good!
-
Lookin' great so far.
-
I have never even noticed this feature. This is something I have been wanting for years. Thanks for pointing it out.
-
You might also want to look at the Sprites Tutorial. http://www.hash.com/forums/index.php?s=&am...st&p=249010
-
There is some information on Raytraced shadows and Z Buffered shadows in the basic lighting tutorial. http://www.hash.com/forums/index.php?s=&am...st&p=248997
-
That's a good idea. If we keep the fan bones as a separate action, it will be fast and convenient to add a default fan bone setup, yet people who would rather do their own fan/coggs solution would not be forced to accept the standard fan bone implementation. In fact, people might be able to create their own fan, cog solution(s) in separate actions and share them on the forum. I was also wondering if we could use the same install system to provide things like extra arms and heads and stuff. What about rigging a centaur? It would be neat to be able to import "Quad Back Legs", "Quad Front Legs", "Quad Spine", "Human Spine", "Human Arms" and "Human Head". They place the geometry bones in their model. Then run the "Install Quad Back Legs" action, then the "Install Quad Front Legs" Action etc. I haven't tested this yet though. I have not idea if it would actually work.
-
Under the Shortcut to Thom, you have the walk action and Choreography Action1. Drag Choreography Action1 under the walk action and set its Blending Mode to "Blend". On frame 0 ... Set the Blend Percentage for Choreography Action1 to 0%. About 6-12 frames (more or less) before you want Thom to do something with his arms, again set the Blend Percentage for Chor Action1 to 0%. This sets a keyframe for it. Go forward 6-12 frames (more or less) and set the Blend Percentage for Chor Action1 to 100%. On that frame, start animating Thom's arms. If you want Thom's arms to follow the walk action again after he waves or whatever, set the Blend Percentage on Chor Action1 to 100% about 6-12 frames (more or less) before you want the arms to go back to the walking action. Go forward 6-12 frames and set the Blend Percentage in Chor Action1 to 0%.
-
Jake, are you *sure* the left half of your model mirrors the right half exactly? And that the model is centered at 0 on the X axis? If you select the right half of your model and choose "Mirror Selection" from the right-click menu, does every cp on the Left side become highlighted. The MirrorBones plugin works great for me, so I am scratching my head as to why it is not working for you.
-
Here are the steps to import an image sequence. First, your images must be named in sequential order. (myImage_001, myImage_002, myImage_003, etc.) If you have more than 99 images in the sequence, you should use 3 decimal places (001), if you have more than 999 images, you should use 4 decimal places (0001). Right-click on the container in the Project Workspace (PWS) window and choose Import -> Animation or Image Sequence. When the "Open File" dialog box appears, make sure the box in the bottom left, labeled "Import as an animation or sequence of images" is checked. Navigate to your images and choose the first one in the sequence. You don't have to select all of them. Hit the "Open" button on the dialog box, and AM will import all the images in the sequence so they will play as a movie file.
-
The first thing to do is comb the hair so it is not all poking straight out. Then you can probably get away with increasing the thickness of each hair so you can cover more area without increasing the density. Then you probably want the hair to taper along its length so it is pointed at the end. I do think you will have to bump up the density a couple of notches anyway. Then you are going to want to vary the density and the length in places, either with grooming or with decals. The area around her breasts might have less, and shorter, hair. The area around her back and thighs might have thicker and longer hair. Her face would have very short hair.
-
The roll handles on your foot bones may be pointing up. Close any Action or Choreography windows. Then open a Model window and check them. If the roll handles are pointing up, rotate them so they are pointing down. If that fixes it, you may be following an old version of the instructions. Please download the updated instructions. The funky fan bones may not have the correct parents. For example, the elbow fan bone should be a child of the bicep. Since the fan bones on the left side of the model appear correct, use them as a guide. If all else fails, just delete the misbehaving fan bones, along with their constraints and add them again in your rigged model.
-
Yes. In the model's |User Properties| window, turn the IK Legs pose OFF. This will show all the foot and leg geometry bones. Make sure you DO NOT turn the IK Legs pose off in the |Pose Slider| window when editing your pose. If you do, then the rig will behave unpredictably.
-
Render Problem- Strange artifacts showing up on final render
HomeSlice replied to cindylyoung's topic in New Users
Maybe you can try converting the PNG decal to a TGA with alpha channel and see if that fixes it? -
Matt, when you post that paper on getting long flowing hair to work, I will praise you for the hair god you are.
-
And ... for something like that, save your models as separate files instead of embedding them all in one project file. That way, if there's a problem with a model or a texture, you will only have to recover one model instead of all of them. If you spend enough time looking at a *copy* of your corrupted file in a text editor, with a simple model file to view for reference, you can usually figure out how to save most of your stuff.
-
I finally uploaded an updated LiteRig. I changed the Roll Method for the Arm IK Controls to "Roll History". It seems to work best at the moment. Thanks for all your help. ---------------------------- If anyone wants this fix in a model that has already been rigged with the LiteRig, look in the rigged model's folder for and . Look in the |Properties| window for each bone and change the Roll-Method to "Roll-History".
-
Here's one from the Technical Manual I didn't know. p48 [Roll-Method] "Occasionally you may rotate a bone and find this default (Roll Handle/Z Rotation) behavior undesirable. To remedy it, simultaneously press the [Ctrl] key on the keyboard, or [Cmd] key on the Mac, (while dragging the end of the bone) to automatically compute a minimal visible roll ..." I think this means if you hold down the [Ctrl] key while dragging the tip of a bone around, the bone will not rotate on the Z axis.
-
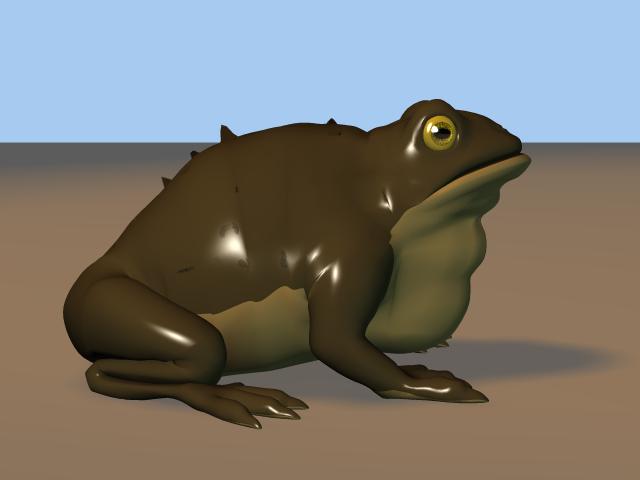
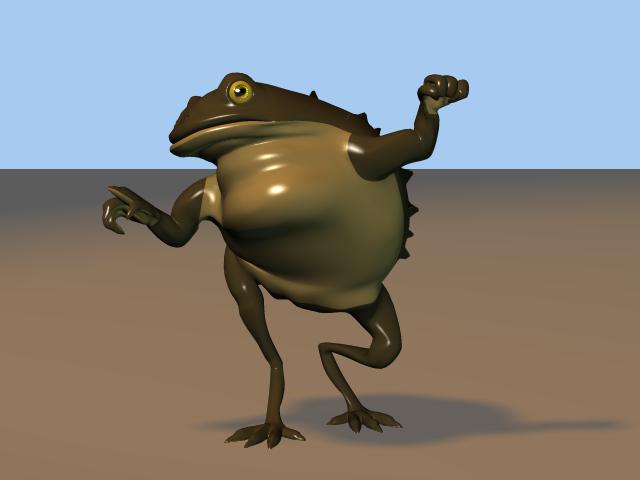
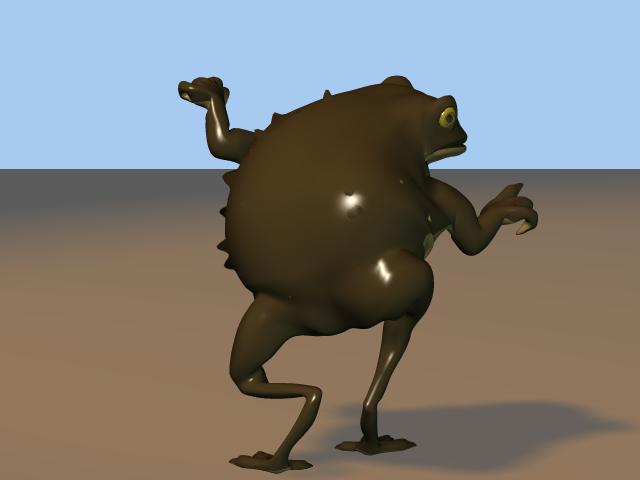
I had to add a couple bones to the legs ... and a couple more constraints ... and do some futzing around ... But basically I just rigged a toad with the LiteRig. WooHoo! I learned something new too. If your model is much larger or smaller than the default bones, you may have to scale the hand/foot controls up or down. That can easily be accomplished when you open your model in the *Install* action. The controls to scale are: "Foot Control" nulls (for the back feet) "Hand Gizmo Parent" bones (for the front feet) "Arm IK Control" nulls (also for the front feet) These controls are parents of all the other hand/foot controllers, so they should all scale in the action when you scale the above mentioned bones. Also make sure to activate the "Key Skeletal Scaling" filter button as well as the "Key Translations" and "Key Rotations" buttons before you export. You can pretty much just follow the basic LiteRig instructions for installing LiteRig_TOAD. http://www.hash.com/forums/index.php?s=&am...st&p=290286 The toad was modeled by Ken Heslip for our very own "Scarecrow of Oz". My cp weighting could probably use a little more work, but dang ... a toad ... with the LiteRig ... I'm stoked LiteRig_toad.zip (updated 1/9/09) Everything you need to rig a toad (or other amphibian). ToadLite.zip (updated 1/9/09) Ken Heslip's toad rigged with LiteRig_toad LiteRig_Toad.zip ToadLite.zip

-
Thanks Rodney. Its easy to forget things like that over time.