strohbehn
-
Posts
542 -
Joined
-
Last visited
Content Type
Profiles
Forums
Events
Everything posted by strohbehn
-
I've only had a couple of minutes to check it out, David, but so far SOOOOO good! Thanks a lot for the great foot control. The ball pivot looks and works great. I'll play more this weekend and get back to you.
-
This quote from the Mike Brown puppet link I refered to previously: The feet are really the only part of your rig, David, that I struggle with sometimes. They work fine as is, but I think the flexibility to use both heal and ball rotation would be great. I'm still finding all sorts of nice features every time I use it. Great job! Keep us posted on your progress. Mark
-
David, here's a great article written by Mike Brown regarding setups for good CG puppets. Take a look... www.anticz.com/puppets.htm
-
David, thanks a lot for the great new changes and the info on how you did it. Amazing... I haven't abandoned you here. It's been really busy this week and I haven't had as much time to work with the rig as I'd hoped. By the end of the weekend I hope to have spent enough time with it to comment more. Mark
-
Hey David, I feel like the guy who rubbed the magic lamp and had his wishes granted. You nailed it, buddy (Genie). It works great. I don't have time this morning to work with it more, but tonight I'll being playing like mad. Thanks for the awesome work! PS. I'm very curious how you added the extra hip and knee controls. I'll look into that tonight, too.
-
Hi David, I took a look at your helpful descriptions... Knees first: What I had in mind was control of knee direction completely independent of the hips and feet. For example, some people walk with their knees almost touching in the passing pose, and others walk with the knees flared out. It's very handy to be able to move the knee without pulling the foot along with it. Feet: After testing your foot setup more, I think your foot solution is probably simpler and more predictable than what I've been using. Your balance beam example described your intent for the heal control well. Hips: Thanks. I'm interested to know what your thoughts are on this.
-
Nice changes on locking the hands! Very good. Here are some observations/suggestions: I've spent the last few weeks learning how to animate walks. After trying several different rigs I've found that having pelvis movement completely independent of upper body movement is very valuable. What I'm thinking of is the functionality of John Keates' rig (and others) where the hips pivot from the belly button and the torso is completely unaffected. For example, in a sexy feminine walk the hips swing side-to-side and rotate, pivoting from the navel, while the upper body is swaying and twisting in the opposite direction. In John's rig the upper and lower body can be animated independently without messing up the other. Unless I'm missing something, there's really no way to do this with your rig. The "hips_IK" moves the upper body as well. "Chest-FK" does work as I would expect, however, which is nice. Also, By having the upper and lower body movement completely independent, it's much easier to change one type of walk style into another. It makes it less likely to have to unanimate unintended movement, too. How tough would it be to add knee target controls for independent knee movement? The "knee_squetch_targets" could be used for this, I guess, but there would be the "problem" of unnatural shifts because the squetch control allows movement in all directions. One other thing I've noticed is that the heel control only moves the heel itself, not the whole leg. If the heel is raised, shouldn't the whole leg lift? It's a great rig as is, David, so don't feel obligated to add or change anything. I'm amazed that this could be used for either a cartoony or realistic character because of how well you've laid out everything. I love the hide/show options. Great job! Mark
-
As usual, David, awesome effort here. I haven't checked on your progress since the early versions, and I'm impressed with how far you've taken this. He's a fun guy to work with. The time you've spent is huge, I'm sure. Thanks for all of your hard work! Now I'm going to go put him through a good workout. Mark
-
Hey David, I've been following your progress here. This last model is really fun to work with. Very nice idea to combine the hand and elbow control. Your controls are organized well, making it an easy rig to use. Thanks for working on this project and posting your updates. I'll stay tuned... Mark
-
Mike, GREAT deformations! Is the rig identical to your POMcKnuckles rig? Did you end up smartskinning at all, or is this pure "cog joint / mesh design" magic? Keep posting your progress.
-
I like the appeal of this character, Mike. He looks like he'd be fun to animate. Looks like your rigging is up to par as well... nice deformations. You said this is just a quick and messy walk cycle, so take this for what it's worth... his hip needs to drop a bit on the side of the lifted (passing) leg, not raise. The way it is now gives him an unnatural sway. Does this mean you've solved the distortion box issues you were having? I'm curious to hear an update on that. Nice job.
-
You're almost there. It's looking very nice. This is what I had to do to finally get a natural look in this area:

-
Hey David, Your pose folders are so well-organized and easy to follow, I was just wondering if this is due to a lot of preplanning on your part before creating the poses, or did you rearrange your poses into folders after-the-fact? If so, how'd you do it so everything still works? Because I'm constantly tinkering, adding new poses and constraints, I end up with just a long laundry-list of unorganized poses. Also, a video tutorial from you on how you did this rigging would be a huge benefit to everyone on this board. You've done a great job with Bertram's rig! Thanks, Mark
-
Outstanding work, Chris! I'd have bet $50 that was a photograph. Thanks for showing the wireframes and some insights on how you did it. Is the fabric fuzz on the edges of the head strap done in photoshop?
-
Colin, are you saying that it was so much easier for you to only work with half the mesh that you wouldn't consider doing it with the full mesh in a pose? Just for fun I tried creating a new pose with the altered mesh, copying a muscle keyframe, then pasting this into the original mesh's new pose window. It didn't work, though. Either I messed up, or it's not possible to do this. I thought since the 2 meshes have exactly the same CP's, just in slightly different locations that it maybe should have worked. If anyone knows how to do this I'd love to know how.
-
Melissa, thanks for the kind comments. Chris and Ken, After I did the morphing as a new model I thwacked myself on the head and thought, "I should have done this as pose so I could morph between the two". Colin's Cooper thread mentions this too. It's a fun idea to try in the future. I was amazed, too, when the Incredibles commentary made mention of using one mesh for all of the different characters. It would be fun to know how much work went into each new variant.
-
Cooper F evolved to the Martian.
strohbehn replied to cfree68f's topic in Work In Progress / Sweatbox
Hey Colin, I LOVE this work you did! This little character is really likeable, and looks like he could be a handfull. Did you do this all with magnet mode, or did you use lattices at all to deform your mesh? Thank you for your activity on this board because it is very informative, and inspirational. Mark -
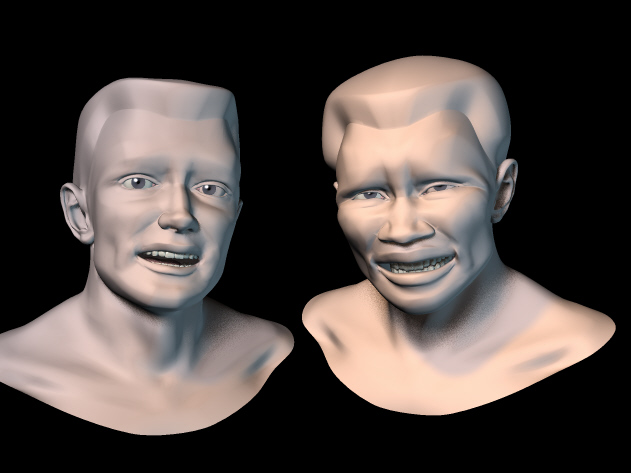
I've been playing with using lattices in distortion mode lately and found it an incredibly easy and fast way to morph one model into another. The really great thing about it is that all of my facial controls still work nearly perfectly on the new, morphed model. The guy on the left is my original head model. And the fellow on the right is his new African buddy. This took me all of about 45 minutes to do. Neat, huh? I love Animation Master!!!
-
You're ear is coming along very nicely, Bill. Keep comparing your ear with photos as you model. Maybe even use photos for rotoscopes if you haven't already. Eventually, things seem to fall into place. It is a challenge, to be sure. Hey Will sutton, the skin shade on your model is amazing. Very nice form, too.
-
Looks really nice. Dagooos' observations are accurate. I also notice that his knees unnaturally hyperextend at two points. One is just before the footfall out in front. And the other is when his entire weight is directly over the leg that's on the ground. If he were running, he'd be mostly on his toes... especially if he were running up hill. I'd keep this walk cycle as your "fast walk" or "determined walk" are rework a new action (based on this one) for your uphill walk.
-
Hi John, The style of this animation is very appealing. Nice job! A couple of things caught my eye. 1. The introduction was overpowering and detracted from the main feature with the number of different colors used, speed of switching, and odd shapes. I think an understated, simple intro would work better... something that relates to the story. As a suggestion, you could fade in to your initial shot of the wall with the paintings on it and fade in your title and name on the open wall above the paintings. Then fade the title out and have your character enter to begin the animation. 2. What jumped out at me immediately regarding the animation was the lack of pauses, where the character stands still for a length of time. The pause at the first painting is pretty good, but after that there is nearly constant motion. I think you would convey intended emotions better with longer pauses. I also agree with the "floaty" comments already noted. Your camera work is very nice. Keep up the good work.
-
In the sample project file that you posted, are the lower lip controls disabled or is there some constraint that I have to turn on that I've missed? It appears they are all on, but the nulls don't translate when the lower lip sliders are moved. Edited: After playing with this more... now the lower lip controls appear to work. I have no idea why they work now and didn't the last few times I've used this file. Also, the cheeks raise but won't do any I/O motion. And the nose will not raise. Any suggestions, David? (I'm using version 11.0h)
-
Wow, you went way above and beyond the call of duty, David! Thanks so much for the detailed explanation of the CP weighting. Just one problem now, though... How am I supposed to get my work done today with a gem like this to study? I'll get back to you after I dig into this more tonight.
-
Thanks for the reply, David, and for sharing your hard work. The way you've organized everything in the project file and web page makes it easier to understand this rig. I look forward to digging in deeper and figuring out exactly what you've done, when I get a bit more time. It's really an amazing rigging job. As for the forhead rig, you may be out of your mind but I'd still be interested in seeing what you did. Did you do it that way thinking you could achieve more realistic arcs of movement (as opposed to using muscle poses), or why? I'll have some questions for you in the next few days if you don't mind.
-
I'm really impressed with the rigging you did here. The additions you made are very useful and solve some of the problems that made me abandon this method in favor of muscle poses. Thanks for posting the rig and tutorial! That was a ton of work to do, I'm sure. Would you be willing to post a screen shot of the model in "bones mode" showing the CP weighting (the fancy-colored weight distribution shot)? Mark