strohbehn
-
Posts
542 -
Joined
-
Last visited
Content Type
Profiles
Forums
Events
Everything posted by strohbehn
-
Hi John, I don't think I've ever replied to one of your posts yet, but every time I see one from you I smile and eagerly watch the movie to see what the latest innovation is. You've done some really interesting things, and I'm glad you're a regular on this forum. When I get the chance someday, I'm going to download all of your sample files (to make sure I have them on file) and have a great time learning the particulars of sprites, particles, decals, etc. It's gonna be great fun. Thanks for posting here, and keep up the good work! Mark
-
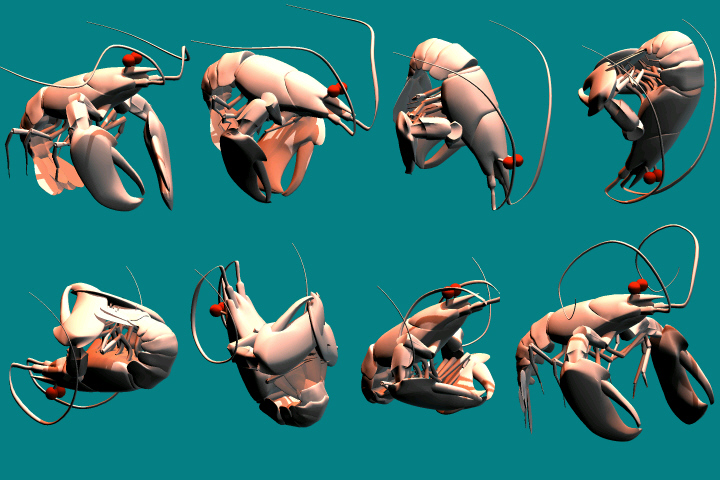
Great crab, Ken! I've been thinkiing about the same thing for my lobster, but just didn't have time to look into a solution yet. I'll bet Paul's hair idea would do the trick nicely. There's one thing that bothers me with this model, though. His legs, body, eyes, and "forearms" are modeled beautifully... then the main pinchers are rounded on the inside. I'm not sure he could actually grab anything except at the very tips of the claws. What do you think? Also, I love the render on this one. Did you do that with a skylight rig, or what? I'm pretty lost when it comes to lighting. Please post new shots as you make progress. Mark
-
Here is a new version of the animation I did for the Anzovin Studios' "Setup Machine 2" contest in November. It's basically a commercial showcasing The Setup Machine's rigging capabilities. Toward the end I added a front flip (with a full tuck) for a little extra pizzaz. It goes by fast to stay in sync with the timing of the jumps, so you may need to step through frame-by-frame to appreciate it fully. Lo Res (Quicktime, Sorenson 3, 320x240, 1.1Mb) http://www.scc.net/~mbs/AnzovinContest2_LowRes.qt Enjoy!

-
In a word... Outstanding! Great use of camera movement synchronized with the dramatic music. Nice job!
-
Thanks for the encouragement and help, friends. I'm thinking now that the vocal track may be too exaggerated for this character. Unless I can put some of John Keates' suggestions to work to extend my pose limits, I may need to find a different track (or possibly tweak some of the poses). Justin, your "Animate a Face" tutorial was fantastic. I really enjoyed your presentation style, and the information was outstanding. It would have taken me months longer to learn the A:M interface (timeline, curves, etc.) and lipsync skills without "Animate a Face". Thanks for sharing your knowledge! Make MORE! Please keep us posted on whatever you come up with for a hand control rig. Sounds interesting....
-
Thanks for the great input, John. There's a lot there to work with. This part I'll have to look into: "setting the pre and post extrapolation of the channels in the poses". You are not referring to the percentage value of the poses' property (not sure I worded that correctly, and I'm not at my A:M computer to check it out) are you? As it is now, many of the poses are at their extremes and I haven't tried changing the percentage values to try to push them further. You're right about the eyelids, brows, neck and head movements needing more attention. I got a bit lost here without a body to help out. One of these days I'll figure out a plan for this character. Probably the biggest help would be for me to videotape myself doing Yosemite's lines and check out all the movements. "It is a good idea to orient the head bone like a steady bone with 'apply before action' to 'on'. This way, it will keep its angle when you add neck movement." I'm not quite following you here. What is the steady bone constrained to.... an upper spine bone? And is the orient like constraint on the head bone at a percentage less than 100? Thanks again for the help.
-
I agree Rodney, it's fantastic. Let's give credit where it's due on this one. It's modeled after Jason Osipa's "Stop Staring" book, and uses the example of William Young's project file at this link: http://www.hash.com/forums/index.php?showt...&hl=osipa's I just implemented their great ideas.
-
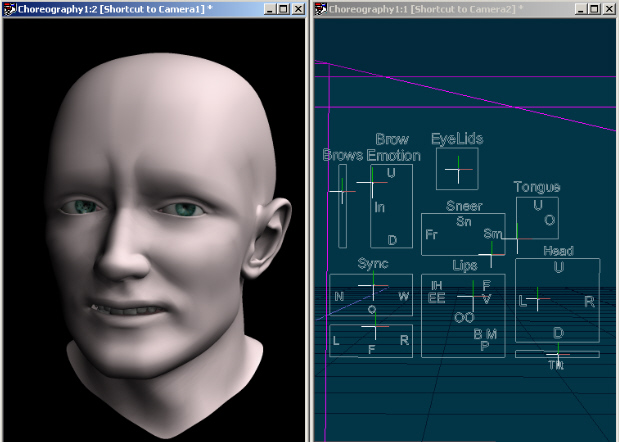
The "slider interface" works beautifully. It's very fast and intuitive because each slider can control up to three pose sliders. So instead of going back to the pose slider window for each little tweak (scrolling up and down the list of poses), the vast majority of the work is done from these few controls right next to the head. My favorite control is the "Lips" box. It controls: 1. Upper lip up 2. Upper lip down 3. Lower lip up 4. Lower lip down This control in addition to the "Sync" control (mouth narrow, wide, open, closed) lets you do nearly any symmetrical lip shape in seconds. I don't have the experience to know if it's the best way, but once it's set up the lipsync moves along very easily. It's great fun! I didn't extend the mesh as far back and down as I should have in the throat area. Good pickup...
-
Thanks for the comments, guys. For reference purposes, the model is based on my face. You're right. As far as rendering goes, I just did a "render to file" with the action window active. I did it this way instead of in a choreography because I didn't want to mess with lighting, and it's very fast. It only takes about a minute to render, and being able to check the realtime result after making changes is really helpful. My computer can't quite play at realtime speed from the timeline.
-
Hi gang, Here's a new lipsync I've been working on. This one has more extreme emotion to show what this setup is capable of. This clip is a render from the action window (Quicktime, Sorenson 3, 1.7MB) http://www.scc.net/~mbs/Yosemite27.mov This one is a wireframe that includes the onscreen interface I use for animating this critter. About 90% of the lipsync was done using the "slider interface" and the remaining 10% was tweeking the individual pose sliders. (DivX 5.1.1, 2.1MB) http://www.mstrohbehn.lunarpages.com/Videos/Yosemite26.avi Let me know what you all think. Thanks!
-
Nice job, Ken. The walk cycle comes off well with the secondary hand and head motions. I also like the solid feel of the footsteps and how they bend naturally throughout the cycle. I like the lighting, too. Something about the torso movement catches my eye. Does your troll's spine rotate around the vertical axis some? His chest and upper stomach could use some rotation with the shoulders. also, I keep wanting to see the hips rotate opposite of the shoulders. It's possible that you did this, but because of the massive upper body volume it's hidden a bit. Did you use any dynamics for the rig on this character (like the head bob)? Did you use TSM2 to rig this guy? If so, how did that go for you with the updated version of TSM2?
-
Thank you all for your input (both here and on the "spline head" thread). I agree that the "V" and "F" forms need improvement on this one. As far as pushing the expressions more goes, you are all right there as well. I think what I'll do is start over with a much more dynamic soundtrack that has a broader range of emotions. Anthony Hopkins' deadpan expressions were what I had in mind with the slow eyeblinks. Unfortunately, deadpan doesn't work well outside of the intended context (especially in a 10 second clip with no body or background). I should have been more selective, but was too anxious to get going. Stay tuned for the new and improved, dynamic-guy lipsync..... Thanks again!
-
NOTE: I originally posted this on page 3 of the "My first spline head" thread, but now think that may doom it to obscurity .... so here it is by itself. Please take a look at this 10 second (2.6Mb - QT Sorenson 3) lipsync clip and fire away with suggestions. It's definitely time for some objective input! Lighting and textures were not my main focus here. I just wanted to try my hand at lipsync first, test my rig, and learn the interface. http://www.scc.net/~mbs/lipsynctest16.mov Also, I'd like to compress this further to get below the 1Mb file size limit so I can post it on this forum and not on a separate web page. What's the best format to use?
-
Please take a look at this 10 second (2.6Mb - QT Sorenson 3) lipsync clip and fire away with suggestions. It's definitely time for some objective input! Lighting and textures were not my main focus here. I just wanted to try my hand at lipsync first, test my rig, and learn the interface. http://www.scc.net/~mbs/lipsynctest16.mov Also, I'd like to compress this further to get below the 1Mb file size limit so I can post it on this forum and not on a separate web page. What's the best format to use? Thanks!
-
Here's the process, very quickly. Please get the project file from the link I mentioned in the first post and tear it apart. All of the elements are in that file. 1. In the modeling window, make the outlines for the interface and add type if you wish. 2. Add the nulls (modeling window), rename, resize, and position them in the proper places in the interface outlines. 3. Make a new On/Off pose and rename it Face Constraints. 4. In the relationship window (for the Face Constraint pose), click on a null and select New>constraint>translate limits. Set the "min" and "max" values which will restrict the x and y movement of the null. Repeat this process for each null. This completes the interface part. Now you need to make relationships for each null slider position. 4. In the PWS go to Model>Bones and select one of the nulls. Open its' properties tab and go to Translate X (or Y, depending on how your slider is going to work), and right-click, select New Relationship. 5. In the relationship window, make your pose slider window visible and set the relevent pose slider's values to zero (the sliders that will be affected by the null). Move the null to one of its' extreme positions and set the appropriate pose slider to 100%. Now, move the null to its' other extreme position, and change another pose sliders' value to 100%. For example, on the right side of a side-to-side null slider I put a wide mouth pose and on the left side I put the narrow mouth pose. Close the relationship window and repeat this process for each null sliders' x and y value you have. 6. Test the null slider in an action window. As you translate each null it should automatically control whatever pose sliders you attached to it. 7. Save, save, save.... repeat. Good luck!
-
The squares are just visual guides that show the translation boundries of each null. Each null has a "transform (translate) relationship" set for its' X and Y value that is linked to pose slider positions.
-
Here's a quick screenshot of the lipsync interface I just finished. It's modeled after Jason Osipa's "Stop Staring" book, and uses the example of William Young's project file at this link: http://www.hash.com/forums/index.php?showt...&hl=osipa's Each null visible on the right controls anywhere from 2-4 pose sliders. The individual right and left poses are still controlled via the pose slider window. After some texturing and lighting adjustments I'll be starting the lipsync project. Comments and suggestions welcome.
-
Yves, this is an absolutely beautifully crafted model. The lighting is amazing as well. Threads like this are pure gold. Thanks for offering your hard work for examination and instruction!
-
Wow! Your lipsync is amazing on this. Really nice job. Great character. Thanks, too, for all your posts on the facial rigging setup. It's powerful stuff that I'm trying to get a grip on. Mark
-
FYI... there is an awsome perl script by Aminator (Jack Morrison) called "splitp.p" that will take a pose and split it into individual Left and Right side poses (and still maintain the bilateral version). I've been experimenting with this for the past few days and it works beautifully! It's a Huge time saver! Contact him to see if he'll post it with the instructions if you're interested. It would make a good tutorial on the Tutorial Resources site. Ken... I actually ended up adding those two rings you mentioned after trying a few poses because I wasn't able to get the fullness below the eye and above the corners of the mouth without them during certain movements. Thanks Mark
-
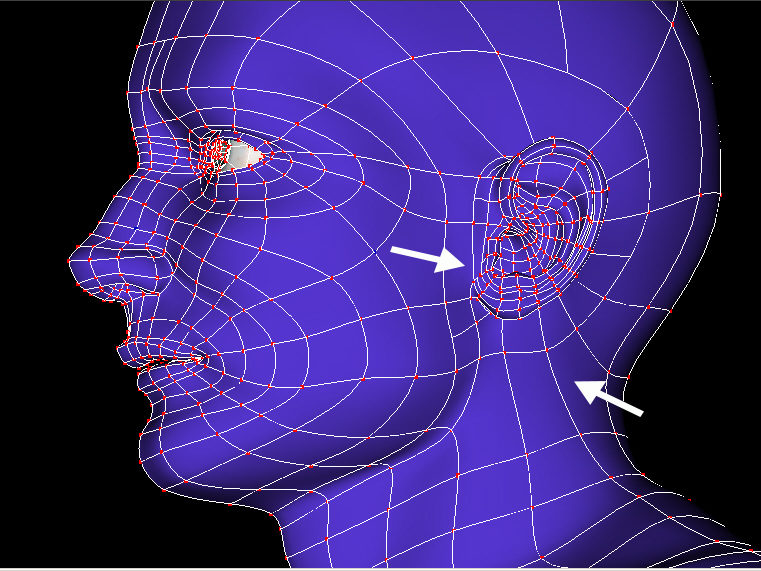
Got a chance to try most of your helpful hints, and you were all correct in your answers. I tried the porcelain material again and did indeed have some normals flipped the wrong way, which was causing the problems (thought I'd gotten them all, but hadn't). Smoothing will help. While looking into nerrazzi'a suggestion about mesh layout on the neck I discovered that that was an old version of the model. Weeks ago I cleaned up the mesh around the ears and neck area on one side, then intended to delete half and copy/flip/paste. Somewhere in the multiple saved versions I grabbed an older version of the mesh and did the poses on that one. Grrrr... now considering redoing the head with rigging just for fun. Pengy asked for a full front view, but I think this one shows everything more clearly. The arrows show changes from the previous mesh. Mark
-
Bravo people. The light is now ON! Your answers made it clear. For future newbies reading this thread, follow the previous three posts and you'll be fine. It appears A:M wasn't initially refreshing the new bump % values, so even though I may have stumbled on the right solution once or twice I didn't know I had it right. Pressing the spacebar did the trick to refresh the values once I had followed the right steps. I actually like the way things are organized in the PWS, but it's confusing at first to know where to look for what values need changing. My light shine-through problem was due to my not setting "cast shadows" on my lights. The first raytraced result was really odd, but I can read up on that now. Thanks... There's soooo much more to learn. Thanks for helping me along. Mark
-
Hey guys, please hop in here with a little "hand-holding, step-by-step" help if you'd be so kind. This should be easy, and I've searched and read the manual but it's still escaping me. I've made some bump maps (ie for the forehead wrinkles) and want to add relationships to the poses that regulate the percentage of bump relief. Easy enough, right? I know how to add the relationship to a pose, but actually getting the bump percentage of my decal to change as the pose slider changes is not working. I'm doing something wrong, and several hours of experimenting haven't improved my understanding. Any rescuers available to make the light bulb go on over my head? Thanks
-
Thanks a lot for all of your comments and help. I hope to have time to try out the suggestions this weekend.
-
Thanks for the comments. This is my third head, first one with splines. I've never gotten to the actual lipsync or animation part, so this should be fun! I like the tools A:M has for animation. There are three bones so far: neck, head and lower jaw. The CP's of the mouth area are weighted. I'll be adding rigging for the eyes and probably tongue. Other than that, all movements are poses. I tried the porcelain material and get a few black areas, even though all normals point in the same direction. It's probably the result of 5-point patches from what I've been able to gather from other posts. Once it's got bump maps and texture the small ridges shouldn't be visible anymore. I have a few questions: 1. There's light shine-through into the mouth/head. Am I missing a setting that prevents this, or do I need to add a "negative" light inside the head? 2. When rendering, if I right-click and do a selective area render it works fine. If I hit the "render to file" and try to save a targa file it renders a totally black frame. This must be simple, but I'm stumped. 3. There are eye decals for the irises that seem to come and go at will. I end up having to redirect A:M to the file again. The decal image is in a different directory from the prj and mdl files. Would it help to keep them all in the same directory? 4. I remember reading a post about aligning all the cp's in a spline to exactly the x=0 value, and now can't find it again. Does anyone happen to have that post bookmarked? Thanks a lot for the help, Mark Strohbehn