-
Posts
5,112 -
Joined
-
Last visited
Content Type
Profiles
Forums
Events
Everything posted by Paul Forwood
-

Question About Dynamic Constraint
Paul Forwood replied to tchamberlain2's topic in Work In Progress / Sweatbox
Do you also have hair active in the scene? I remember a problem with the dynamics of hair interfering with dynamic chains but I thought that it had been fixed. What version of A:M are you using? Sorry, I can't test it at the moment. -

New WIP - Lost In Space B9 Robot
Paul Forwood replied to Tralfaz's topic in Work In Progress / Sweatbox
Well, it seems that I am not the only one who is confused about the name: Robot B9, (benign), is good though. The name suggests an amiable character. -

New WIP - Lost In Space B9 Robot
Paul Forwood replied to Tralfaz's topic in Work In Progress / Sweatbox
Robbie is looking terrific, Al. I'm glad to see that you got the arms working. I did try to rig an arm for you but my effort didn't work quite as I expected. Well done! -
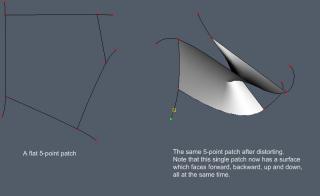
Select the problematic patches and hit "F". This will flip the normals for any selected patches. Though it seems to be possible to provide a reliable normal unifier with polygon programes it does not seem to be possible for anyone to do it with patches. Perhaps it just too difficult to automatically decide what is an outward or inward facing patch: Even a 3 point patch can have a pretty convoluted surface. I do think that a routine could be written that would allow you to select one patch on a mesh and then select "Unify Normals" and the routine would compare neighbouring normals and flip them if their normal varied by more than a certain number of degrees but that would fail as it followed the contours of a vase's surface from the outside to the inside.
-
First class work, Stian!
-

Ok, a newbie logs on to a software support forum.......
Paul Forwood replied to MJL's topic in New Users
You did a good job on your toy soldier, Myron! Baptisms of fire sure make you learn fast, eh, but you've got to keep those little army men at a safe distance or they melt. -
That is a wonderful looking model and the hair is some of the best that I have seen in A:M.
-
Thanks, Steve. The render looks good alright and the hair looks very good at that range.
-
No worries about the hair, Robert. I just mentioned that I had turned it off in that render because I didn't want to wait several days for a test render. If I were to attempt a complete animation with AO I would definitely use helmet hair. That's all.
-
Thanks guys. Steve, I look forward to seeing your render.
-
Hmmm. Definitely sounds worth investigating. Thanks, Robert. I'll give it some attention. -------------------- Edit: Well, after reading some of the old posts regarding light rigs versus AO I think I am getting off course again. I only used AO in that render to help me identify problems with the model's contours as I continue with the modeling and weighting. AO just gives another lighting condition to scrutinise the model under. The increase in render times, using either of those techniques, puts me off a bit but I may try again later.
-
Are you refering to one of those complex spinning light rigs that Yves has spoken about in the past? Don't they require lots of passes? The sample I showed was only one pass. Spinning light rigs brings to mind this video that I watched the other day. It is a Google Tech Talk by Paul Debevec about the cutting edge CGI stuff that he is so involved with. It is about an hour long but very watchable. I found it riveting. He has some pretty amazing light rigs.
-
Oh, you're so predictable, Myron. SBoyle_A002.mov I will have to model some helmet hair for her if I want to use AO. I may just do that but I wasn't intending to go that route initially.
-
Just default settings, Steve. Choreography Properties: Intensity=100% AO=100% Render Properties: AO=30% Hair was turned off because it was going to take days to render. Without hair it rendered 320 x 240 at about 1 frame per minute.
-
Well this example only has one object in the scene and the colour decals are turned down to nothing but the other surface properties, such as bump and diffuse colour are present: My AO test This is also a colour render which uses AO: AO Cottages.
-
-

New WIP - Lost In Space B9 Robot
Paul Forwood replied to Tralfaz's topic in Work In Progress / Sweatbox
Excellent! I might have a go at Dr. Zachary Smith. : -
Polygons are actually triangular so each of those patches should produce two polygons. Five point patches of course must be broken down further. Polygons also have something called winding which basically determines in which direstion, (clockwise or counter clockwise), that the polygons will be drawn. Even ngons are polygons really. Perhaps that is the problem. Perhaps the conversion plugin has to construct a model with identical winding everywhere. Anyway, can you just take the best half of the model and flip and weld in the other program? Not the solution that you were looking for, I know. Edit: Oops! Robert posted while I was typing. I don't think you have to worry too much about that little detail in Zbrush, especially for testing purposes. The subdividing that you will do in Zbrush will still give you a beautifully detailed mesh.
-
Strange! I deleted all materials and groups but the glow persists. I then copied the geomtry to a new model window and was able to get a render without the intense ambiance but, of course the model would need to be textured and rigged again.
-

2001 - A Space Odyssey - Modelling the Discovery
Paul Forwood replied to Tralfaz's topic in Work In Progress / Sweatbox
So cool, Al. Just out of interest how long is your model? -
The website looks great, Mark!
-
Ahh! Right. Just my scrambled memory then. It's hard to remember back that far... at my age.
-
I haven't read the tutorial but perhaps this is just scrambled terminology. Maybe he was talking about posing the model in an Action rather than creating a Pose. There are plenty of websites selling motion capture files. These should all come with a calibration pose. Something else that you could try is to edit the BVH rig on frame 0, using the rotation manipulator to get it into a t-pose, and then constrain your rig on that frame. You will get a jump when you scrub through to frame 1, because the BVH rig will be jumping from your t-pose to the mo-capped pose, but that doesn't matter because you probably won't want to render frame 0 anyway.
-
The BVH files that you can download for free are a mixed bag. You never know what you are getting and more often than not they won't start with a t-pose. My suggestion is to scale and position the rig as close as you can get it to match your rig and then set your constraints. Then, making sure that "A"nimation mode is not active, adjust the rigs as neccesary. Don't forget to turn "A"nimation mode back on afterwards.
-
Thanks, Steve. There is far too much blinking going on in there. It makes the eyelids look transparent.


