


MJL
-
Posts
967 -
Joined
-
Last visited
-
Days Won
8
Content Type
Profiles
Forums
Events
Posts posted by MJL
-
-
LOL I don't remember who said it first, but: "You ain't seen nuthin, yet!"
-
Up to now, I've pretty much been posting only still images, but this IS an animation forum after all.
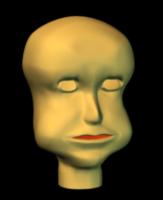
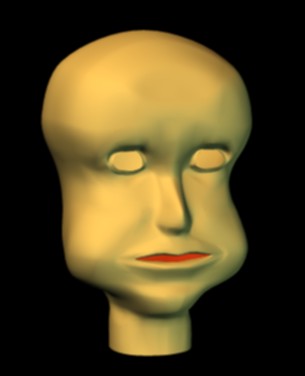
So I'm starting a project. I've created my first character, I have the head complete, although there's gonna be a lot of tweaking yet to refine the head further. The body should be easier, hopefully.
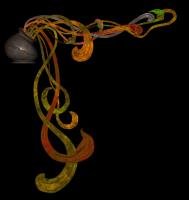
Here's the sketch I used for rotoscopes and a turnaround of the head so far.

-
Happy 29th, Holmes!
Ah...Er.....aaa......does your nose look a little bit longer?

-
LOL, Thanks guys.
Yeah, David, I was after a "suggested" face, and judging by your reply, I got what I was after.
I'll play with more refinements over the next while, and spruce it up some.
-
Something That's the Same but Different:

-
I opened the EXR image in A:M. My computer tried to open it with an expired demo version of Photoshop that I downloaded some time back. I have Corel but it doesn't recognize the file extension. (Stupid me, what is the EXR format, anyway?)
Did you create the original image in Photoshop?
Thanks, Rob
-
I agree with Steve392, that is way more than semi-successful. Rob, you know I've been working on getting a handle decal and bump maps. Could you possibly post the greyscale image that used for that displacement map? I don't wanna steal it, just wanna study it.
-
I thought that was just because he's an alien.
Nice creature, well done. -
Mark,
I'm trying to model a cascade Pine Bonsai tree for a project I'm working on, and I remembered you masterful job you did on this landscape. When I first saw this image, my first thought was that the trees were from a photo.
I used the treez plugin for the regular trees and modeled the pinesI'd like to learn from your modeling expertise. You have such a good eye for the graceful, natural curves of the branches.
How did you handle the needles on the pine tree that's on the left side of this image?
-
That is so excellent!
-
Holmes, in section 4 of your wonderful tutorial, there is a bone that you rotate. Is this a bone that you created in the model in bones mode or is it the model bone that has been heretofor hidden?
-
Thank you , Nancy. Got it working.
Thank you , Holmes, for that great tutorial.
Is there a way to get the dialog menu to pop up? I'm not sure that it is necessary, but it would be interesting to see what it contains.
-
I went to the link using FF. Got the Kristin tutes. Used the password. Thank you Jason
-
Applause, Applause, nicely done! very Good Stuff!
-
I'm starting to learn the Treez plugin to make my bonsai tree for my vase. I downloaded the Treez plugin into the hxt folder in my AM folder. How do I install it into AM?
-
Thanks for bringing that up, Darkwing, I checked and they were ALL reversed. I flipped them, but it didn't seem to make any difference in the image. I'm such a newb!
-
Robcat, I'll try to find time tomorrow to play with displacement and normal maps and post the results.
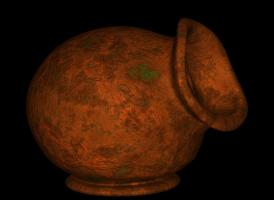
Here it is with the bump percentage turned on in the material. With the bump map on the design I was trying to make it look like there was a raised design that has partially rusted away.
I thought there had to be a fairly high mesh to use displacement maps?
The bump map percentage is pretty slight.(75%) I tried it higher but ended up going back to that percentage for the look I was after.
-
Ahhh, Rob, now that makes more sense to me. I'll remember that for future use. the negative number helped me a ton, after trying that, I ended up going back to what I had originaly.
Darkwing, that's good advice, but I have to concentrate on one thing at a time, or I get lost or distracted. You're right about the render times this one took 45 minutes for the one frame. But I didn't mind because I was just going for the look.
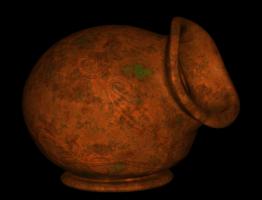
this is another version of the vase, I think maybe I'll play with trees and put a cascade Bonsai Pine tree in it.
I do feel like I'm getting a much better handle on the Bump Map thing. Robcat's advice helped a lot.
Edit: I just realized that I had the material bump percentage at 0. I'll make another posting when the render is done.
-
Thanks, Rob,
I figured there was a way. It's just that my ignorance is sooooo vast.
Your'e talking about expanding the images folder, right?
If it's just a matter of reversing the black/white of a bump map you can set the percentage to - number.Very Cool, saves me a bunch of trouble
-
Still studying bump maps.
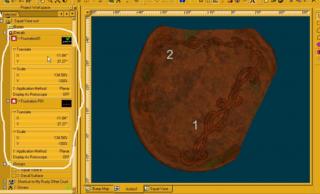
I put a bump map and color decal on the model and matched them up using translate and scale in the PWS (1). I repeated that with a second stamp each in another place (2) on the model changing the scale and translate adjustments in the PWS.
Now I want to go back and replace the bump maps with one that has had the colors inverted.
I can do that easily on the second one because the translate and scale numbers are still the same.
My question is: Is there any way to get the scale and translation numbers of the first (1) decal back in the PWS?
The numbers in the screenshot are from decal number two.
-
I can hear the quiet ripples of paddles in the water and the soft cooing of the lovebirds as they "sing love's old sweet song.
-
Wow! Thank you everybody! After 30 years with my future x-wife, I'm not used to this sort of positive, encouraging response to the things I do. It has been my hope that these images will impress prospective employers (read gigs) and customers (CD Sales) that visit my website. Ergo: If this website looks cool, maybe the music is good too. (You know, the ol' bait and switch
) Seriously, though, thank you , it means a lot
-
Here's another version trying to adapt Nancy's suggestions. I bet she could come up with something........well........... Nancyish.
-
Too late, they found them. It was so embarrasing. they missed the lacy ones, though.


Hot Off The Presses!
in Ain't No Way
Posted
So..... Gene says to me.......I wanna do an up-tempo, peppy, funny, video about the Plagues of Egypt.
I gave him the song he wanted, so he's giving me the honor of making this post.
Here's what we came up with.
I'm proud to announce the latest release from Spleengene Animations: (Our 5th Collaboration.)
Then Came The Plagues
Enjoy!