DJBREIT
-
Posts
359 -
Joined
-
Last visited
Content Type
Profiles
Forums
Events
Everything posted by DJBREIT
-
You may want to check the right_arm_FK_IK_switch and left_arm_FK_IK_switch they have the Z rotation on but I don't know what it dose. Also right_shoulder_steady_switch and left_shoulder_steady_switch check X, Y, Z rotation.
-
Hi Guys This is a nice setup. I may not have much experience but I have found two things 1 The blink null slider and aim at master eye target switch should have the "Limit Manipulator" set to "ON" and the rotate set to "OFF" for X, Y, Z so it wont roll when you go to move it. Two you may want to review the color selection for the geom bones. Some of the bones have similar colors next to each other and it make it harder to tell which CP’s belong to which bone.
-
Thank's guy's but I already know about the work around, tutorial and the decal system. But I think the lack of the right anser means there is no additional tools or plug-in for the hair system. Can someone direct me to the “add feature to A:M software” section. I would like to add some new tools request to the wish list. And maybe One day they may get around to my request.
-
I have found that there seems to be very limited tools for the hair system. I was hoping someone had made some additional tools or plug in’s stuff like Being able to draw a line and extend all selected hair elements to that line or trim it to the line. A tool that allow you to grab a set of cp’s “ any cp in the hair element “and drag them to a position instead of one at a time. So you can make pony tails pig tails or other hair styles. Something to tie the hair so you can add a bow, clips or ribbon. And any other tools you can think of. I am looking at twenty or more model to make over the next couple of mouths. And my hand is numb after five hours of pushing around a mouse moving one cp at a time. The brush is the only help for moving around more then one cp at a time. (Yes I know there is a joke in there lets not go there)
-
Are there any plug in's and tools for the hair sys other then what comes with A:M?
-
You may want define a set of lips. Or steal them off of one of the A:M characters.
-
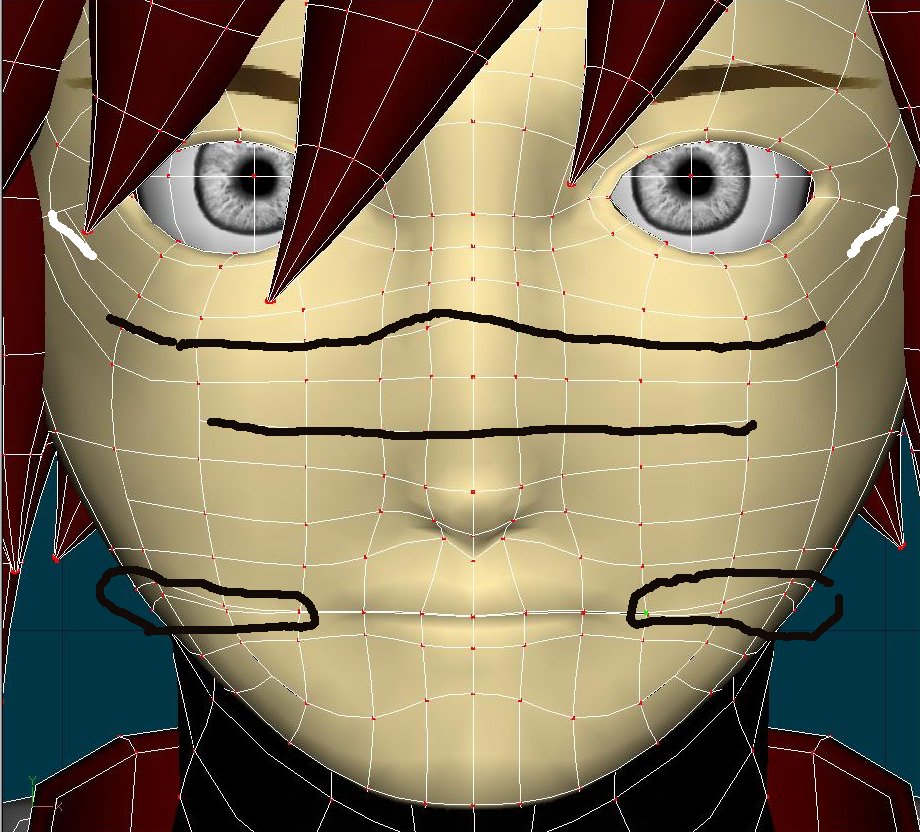
Some line can be removed for smother animation. In the image the two lines on the nose can be removed. use the one in the middle for above the nose. The white line on the side shows you where to reconnect. Remove one of the two lines next to the mouth. Since this can cause some problems. After that look around and see if some more can be removed. Also the eyes look a little odd. But I have no recommendation. That all I can think of for now.

-
Fishman I have already found that tutorial thank's anyway. Paul Forwood Bingo thanks for the tip:) I just split the head cap up the middle then overlapped the two sides just a little bit then comb them to make the part. Before After
-
In the hair system. Dose anyone know a tutorial on parting hair?
-
The problem with comics cartoon/animes are unless they are made from a 3D program the front and side profiles almost never match. What you can do is use the front image as the primary and use the side as a reference image. Take the model from begging to end and don’t wary if it dose not come out as you would like it. It may take two or three tries before you get it to you liking. Art is not an exacting science so you will need to learn from experience. And there maybe other considerations to taken into account as you make your model. You can also cut and past some of the body parts from existing models on your AM disk to help you get started. And after two or three models you will find you will be able to make these features your self. If you would like I can show you some of the progression I did with the first model I am working on now, and I was in the same boat you where two month ago.
-
Need some help with decals. All of the decals tutorials use photoshop pro but I have paintshop pro. I would like to use the eyes from Miki model on my model. Here is a shot of my anime face model(center). The left model was a modified face from Miki model. I remade the face so it is easier to rig. But since the eyes are spherical and not cylinders and I am missing a step or two in applying the decal I have been having problem applying the decal
-
It seems that you have fallen into the same trap that I did when I first bought A:M back at version 8. Purchasing A:M at the end of the year was a disappointing experience when I discovered that I had just missed out on a new version and a year of updates. Hash have now addressed this problem with their new subscription system. With the subscription you will get a year of updates from the day that you unlock A:M, no matter when you first unlock it. When your annual subscription runs out A:M will lock up again until you renew the subscription and gain entitlement to another year of updates. That's the way I believe it works. Thank's for the info.
-
Let me see that I am straight on this before I upgrade. 15 upgrade Is only thru subscription even thou I had bought 13 a month ago.
-
Thank's I will try it out later. At this time I am rebuilding the head. So it may be some time before I get back to this and test it out.
-
Yes it was a typo I wanted to add the hands and feet control gizmo to the 2001 rig. Since the 2001 rig was most satiable for secondary and back round characters. Like if you had a scene in a school yard or in a restaurant. These characters can be set up with quickly and easy compared to the Squetch Rig Found it. If I understand you right and what I see in the file, the Biped Squetch Rig is not set up with the controls like the hands are.
-
Never mind on the hand add-on since these do not have the gem bone in them. I ether have to adapt them to the existing 2001 rig or copy the hold hand Bones and Relationship over and adapt them to it. And I don’t know enough to do that yet. There’s no instruction with the files. Also I have the existing setup. Do you have a rig add-on instruction for existing installed riggs for dummies. Since there are a hundred way’s to screw it up and one way to get it right. What I need to know is what needs to be deleted from the bone list and Relationship and how to added the rig in to an existing installed Squetch rig “02-25-2007"with five toes.
-
You may want to fix the link to the Tutorials "compensates for the biped rig"
-
Yes they do work. By chance do you have the hand add-on"s
-
Yes It give an error.
-
I have set up the foot with the gizmo and most of it work fine but it was set up with an opposable big toe in mined. So it dose not work well with the other toes. How do I fix this problem? Need some detailed instructions.
-
Thank for the info. I like the update eye install bones in the face group. But this face group may not be ideal for my model. I will put up a new post on that subject so I can get some opinions.
-
The video Tutorial I watched did not tell me what to do with "auto_controllers_INSTALL" bone. should I hide it or do I have to position it first? Also is there more video Tutorials then the first five I found? Squetch_Installation