Rodney
-
Posts
21,649 -
Joined
-
Last visited
-
Days Won
119
Content Type
Profiles
Forums
Events
Everything posted by Rodney
-
In my (admittedly brief) search for clues into how this decal driven glow might work I ran into several approaches but all seemed to have limitations that wouldn't be acceptable. The primary one being that most emission maps can drive the glow effect but only within the silhouette of the object (or objects) in the scene. So as we observe in a few other cases where alpha channel/transparency is set the glow effect would be clipped either all the time or when other objects don't provide a background. As has been mentioned here in this topic many workarounds exist. If anyone has a link to programming and implementation of emission/glow maps that would be useful in delving further into this.
-
I really like the simplicity in that. The hints to the scene being part of a much larger world makes us believers that there really is a larger world there.
-
Looking very good! That issue appears to be related to an internal clipping plane that is driven by where the ground plane (usually) resides. But this isn't an actual ground plane but rather the Chor Grid and that grid is likely used as a way to optimize rendering... so that unnecessary samplings and calculations don't have to be made. If this is/was either the ground plane or related to the Alpha channel we could just disable those and press on. As it is likely related to the underlying Chor grid even when we toggle it off it is still present (to assist with depth sorting and such). That's my take at least.
-
I've been cheating and just watching the videos. Some interesting stuff... although not sure how much in sinking in without doing the practical exercises. I'm getting a fairly good overview and it's pointed me to some other interesting concepts that might be useful later.
-
There are some volumetrics in the Volumetric Effects and Lens Flares so it may be quite possible to bridge the gap and get decals to drive those type of results without a major rewrite or building new foundations. If it can be done in a reasonable way I'm sure Steffen would be up to it. He knows the A:M code thoroughly. Tore, you've done your part and submitted a feature request. That's the first step toward successful implementation. The next time Steffen is in that area of the code who knows what might happen. .
-
Sorry. I thought we already had that feature. It's more than a little out of my experience but I think we need to use Radiosity for that. I struck out on all my attempts.
-
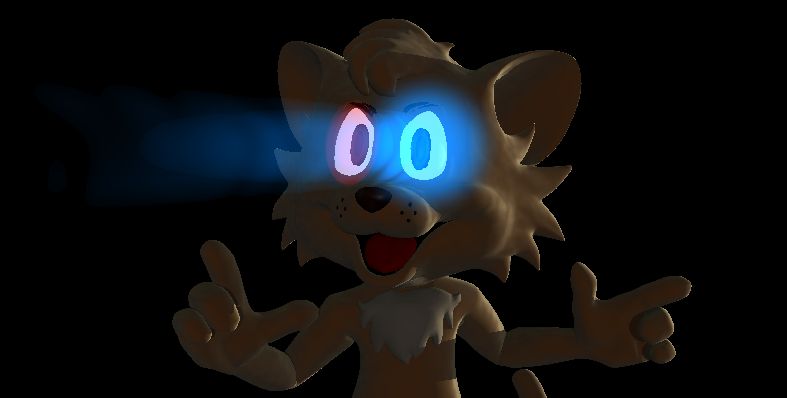
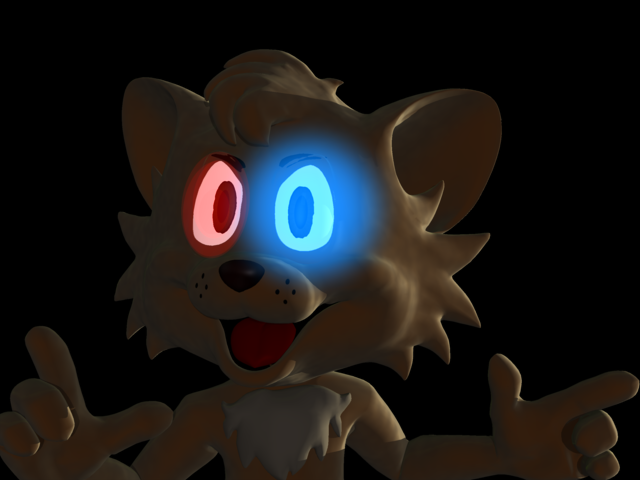
Here's a little 'steam' (again a Volumetric Effect) thrown into the mix to get some light projecting outward... These are added to the Keekat model as Action Objects) so are easily drag/dropped into place and adjusted. (This one is a screen capture of what is showing in A:M... the previous was a final render) I'm not having a lot of luck with Dust...

-
There are many approaches we could take. This one... uses Mist (one of those Volumentric Effects that no one tends to use): Both of these Mists (one for red/right eye and one for left/blue eye) started as copies of the same Volumetric Effect but were tweaked in different directions.
-
Which feature are you referring to? Ambiance maps with glow should get the desired effect. The Lens Flares is one of several alternatives. Don't tell me Robert is going to have to break out a new series of "It can't be Done!": videos. (I'm all for that!)
-
cool. That's something of a retro 80s game effects look.
-
Lens flares are just settings on lights so you can constrain a light to a model and even place a light(s) inside a model. If you place them inside the model they will automatically move and rotate with the model. For more versatility Lights can be Action Objects as well.
-
Here's a quick proof of concept with Lens Flare over the top of an image from your new website. Nice website! Added" I learned something new today... I didn't know that Layers could accept Light Lists!
-
It seems to me that a Lens Flare set on a light might be more appropriate although you could certainly adjust the surface also to add to the effect.
-
Eh? This is quite a very old controversy (the 3D coat voice thing). Circa 2007 even. Regarding the OBJ thing... say on. Say on. I didn't see anywhere where OBJ was suggested but I doubt they will easily be able to open native .mdl files. I'd be happy to be wrong in this. Of course perhaps we can include a subscription to A:M along with our entries.
-
Thank you!
-
We have more than a few people that can win in this category. I note that it doesn't mention a file format but I would assume at least one copy submitted would need to be OBJ. Some info from the contest: I see this as well: Terms & ConditionsIn order to qualify for the prize winnings, you must agree to terms & conditions. Things you must know The Female character challenge will run from the 13th of February to the 15th of May. There is no polygon limit, therefore both high poly and low poly models can compete for the prizes. Submissions deemed to be adult content are not eligible to participate in the contest. Cool renderings are optional but we will definitely consider the presentation of the model when judging. Only 3D models uploaded during the period from the 13th of February to the 15th of May will be treated as valid entries. Designs uploaded to the gallery are not treated as valid entries. Upon joining this challenge, you agree that your rendering scene might be used by sponsors for marketing (non commercial!) purposes. The challenge is open to everyone, including teams, legal entities and people from all over the world. You can submit as many entries as you want. Only models that do not contradict 3D-Coat’s voice will qualify for the prize provided by 3D-Coat. Participating in the challenge and uploading 3D models to CGTrader platform is free of charge. All the entries must be original and not derivable. Employees and relatives of CGTrader and sponsor teams are not allowed to participate in this challenge. Any existing taxes or duties must be paid by the winner. CGTrader is not responsible for any illegal actions taken by the prize winners. We are independent sheriffs of this challenge, so stick to the rules and don't do anything stupid.
-
There are two community challenges listed at present: Community Challenge#1 50 members. Community Challenge#2: An (icon) image. 512x512 is recomended although the current one is 128x128. Major customization can be achieved but that is (currently) reserved for Discord partners. The criteria for partnership is well beyond what we might expect to see happen. (ex: 10,000 followers on Youtube, etc.) Not impossible but highly unlikely in the short term although as a community we could convince the powers that be that if we count everyone in the A:M Community we have collectively produced a ton of views.
-
Started posting some resources... This link is set to expire in 24 hours: Resources - Misc
-
It remains to be seen where it might go but one does have to start somewhere. For those who like verbose mode (like me) that might be a good place to spend time. Not everyone enjoys the noise of randomized productivity. And we shall still be collecting the gems here in the forum!
-
It can be a good place to quickly share information and resources. It's basically an updated chatroom but definitely a considerable update from the iRC back in the day. There are also some people that might not drop in to a forum that might stop by there. When they arrive they've find links to popular topics here in the forum. In addition to voice it also has (limited) video and screen sharing capability for those that desire such. There is a Help Desk so that'd be a good place to start that kind of session.
-
For what it may be worth, I would not want a USB key solution. Having said that, I suppose that would depend on what came with the license.
-
For those interested, there is now an Animation:Master Discord Server. Visit the Animation:Master Discord - Collaborate - Chat and share files - Share News and information - Search for topics of interest - Edit documentation in real time. - Initiate group or private chats (voice or video) - Develop your personal projects and explore your ideas These channels are meant to supplement the A:M forum with capabilities we don't have.
-
Here's a list of all the Object types we can filter for: Name=Filter for All SearchString=Object names containing this text SearchString1=And LinkString1=0 SearchString2=Or but not LinkString2=1 Choreography Model Segment Action Group Decal Rotoscope Camera Light Null Object Project Muscle Channel Container Objects Actions Materials Aim At Constraint Aim Roll At Constraint Translate To Constraint Orient Like Constraint Kinematic Constraint Aim Like Two Constraint Aim Roll Like Two Constraint Material Attribute Gradient Spherical Checker Distort Turbulence Blobby Emitter Path Constraint Spherical Limits Euler Limits Pose Pose Container Dope Sheet Dope Frame Stamp Path Model Motion Capture Device Sensor Container Action Object Container Roll Like Constraint Action Object Action Force Particle Material Effector Volumetric Effect Hair Emitter Sounds Sound Images Clip Still Animation Decal Image Decals Decal Images Stamps Sprite Emitter Sprite Relation Container Relation Surface Constraint Scale Like Constraint Groups Translate Limits Flock Effect Light List Node Light List Choreography Action User Container Bones Spring Spring Container Spring System Mass Mass Container Prop Phoneme Text Dialog CP To Mass Constraint Action DopeSheet Spline Container Channel Relation Storage Driver Action Container Object Shortcut Channel Driver Euler Rotate Driver Vector Rotate Driver Quaternion Rotate Driver Pose Channel Container Empty Relation Mass To CP Constraint Mass To Bone Constraint Layer CP Shortcut Spline Shortcut Flock Surface Constraint Translate Driver No SubProperties Shag Emitter Animatable Driver Animatable Driver Keyframe Constant Driver Mass Shortcut Action Object Placeholder Rigid Body Empty Driver Model Bone Folder Expression BoneToSpringConstraint Post Container Post Effect Post Effects Dynamic Constraint Spline Container Shortcut Hair Guide Hair Guide Shortcut Hair Guide CP Shortcut Dynamic Results Driver Bullet Rigid Body Bullet Soft Body Buffer Shortcut Composite Light Buffer Lights Translate Driver Time Channel Choreographies Guide CP Hair System Light Buffers Rotoscope Container Streak Emitter Bias Driver Guide Hair Info Tree Object List Action Object Light List Action Object Light Lists Dummy Buffer Shortcut Camera Dummy Buffer Shortcut Sound Info Node Fluid Emitter Group Constraint Off the top of my head I can't say I know what a 'sensor' is although that likely has something to do with Motion Capture. Come to think of it... there are more than a few things in that list I should investigate.
-
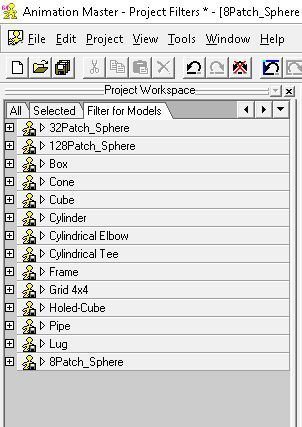
I'm adding this topic because I'm sure to forget exploring it further... Filters are very useful for quickly finding resources in the Project Workspace (PWS). Also very useful is that we can save those Filters in the Project File. Inside the file itself (the text of the file that is) filters appear as in the following: Name=Filter for Models Model At least initially the order of the list is by order of how the resource is opened in the file so it can be handy to have some filters open as assets are added into a Project. In this way they can be more easily managed, renamed (by saving), etc. A downside of using Filter (besides the fact that they are hard to find and therefore easily forgotten is that crashes can ensue while using them. We'll need to investigate that.
-
I need to delve more deeply into the versioning aspect of Dat because I can sense some usefulness and power in it's ability to move through time restoring to any published point. This makes me wonder how applications process dat files because if Animation:Master could directly access those revisions... good grief that'd be awesome. I'd have a mini test for that but I know for a fact that A:M's internal browser is not Dat compliant .