Rodney
-
Posts
21,630 -
Joined
-
Last visited
-
Days Won
114
Content Type
Profiles
Forums
Events
Everything posted by Rodney
-
Nice! I like it.
-
It's not wrong to experiment... that's always a good thing. But when adding in an unknown file or process into the mix such and having A:M convert a model from polygons to patches that skew the results of the original experiment considerably. Some people might even equate the use of alpha channels with the time that it takes to convert models... which would be most unfortunate because the use of alpha channels can be demonstrated almost instantly. See this as an opportunity to simplify your approach to experimentation in that we can all learn from how the best in the business approach their research; they tend to simplify and isolate things. As a for instance, to test a material, a model, an alpha channel... practically anything... it can help to work with exceedingly... almost humorously to the point of being ridiculous... simplicity. Then as success in that basic workflow is achieved complexity can be added to meet more specific needs. There may be times where a 16 hour conversion of OBJ/3DS files is worth the time invested. However, in a majority of test cases just a simple patch may be all that is needed. A great way to test things like alpha channels is to simply extrude a patch, create a grid or lathe an easy shape and then experiment with that. The benefit is that you won't spend time in the setup and you can get right to your point of interest. Success leads to more success through simplicity. This is not to say that all experimentation isn't valuable in some way. Right now you are learning something about the process of converting 3DS models and the amount of time that can take. If ever needed you'll know more about the time that it can take. And others seeing this process, if they are paying attention, will know what to avoid in their own experimentation. When it comes to things like trees... that is something that I hope we can help with in the forum by adding such basic resources to the A:M Exchange Model's section. If a good variety of trees was there then you wouldn't have to spend a whole lot of time creating/importing/converting them. You could just tweak to taste.
-
Do you have the Fast/FakeAO Post Effect on your camera? Very cool render! Tint that with sepia and some mild Christmas colors and you'll have an old fashion Christmas card.
-
If you are importing .OBJ files to populate your scene your learning curve has just gotten a whole lot more steep. No, it is not normal to torture yourself needlessly. If you can build the asset in A:M... just a recommendation... build it in A:M. Then you'll see your learning curve ease considerably. I suppose if you really want to import an OBJ or 3DS you could built the model in A:M and export it out to one of those formats. Then import it... Have you used the Treez plugin before? Using that for the trunk and Hair images for the leaves might be a better approach to creating trees in A:M.
-
Yes, we have to activate once for each installation (32bit and 64bit).
-
Well, don't leave us all alone here in the dark. What did you find? Where did you find it? Illuminate the path for us who might some day want to go there.
-
It's a bit too isolated from what is going on in the story to comment on... To me this suggests perhaps he could have more movement in his facial expression to suggest what is happening. Is he hiding/running from someone? Is he mad? He's certainly not surprised... he isn't suddenly seeing someone. I'd be nice if there was a change from one expression to another to emphasize and target that emotion. At a minimum some slight movement in his eyebrows or a pinpointing of his pupils to indicate he is changing from a near focal point to a distant one... change is what animation is all about and we don't get to see into his mind and anticipate his action. Perhaps a beat of anticipation where he realizes that the coast is clear and that he is free to run? A look of determination might then set in as he launches into his run. As he is now there is no change to his facial expression. He's just turning left and right as if it's in the script to do that. But... from a purely technical standpoint it looks like a very solid run cycle! I really like what the motion blur adds to the run.
-
This might be of use to some folks. If you already upload to Youtube you probably know about it already though... so apologies if this is old news. http://www.labnol.org/internet/add-logo-to...e-videos/25948/
-
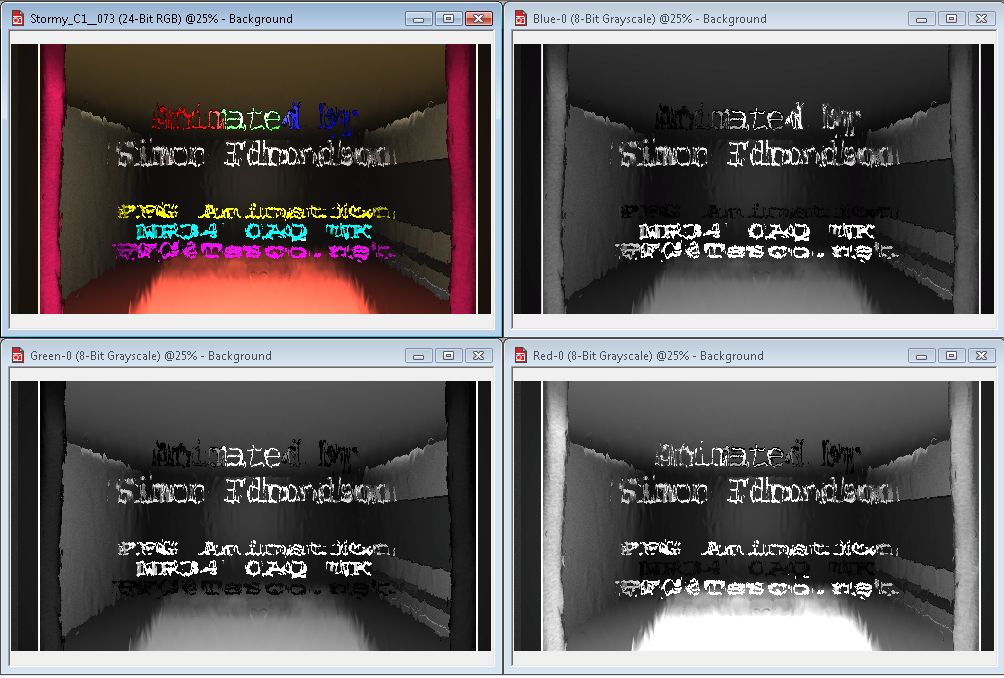
When it comes to leveraging Alpha Channels join the club. We could all be using Alpha Channels far more than what we do now. I'm more at home with Corel Photopaint than Photoshop but in most 2D paint programs Alpha Channels will come in either as masks (usually painted red) or as those crawling squiggly lines that everyone loves to hate with the background a checkerboard pattern. Each program has a different way of displaying transparency. Of course these methods of display can be changed. In A:M the previews just display the Alpha Channel as black but when in use the full realtime transparency is displayed. Something that is useful to know is that in A:M's Composite there is a Post Effect called Channels. There you can specify a Red, Green, Blue or Alpha channel to use in a Composite, as a Rotoscope or elsewhere where Composites are allowed. To alter the settings we don't change the settings in that location but back under the Composite itself. Now you've got me wanting to test some things in Composite...
-
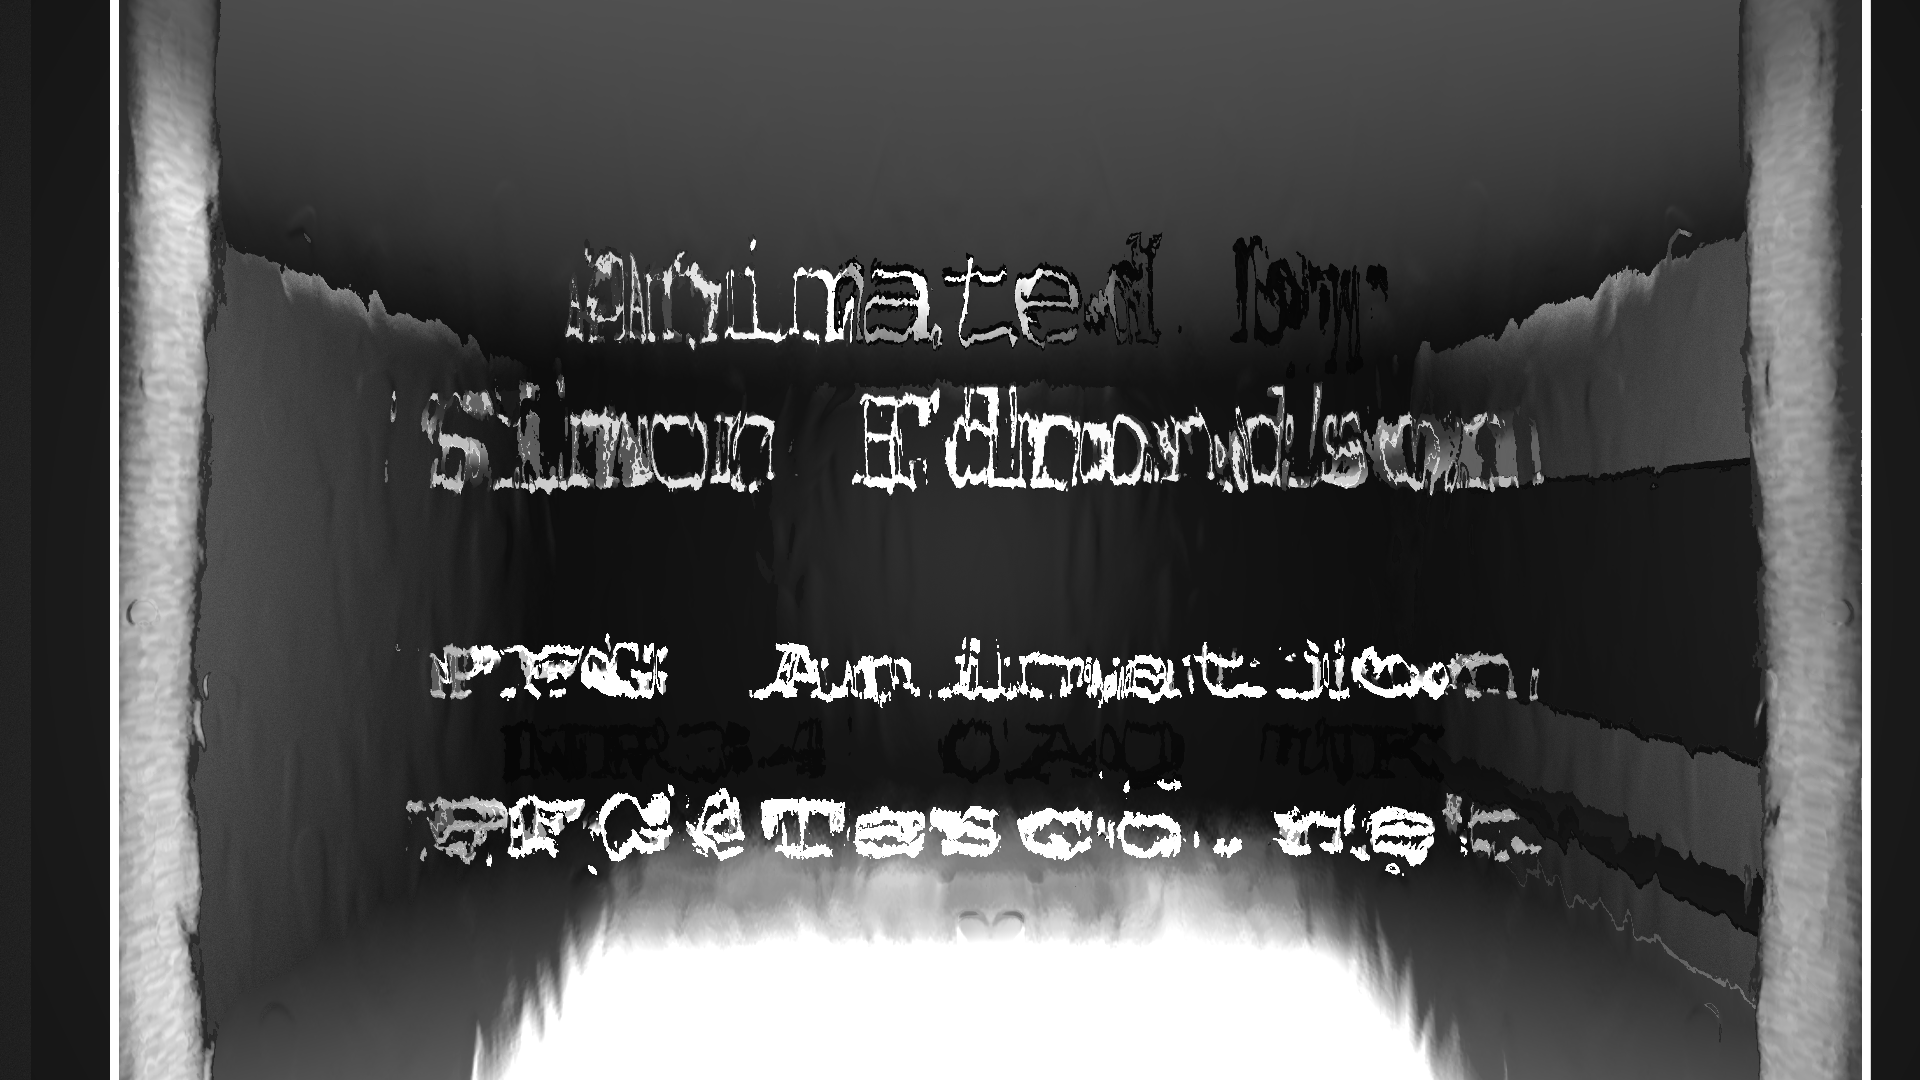
For completeness sake I'll post the final along with the Red, Green and Blue channels: The RGB channels operate the same way as the Alpha Channel in how they mask their respective colors. Black... less of that color. White... all of that color. Gray... midtones Whenever using an image with an Alpha Channel there is one additional consideration that must be made and that is where the image itself will be placed. If it is place on a white background the transparent areas will make the image look brighter in the midtone/unmasked areas and the reverse will be true if the background is black... it'll darken any midtone/transparent areas. Of course as has been previously noted, a full black masked area will let all the RGB through (so it'll appear transparent) and a full white masked area won't let any through so all of the RGB will be seen. What complicates this matter is that many programs don't allow the viewer to easily distinguish between the mask of the Alpha Channel (which is black remember) and the black areas of the image, so that black alpha channel on a black image will just look black to them. The test for this would be to render something that is completely black with an alpha channel. Then change that object to white. Compare the two images and you'll see that the Alpha Channel mask is the same but the RBG channels are not.

-
Here is what is stored as a mask for the Alpha Channel: Black=Transparent White=Opaque Gray=Somewhere in between based on the gradation This Alpha Channel mask is what tells a program/browser/utility to what extent to display the Red, Blue and Green (RGB) channels. Black and it won't show anything White and it'll show everything Gray and it'll show a partial transparency of what is stored in the RBG. This seems to validate what I was saying before with regard to your background color bleeding through and altering the color of the entire image. Layers... drag and drop a bunch of images with Alpha Channels into the Chor as Layers (preferrable to rotoscopes for the purpose of compositing experimentation). Move them around. Rerender everything and bring it back into A:M again. In no time at all you'll have a great grasp on how to leverage Alpha Channels in A:M.
-
It occurs to me that you might be wanting to composite this shot over the top of another. If this is the case then you won't want to use JPG because you'll have lost your transparency/Alpha. One way to see the full effects of the Alpha with the TGA is to bring that into a program that correctly reads Alpha channels and mess with whatever is in the background. In A:M you could drag and drop the image into A:M and when asked what to bring the image in as select "Layer". (You could chose Rotoscope too but if you haven't used Layers you should experiment with those too). With the TGA image in the Chor then change the camera's background color to red or some other color that will be easy to spot. You should see that color through the transparent parts of the TGA image. Rendering out to JPG will result in a similar image. If you have a program like Photoshop or Illustrator it'll be easy to see the effects of the Alpha in real time as well by placing any object/layer behind this TGA image. When saved back out the results should be similar and include (parts of) whatever was in the background (i.e. whatever masked for transparency via the Alpha Channel)
-
There are a few things we don't know here but I assume you are doing your conversion in A:M? Since JPG doesn't have an Alpha Channel I'm not sure what you are referring to there. A:M shouldn't even allow you to turn Alpha on for JPG images. Perhaps I'm not fully understanding the problem. If what we are seeing through the window doesn't have any background then I'll wager that there is nothing there n the background and therefore in the TGA image that area is rendering correctly by showing black as areas that are transparent (i.e. those areas effected by the Alpha channel). Since JPG doesn't have an alpha channel it is doing it's best to show through this Alpha Channel and likely to your camera background color (perhaps still the default blue color?) in showing through in the JPG. It sounds to me like you haven't converted the file as much as rerendered it and the Alpha is being maintained. If what I've stated above is indeed the case then there are at least two ways to proceed: 1) Renderer the scene with the Alpha off (this should yield a similar image as the JPG though so you'll probably want to have something in the background (or change the default camera background color) 2) Render straight to JPG which will not give you an Alpha (since there is nothing in the background you'll want to either put something there... or change the camera's background color) My gut feel may be wrong but it seems to me that you are getting what you are asking for but aren't realizing the effect of the transparency created by using the Alpha with nothing in the background. I can't recall if there were any know issues with Alpha's in v15 but that is also a possibility. You said this before: Can we assume this is the look you are after? If it is then you should render with the Alpha Channel off.
-
That was fun... BUT DIFFICULT! (My family made me turn off the sound) hehe. Congratulations on the game!
-
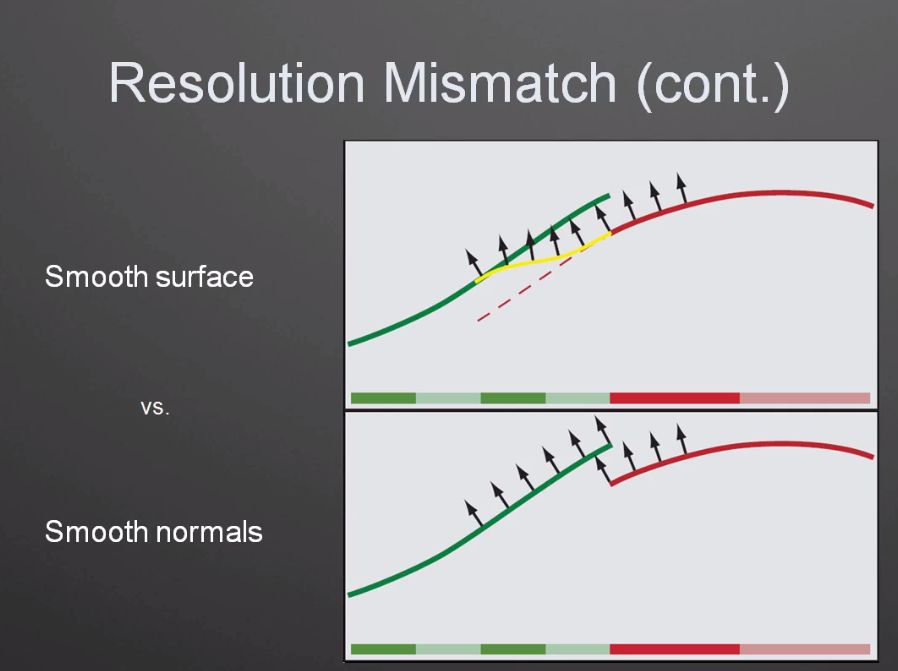
It's interesting to note that the concern with regard to triangular shapes has long been an area of interest and resisted easy solutions. Pixar's current way of dealing with the problem echos Martin Hash's with regard to how to deal with surface anomolies. In short, they use 'infinite resolution' to make the problem (appear to) go away. Through subdivision the problem still exists but at such a reduced level that the anomolies become imperceptible. One way Pixar is further reducing the problem is to craftily transform the tris into quads via factors of 3 and 4 with the lowest common denominator being a quad-compatible surface (i.e. the subdivision of a tri resulting in groups of 12 tris). This quad shaped tri can then be better matched to it's quad shaped neighbors. In texturing terms this can also be seen in Pixar's approach to Ptex: http://ptex.us/tritex.html There is also that pesky matter of using Normals to determine the smoothness of surfaces . A problem arises when incompatible surfaces cause their normals to face in sub-optimal directions (the don't know where to look so they look where we tell them... yielding surfaces that too precisely display our control point and spline placement). As the intersection between tris and quads cannot perfectly match, something must be sacrificed, unless the problem is reduced/subdivided/hidden in some way. This equates to the subject of seams in textures as the overlapping of textures is yet another approach to masking/hiding the problem incompatible surfaces. But even here we see an effort to subdivide the seams in such a way as to transform noncontinuous tris into continuous quads for the purpose of matching otherwise incompatible surface shapes. (see attached image) Ref: Below image is from Ptex-slides (Page 31)
-
Okay, that was weird... I just left comments at the review site... and commented here... and both have disappeared. That Paunk alien is up to something again. Congrats on the review Mark. That preview still holds up well!
-
Thanks Fuchur, I know that will come in handy!
-
I understand what you are saying. A similar issue exists with the various rigs that a character can have in A:M. Actions created for one generally will not work another. As I'm after the poses more than the motion itself the BVH data could be used without any constraints at all to inform the poses as well. I'm not after every keyframe but rather only those poses that work the best for the intended action. I expect to hand animate the rest. I have a tentative plan to setup Thom (or some other character) to work with the Carnegy collection and use that as a trial for testing out optimal workflow in A:M.
-
That's what I'm looking for. If someone has constrained Thom to BVH in the past then perhaps they can share that with us in the forum so that everyone doesn't have to do the same thing all over again. If no one has done it then that might be something I should do but I suspect the 2001 Rig has been BVH'd many times before. Reusage is what makes computers worth having.
-
Does anyone have a Thom Model or anything with the 2001 rig constrained to the basic BVH motion data? Constraining a character to BVH data has been on my list of things to do for quite awhile now and since I haven't got around to doing it yet I'm hoping someone already has one set up and ready to go. I'll post any Actions I modify from the BVH data to the 2001 rig in the A:M Exchange forum. Now that Robert has clued me into Baking Actions as a means to reduce the complexity of animation I'm all set to do some pose ripping. Alternately, if anyone has any character constrained to BVH data I'd be interested in testing that too.
-
I look at the shape of the curve, delete the CP i don't want, then reshape what's left to look like what was there before. You only do this on one curve at a time. But unless a CP is the cause of some problem I just leave it. One method I've found to work in a good number of places is to create a keyframe at the appropriate location on both sides of the keyframe that I want to get rid of and then delete that keyframe. This merges in the sense that it averages the new keyframe out based on what is happening at the two extremes outside the new keyframe... that's what I might term an 'averaging merge'. A little more controlled merge would be that of simply sliding the keyframe from the old location to it's desire position. This has the benefit of maintaining all of the keyframes (i.e. not averaging them based on it's neighbors) but is subject to the biases of both. I'm not sure what this form of merge would be called as technically it's not really combining any keyframes. Perhaps it is 'transposing'. Trans + Pose.... that works for me. 'Transferring' would then be using the Copy/Paste method of moving keyframes from one location to another.
-
Yeah, I think for my purposes digging that deep into the individual channels isn't going to be realistic. I could see doing that when refining and finely tuning details but there is no possible way I'm going to be going into every single channel individually and reducing them via that method. It'd be easier to go into keyframe/dopesheet mode and perform some other process. Reducing every channel's keyframes manually might take weeks while deleting keyframes manually from the top level could be done in a matter of minutes. Of course, this is why we want our key poses to be at the right location... because if they aren't... we've just deleted the important stuff! There is another (better) way to reduce/merge keyframes and I'm convinced I've done it before. My memory says it was when I was dialing back the number of keyframes set on a BVH motion capture. Now I've just got to be clued back in. It almost seems to me that it had something to do with a copy/paste function. You know, like grab every fourth key (i.e the good stuff)... delete everything including the good stuff... and then past the good keys back. Not sure but I seem to remember Raf Anzovin doing it.
-
That worked perfectly! Life is so good.
-
Thanks Guys, you've given me not one but three approaches to this. Simon, I'm curious about yours because the only way I see it working for what I'm thinking of is in the sense that if a key already exists on every frame then it is more likely to store changes in the future. Because there is some grey area there and I'm not wanting to guess but rather to know that everything is keyed I'm going to guess this approach will not work for my purpose. I'm writing this to let it sink a bit further in to my brain because what might not work now might work perfectly later in some other project. Fuchur, I have to admit I'm a fan of exporting and then reimporting in some specific cases in A:M. I use to be that way more for some specific cases and I confess that short of MDD export I hadn't thought too deeply of exporting. That zero tolerance thing... now that is important. Things like that remiend me of the throwaway/sacrificial processes that can sometimes be done to get to a goal all the while knowing that the middle process won't show up in the end product but is just a means to move forward. As I see it, using the Action to .MOT process should work quite well and as you've stated all that would need to be done would be to export the Chor as an Action and then reimport that Action. Again with the sacrificial process to get things going. Robert, It looks like you win the kuepy doll for best process and I'll be looking into that first. I agree that having a solid plan to begin with is ideal but unfortunately I rarely find myself in that ideal world. There is also the idea of getting an animation from someone else and then having to figure out what is going on in the channels... not much of a problem for me at this point but it could be. I should have thought of Baking Actions. That seems so straightforward and that's probably why I overlooked it. As I said with Fuchur though I don't think I'd have thought to set the tolerance for zero although I'd like to think I would have figure that out eventually on my own. I suppose to answer the question though I'd say that there are a number of processes that create keyframes on every frame of an animation; simulation, mo cap and baking of Actions being three prevalent ones. In the first two I've experienced first hand the benefits of decreasing keyframes so I have good reason to expect the same from Actions. There is a danger of course that in decreasing keyframes some key (i.e. important) movement can be lost and so I suppose a second/follow up question to this one would be how to best approach merging of adjacent keyframes. I suspect that reducing channels can do this... or perhaps rebaking again with a different tolerance is an equivalent of 'merging'? This second part is just one of those inevitable curiosities that come with the territory of keying and at this exact moment is not the primary goal. I believe you've resolved that by suggesting the Bake All Actions approach. Thanks guys!