Rodney
-
Posts
21,649 -
Joined
-
Last visited
-
Days Won
119
Content Type
Profiles
Forums
Events
Everything posted by Rodney
-

Captain Crazy Pants works out
Rodney replied to NancyGormezano's topic in Work In Progress / Sweatbox
VERY NICE NANCY! That's not (really) a fitting render for that animation. Well done! -
Keep in mind that not all models work best with a flat/planar projection of a decal. In many cases a cylindrical projection will be more than adequate. I haven't had much use for spherical projection... outside of spherical shapes. (Go figure) I don't like to flatten meshes (never have as this tends to pinch the decal worse than simply applying the image to the curved surface in the first place) and prefer to hide those areas that shouldn't be decaled first and then decal. For such an approach it can help to organize your model via Groups for easy manipulation. Most models will have natural locations for seams (such as anything that would have been manufactured). These provide additional locations for layering in detail. Automated decalers have their down side as well and most require manual adjustment as well. At a guess I'd say many auto-unwraps are simply using a form of cylindrical projection. Perhaps the more sophisticated of them automatically re-curse through user defined groups, hiding them before applying the (empty) decals to each section in turn. In other news: Rumor control has it that v18 might bring some functionality that saves us a few steps in decaling. Specifically that of applying an image (screencap) of the model back onto the model as a decal. Sounds great to me!
-
My first thought was that a few strategically placed rocks might help but even then the rocks might not suggest size (i.e. are they boulders, stones, pebbles or what?) I'm leaning toward the set itself making the shot look toy-like although you may be on to something with regard to his movement. Some of this feeling might also dissipate somewhat as this sequence is joined with the next one.
-
I don't know about any pages but the FTP site is still there. The FTP pages themselves have been gone for several years now. Here are the installers for PC: ftp://ftp.hash.com/pub/updates/windows/ ..and OSX: ftp://ftp.hash.com/pub/updates/osx/
-
It is very hard to strive against a man with such devotion of mind. ...and speaking of winners... that reminds me... I need to add a few asterix-type winner thingies to some profiles...
-
Captain Crazy Pants works out
Rodney replied to NancyGormezano's topic in Work In Progress / Sweatbox
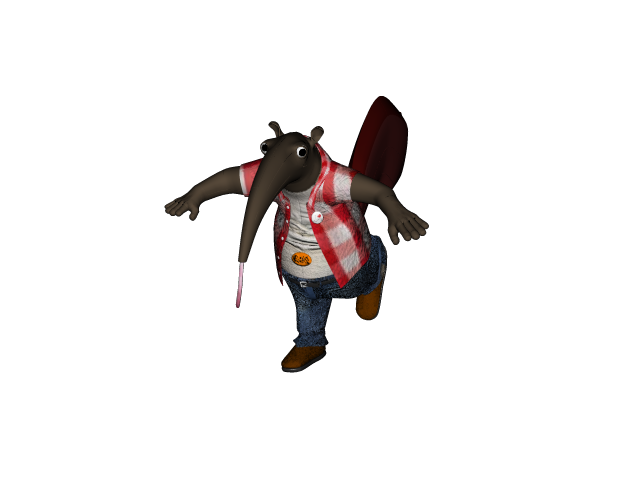
Ha! Love the final pose he jumps into... as if to say, "And here you thought I couldn't do it," or "Told you I could do it!" More please. -
I couldn't resist creating a minor pose and rendering him in action. (No Hair and Materials here though... I did a quick bake of surfacing)

-
I'm late to commenting... Wow. She looks great Jeff. You haven't lost your touch!
-
I almost got chills in the shot of Firefall exiting the cave and beginning his descent. Very nice. The final shot of this last sequence has Firefall looking a bit like a toy on a modeled set. (not necessarily a bad thing) My thought to counter that would be to put something into the scene that would allow for a sense of proper scale. I always enjoy your updates. Keep 'em coming!
-
Awesome Marcos! Thank you! Whaaaa???? No Sir I had not!
-
Robert has excellent suggestions here so I'll not suggest anything beyond that. I especially like where he has emphasized the opportunity for the characters to go downward even more before launching upward (blue girl squashing before launching up and off of the ledge) and (red guy squashing down even as his side of the seesaw goes up) to really sell the weight/force involved. It's this second movement (with the red guy) that really gets me excited because it's such a staple of quality animation... objects moving in opposing directions at the same time. Milt Kahl was such a master of this. Specifically in this case it's the guy's body weight holding him down by gravity even as the force of the upward moving board advances him higher. Now that's what I'm talking about! What you've got is nice... but golden opportunities abound in this one Simon!
-
Disclaimer: I have not yet purchased any of Scott Petersen's products so therefore cannot personally vouch for their thoroughness or quality. Scott T. Petersen has been an animator, director and teacher for quite awhile. Here's his basic bio: For those that tend toward a traditional hand drawn approach to animation you may find his current DVDs of interest. At this time he has three available: 1. Animation and Drawing: The Essential Basics 2. Lesson 2: The Power of Anticipation (Umm... no direct link... so see the preview below) 3. Dynamic Posing for Gesture Drawing h7HcAsuYl9o Here's a related video on anticipation that is (presumably) not on his DVD: NFX1c-OqCDE G84ZxCwlDrM This one will look familiar to anyone that has Cristin McKee's videos, however, since Scott approaches from a traditional mindset his methodology works from Breakdown to Inbetween a bit more appropriately: t3ufUkWI9vc " Need a lesson (or overview) of gesture drawing/poses: w8qqYEloRAM" For those of you who have invested in training material by Glen Vilppu and/or books by Walt Stanchfield you'll enjoy this video. For those interested in animators in general or finding out more about Scott Petersen, Joe Dorsey (from the Don Bluth forum) recently completed an interview with Scott and posted it on Youtube: 597U84UxBS4 (To view all 88 or so videos visit Scott's Youtube channel) At any rate, you can find out more about the DVDs here: (from what I can tell, each DVD runs at 90+minutes for $19.95) http://animationexcellence.blogspot.com/
-
Wow Steffen, that looks great! I can hardly wait to play with that. Fun stuff John!
-
I'm posting this on behalf of Marigold because I don't have time to properly respond at this moment. Thanks in advance for any and all assistance!
-
I don't believe there is a default way to step by step frame by frame without adaption, download or using a utility. There are several close solutions. 1. After pausing the video.... use the right and left arrow keys on your keyboard to step through the frames (Note: this can sometimes be used to step through frame by frame but only if the author has set a keyframe on every frame (I believe the default gap between keyframes for youtube is 10 so a right/left arrow will move you ahead/back 10 frames. Similarly the Space key can be utilized as well as a few other keys to move you through the video(The K key works similarly on a PC in Google Chrome for me). If you are the author of the video try setting keyframes to every frame of the video and see if the Right/Left arrow keys will move frame by frame for you.
-
Congratulations all the way around! Great turn out! ...and to Marcos... my very dear Marcos... congratulations to you my friend. But... do you really think you can keep this winning streak going indefinitely? Do you?!?!? Next year buddy.... next year!!!
-
YupYup. It truly is a case of 'ask and ye shall receive'. I am told that if you download this you can easily turn it into one million dollars. And I believe it is in small (but not unmarked) $1 bills. That's a pretty good return on investment if'n you ask me. Free Money!
-
Nancy located it. Thanks Nancy! As the lists that are compiled and placed in a post are not automatically updated and links will break if their sources are removed, it's generally best to click that Lo-fi link at the bottom of the forum to get the latest and greatest text listing. Example: Listing of Vehicles contributed to A:M Exchange To run a quick search for a specific word on any given webpage/listing hit Control F (for Control "Find") and then enter the word you are looking for. I believe Control F should work in every browser (at least it should on a PC).
-
Aside: From your screen shot it appears you are animating the characters jumping on the seesaw. That was one of the more interesting video references I saw when I was previously responding to you. Good on ya!
-
Well, I won't be able to feed the family this month but at least we'll be able to draw some really cool pi'tchers. I'm in.
-
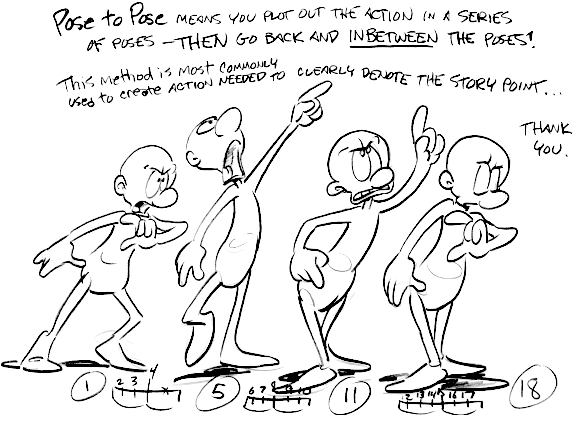
I should note that the attached image is one of my favorites from the Karmatoon series but not for entirely obvious reasons. The Pose to Pose aspect is great. The actual drawings and poses too. But what I perceive as an unintended message that a three act play (i.e. any story) is generally comprised of four golden poses (story points) but with three 'actions' to deliver the performance. Now THAT is the gold to be mined here. This lesson is borne out (emphasized) by the Timing Charts... and the Key Drawings... and the plan they create for carrying out the story's 'inbetweens'. And best of all... this is all captured in one single... solitary... unmoving... drawing. Fun stuff if'n you ask me.
-
Here's a blog from a guy (Mark Maund) who as a student of the Kubert animation program animated Mr. Basic to get the various still drawings working together. Note: I assume here that this animation is representative of the course curriculum at the time. http://markmaund.blogspot.com/2008/01/mr-b...-animation.html
-
Love the sketching Marcos! Your final model has a 'Wind in the Willows" calm and serene feel to it. You make me wish I had taken the time to video capture some of the thought process behind creating my entry.
-
Thanks for the link. Karmatoons is one of those perennial sites that folks disover from time to time and it's a great one to revisit. Doug Compton's flour sack and Mr. Basic treatments (which appear to be from the Preston Blair 'school' of animation) have influenced a generation of artists and animators. I really enjoyed running through the Karmatoons site again because I pick up something new every time. Somewhat related: It's a bit early for the holiday treatment but... Doug Compton (Mr. Karmatoons his-self) animated this short film/music video over the period of a year in a classic hand drawn style: B_7xqqt1Vgs There is a (very) short breakdown/analysis of one of the shots posted here. The author of the write up had this to say about Doug's project: Emphasis added. This is very applicable to computer animation where a keyframe is used to interpolate the movement of the following frames (of course it influences the movement of the proceeding frames as well). As opposed to hand drawn animation however, computer animation let's us specify different movement for the 'missing' frames; Hold, Linear, Spline and Zero Slope. When computer animators struggle it is often because they expect to see the effect of what would happen with hand drawn animation when what they get is driven by how the computer has been instructor to proceed by this interpolation setting. There is a blog post from a former student of Doug's that talks about Doug's drive to push the students at the Kubert School to perfection. The take being that Doug encouraged students to really "commit to a line". This is similar to what we do in computer animation when we have any given idea. It's not enough to just have the idea... it's not even enough to know the technicalities... what is needed is the commitment to act decisively... to finish the job. Then once the job is finished... move on. Alternately, we will noodle away at unfinished projects for the rest of our lives. In a way this is exactly what I like about the Karmatoons site. It's not perfect... at times it's not even pretty... but it's out there for others to enjoy and experience. Apologies for droning on. I guess I must have enjoyed the revisit to the Karmatoons site.
-
Happy Birthday John! (But as soon as the party is over... get back to those modeling/animating those superhero characters!!!) (The world needs more cool superhero characters)