-
Posts
21,649 -
Joined
-
Last visited
-
Days Won
119
Content Type
Profiles
Forums
Events
Everything posted by Rodney
-
Sweet! I hope you are prepared to animate more because when folks see this they are going to want more of the same! I'd type more but I'm going back to watch it again. Cameo Light is very fortunate to have you.
-
Very nice John. Top notch!
-
He did a lot more than just manage SO... his considerable skills are all over that film. Apparently it takes 2 to 3 years to recover from creating a feature film and Holmes had to recover from two of them!
-
Nope. It isn't your imagination. While technically termed 'Snap to Surface' it started life circa v17 known as 'retopology'. Fuchur has a tutorial on his site and here's a short article to get started: http://www.hash.com/forums/index.php?showtopic=44299 Impressive work Jirard!
-
I'd call it more of an 'homage'. In which case it would be appropriate to site his inspiration. He may also have simply forgot the original source from which he was inspired. This assuming it's the same Theirry
-
When last I checked, Holmes was off writing his memiors. His blog (with all of his writings) has recently disappeared. Hope he's doing alright. We do miss him.
-
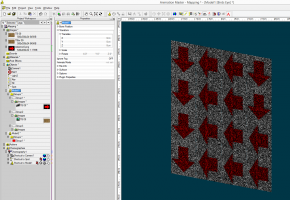
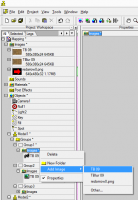
(edit: what Robert said!) One way you can determine the orientation of a patch/patch image is to temporarily add an image that points the direction out in an obvious way. Such as this red arrow image: When using Patch Images there are a couple things to watch out for (here's one): - Do you need more than one group on the same area to apply the patch image(s)? Note that it may be best to apply a second image (Bump, Ambiance, etc.) to the same group by Right Clicking the image container and selecting Add Image (as opposed to creating a new Group for each Patch Image). This will help later for organization in reducing the number of Groups you have and have no idea what purpose they serve at a glance. Added: The primary reason to add a new group for Patch Images is to drive different surface settings via that new Group beyond the surface settings of the original Group you've applied an image to.
-
Nicely rigged Mark! (great sets too)
-
It looks like inverted normals to me although patches with hooks might also be effecting the surface of those patches. A bit less likely would be five point patches. In considering your general approach to splines/patches I'm leaning toward non-continuous splines (i.e. where you might have intersected more than two splines thereby creating illegal patches). A:M doesn't know what to do with that sort of thing so it just does the best that it can. Can you post a wireframe view from a same/simliar angle?
-
Thought this link might be of interest to folks who aren't familiar with the feature film the A:M Community put together a few years ago: http://wiki.hash.com/index.php/TWO_Index Sometimes it's a bit hard to navigate through the main wiki so the index page helps to zero in on specific areas of interest. A few random samplings: http://wiki.hash.com/index.php/Characters (The TWO cast of characters starts to shape up) http://wiki.hash.com/index.php/Contact_Sheets (Note: This was more of a test... to my knowledge contact sheets such as these were not used extensively during TWO) http://wiki.hash.com/index.php/Center_Of_Gravity (Some thoughts on Center of Gravity... with play by play revision of the refinement of a sequence not in TWO) (this index link links back into the forum to a progression of Tin Castle from initial proxy models to the final set) http://www.hash.com/r_reynolds/fillet_tute/fillet_tute.htm (Links to a classic tutorial by Rodger Reynolds) http://wiki.hash.com/index.php/Image_Gallery_5 (One of several mini galleries collecting early imagery from the film) http://wiki.hash.com/index.php/Distortion_Cages (Experimentation with distortion cages in A:M)
-
You could even be mentored by one of the guys who cut their teeth on computer animation with A:M back in the day. Here are three current mentors that were quite active in the A:M community (they demonstrated a propensity for quality and instruction then as well): Victor Navone Shaun Freeman Dimos Vrysellas Oh dear. There are quite a few A:M Users that have pressed through Animation Mentor aren't there? (if I start listing them I'm sure to miss many... but here's a shout out to Dhar, Teresa, Gary (Abrehart)... in my estimation Animation Mentor took them from having an avid interest in computer animation to being skilled technicians of the art. The majority of us live vicariously through your experiences.
-
Sweet! That one's an instant classic. Great tank as well!
-

One Upon A time... Life: Globin, the red blood cell
Rodney replied to JackDrama's topic in Characters
Good eye (pun intended)! Mine was just a quick render to show that I'd downloaded and played with the character so that pose is not worth refining. Your imagery above is considerably better. And those would be worthy of A:M Stills! If I use her in something 'real' I'll try to remember to post a link to that that here as well. You know how it is... sometimes you just feel like rendering. Added: Something worth adding to any character is an Eye Target Bone. Then when that Null/target is moved both eyes will track it. Lack of an Eye Target invites the kind of eye diverging we see in my render because both must be oriented separately and manually. The idea is then to place the Eye Target wherever the character is focusing their attention... or alternatively (when in doubt)... at or near the camera. -
Man, it's been too long and I miss this guy. He hasn't updated his website in quite awhile: http://sharks.uw.hu/ Hope he's okay. Happy Birthday Sharky!
-
OKay, where does the little superhero guy come into play?
-
And there may be the crux of the matter. At the outset Animation Mentor didn't even require 3D software. You could take the course and apply what you learned to hand drawn animation. That... didn't last very long in the face of real world constraints and hand drawn animation became mostly a reference point. They had to make that move to remain relevant as 2D animation jobs went away. It is perhaps this more than anything that opened the gate for competition in a variety of ways as talented classically trained animators saw new opportunities appear. We continuously see Animation Mentor taking steps to reinvent themselves and that is a very good thing. The pay per view lessons they have offered in the past year, for instance, and branching out into VFX... an interesting move in the midst of the ongoing VFX upheaval... but a shrewd business move never-the-less. The animation industry is a better place for having them and I wish them long and continuing success. You know, if you ask nicely, I bet they will.
-
I almost hesitate to share this because I'm a firm believer that you shouldn't go into any major expenditure unprepared... so this only applies to you if you are already prepared. Animation Mentor is currently offering a 'one time only' discount on their Animation Basics course. Some caveats (in my opinion): *If* you already versed in Maya at least to the point where you can find your way around easily, or... *If* you've already taken a course in Maya (preferrably the intro to Maya course at Animation Mentor), and... *If* you have a lot of free time in your schedule, and... *If* you've currenty got the spare cash on hand, or... *If* you were planning to attend a local college/course that would cost nearly the same, or... *If* you were already planning to enroll in Animation Mentor at sometime in the future anyway... ... then enrollment by 9 March could save you almost $1,300. Several considerations: - One time only deals are never to be trusted. They will likely offer the same or even better deal sometime in the future. One time deals are often a sign of short term desperation and/or wheels turning to resolve a short term internal crisis (i.e. not enough new folks enrolling to fulfill the available schedule*). - Once bitten by the Maya bug you may be infected for life... not necessarily a negative... but it will likely affect your enjoyment of 3D software in general. - Once in Animation Mentor you'll be more likely to spend additional thousands of dollars for the other courses available... the cheaper intro courses are there to indoctrinate... again, not necessarily a bad thing. --------------------------------------------- The primary purpose of attending Animation Mentor and most of the other online schools (in my opinion) is one of access and connectivity(networking). Gaining access to: experienced instructors... limited characters/rigs... exclusive pipelines... these are some of the major selling points of . Now, lest it seem as if I'm not a fan of Animation Mentor let me confess I am a fan and that I would love to attend any and all classes available... not that I could ever afford them. (For the record I currently rank the top three online schools as; Animation Mentor, iAnimate and Animschool... although there are many other high quality (and lower quality) alternatives giving them some tough competition... another excellent reason to discount) At any rate, the results you get out of any endeavor will be proportional to the investment you put in. So, if you commit to Animation Mentor be ready to fully devote your time to it. And that's enough of me trying to sit here on this fence. Their website: http://www.animationmentor.com/ *Smaller class size can be a very good thing as students will get more one-on-one attention.
-
Yes, I believe Raf was building up to his 'Sorcerer's Apprentice' short at that time. Around this same timeframe Raf released a proxy version of Dennis ...and Cameraman. Then work shifted into high gear on The Setup Machine.
-
Oh oh. That's less competition for Marcos!
-
Hey! She's really shaping up nicely.
-

One Upon A time... Life: Globin, the red blood cell
Rodney replied to JackDrama's topic in Characters
-
Looking good Steve!
-
I should know but... sadly... don't. There are relatively few Scott candidates though so we should be able to figure it out.


