Hisako 100112 Posted August 3, 2008 Share Posted August 3, 2008 i made another face; i think this one is less flat. How does it look? Still not my final production; sorry i lied in that other forum saying i wouldn't post again, but now i think i need to so i can learn more. Quote Link to comment Share on other sites More sharing options...
Hash Fellow robcat2075 Posted August 3, 2008 Hash Fellow Share Posted August 3, 2008 the chin is too prominent for a female face. I think you really, really, REALLY should get a reference photo of a person similar to the character you are trying to model. and then some things would become more apparent when you compare them. And that would give us all a common reference point in trying to improve your model. Quote Link to comment Share on other sites More sharing options...
phatso Posted August 3, 2008 Share Posted August 3, 2008 This may be easier if you approach it with a different mindset: you're not modelling a face, you're modelling the front third of a head. You need to study someone's head from a number of different angles. A lean person's cheeks, for example, are planes that face almostsideways. This implies that you need a human model, which implies money. Here's a free alternative: Google "Hunter Parrish Whistles Weeds Theme". Download it and save it. He turns his head at all different angles, so you can pause the video and study his head. Granted, he's not the person you're trying to model, but when you can model him, you can model anybody. Quote Link to comment Share on other sites More sharing options...
Caroline Posted August 3, 2008 Share Posted August 3, 2008 And Cooper - have you tried this tutorial? (11.5 in TaoA:M manual) http://www.colins-loft.net/CoopFace.html I've been trying to analyse why your face looks so flat. I think it is partly that the eyes are very big, and the nose is very small. Are you going for realistic or stylized? Also, if you look at the side of your model's face to the left and right of the mouth, there is no curve. It's like the mouth continues flat and does a 90 degree turn to go to the back of the head. You can't tell from a mirror, but feel your own mouth, and you will note that there is no flat bit on either side. None. It is one curve to the back. And the mouth itself is not flat, from the corner to the center of the mouth, it is a curve forward. (OMG maybe I am a freak, and nobody else looks like that ) It is certainly better than it was before, keep trying. Quote Link to comment Share on other sites More sharing options...
heyvern Posted August 3, 2008 Share Posted August 3, 2008 Whitley Strieber comes to mind. I don't know if you are asking for AM help or "artistic" help. Seriously though, look at any books or web resources you can find on drawing faces. There's a lot on the web. Creating a "nice looking" face in any medium is the same. The same proportions, structures etc. All the same rules apply whether it is a pencil, a lump of clay, or AM. You should do a ton of sketches of faces. Over and over. It will be hard to "learn" to draw working in AM because the modeling process is much longer than sketching. Even if you use photo reference and "trace" on paper the positions and proportions of eyes and mouths and ears you can still learn from that. Learning to draw a face from scratch in AM could be a bit difficult and counterproductive. -vern Quote Link to comment Share on other sites More sharing options...
Hisako 100112 Posted August 3, 2008 Author Share Posted August 3, 2008 I've been trying to analyse why your face looks so flat. I think it is partly that the eyes are very big, and the nose is very small. Are you going for realistic or stylized? i am trying to make a semi realistic face like a character from Final Fantasy or Dead or Alive (both video games) i guess that's stylized. i want the eyes to be bigger than normal, the nose smaller and the mouth a little smaller (for some of my characters; i have way more than one to model.) i want the cheeks and the rest of the face to look human though (i'm still working on it; do you have any tips or trick for making good cheeks?) here is a picture of two video game characters i think look like what i want (their eyes are smaller the my characters though.) i want it to look more like the one on the right. and the chin; which splines should i move to make it narrower? maybe i'm totally constructing the face wrong to begin with Quote Link to comment Share on other sites More sharing options...
Caroline Posted August 3, 2008 Share Posted August 3, 2008 This is the mouth area of something I'm attempting to model at the moment: This is the top view: The green splines on this top view is a possibly exaggerated position of your splines: Try hiding areas and looking at the one area from lots of angles. It is very difficult to make a face without a front and side view. It is also very difficult to take photos of front and side, because they never seem to match up. I have never understood why the bit between the nose and the mouth can be one size from the front and totally different from the side. Look at all the A:M models you can find, and analyze the splines in them. In this forum, especially in WIP, there are heaps of pics of faces with splines. Research. It all takes a very long time. If it were easy, everybody would be doing it Quote Link to comment Share on other sites More sharing options...
heyvern Posted August 4, 2008 Share Posted August 4, 2008 I have never understood why the bit between the nose and the mouth can be one size from the front and totally different from the side. This is due to perspective and the camera taking the photo. Most photos or portraits are shot fairly close to the subject so features closer to the camera will appear larger. This seems like it would be very subtle but for what we try to do in AM it is an enormous annoying difference and can completely distort the model if the photos are followed exactly. Look at freaking EARS! Front view photos the ears are TINY compared to side view. Another problem is slight rotations of the photo subjects head when the photo is taken. A front view might not be even CLOSE to being front if there is even a slight rotation forward of the head. It will throw EVERYTHING out of whack. Side views are easy to fix by rotating the image but front views are impossible. It is often hard to find straight on photographs of a subject shot in such a way as to reduce the lens and perspective distortion. What I've done in the past to try and overcome this... a little bit... is to view the model in AM in perspective mode and try to adjust the AM camera to match the perspective of the photo. This can be done in the modeling view by decaling the rotoscope on a grid. It shows in perspective mode and you can sort of line it up with the face. It is not perfect but sometimes you can see clearly what areas are incorrect because of the camera lens distortion. I used this technique on my Dave Bowman image (it's on the AM box if anyone has it... shameless plug. ). I was so FRUSTRATED that my model wouldn't not line up AT ALL with my rotoscopes. Once I did this sort of... perspecive trick I could see the areas that I modeled too skinny because the of the camera distortion in the photo reference. As I mentioned before I end up using "artistic skills". Instead of using the photos to "trace" I have them visible in another completely separate window only as a reference. Then I "sculpt" the model... tweak it... so it looks like the person in the photo. I nudge points here... push them there... I don't measure... Like painting a portrait. Eventually when I look at the model it looks like the person... but... the photo reference would never line up with the model. ------------ I may get yelled at for saying this... but... I think you really need to know how to properly draw faces before you could ever model them effectively in AM. Realistic faces. Maybe I am wrong... but I just can't see any way to cheat that. There is no way to take a short cut. AM is still just a big pencil. You might get close using photos but it will always appear slightly "off" if you don't know how the shapes of the head connect, how the curves of the mouth connect to the cheeks and chin, how the nose and eyes connect to form the brow. Even my own results are not nearly perfect. Not even close to perfect. Realistic heads are probably one of the hardest things to do in any medium. -vern Quote Link to comment Share on other sites More sharing options...
DarkLimit Posted August 4, 2008 Share Posted August 4, 2008 -here are some references that could be of some help; they can also be used as a rotoscope if you like- Quote Link to comment Share on other sites More sharing options...
Admin Rodney Posted August 4, 2008 Admin Share Posted August 4, 2008 Robert, I don't think I'd use that as a good example of spline modeling. A noble effort... but sure to cause some problems. There are too many places where 5 splines connect at one point. In particular the cheek and brow. (but all over the place) That'd work for polygon modeling but not for Hash splines. Porportion-wise it might be useful but... Quote Link to comment Share on other sites More sharing options...
phatso Posted August 4, 2008 Share Posted August 4, 2008 You don't have to make the face narrower, that's not the problem. You have to make it deeper. Your face is still largely a plane facing forward; a real human face, especially a feminine one, is not a plane but a slightly distorted sphere. Look at the two video game characters you posted, specifically the one on the left. Her cheeks are almost 90 degrees sideways. The outer part of her jaw and cheek, farthest from the nose, is halfway back around her head and almost lined up with the ear. Now look at the top view Caroline posted. This is a cross-section slice at the level of the mouth. Note that there is no part of the face that's a plane facing forward. Note also that the head is deeper than it is wide. This is, as I said earlier, a problem faced by most people when they first try to model a human. The fact that you're looking at a flat computer screen makes you think like a 2D painter, not a 3D sculptor, and you have to get rid of that mindset. The first step, if you're not doing it already, is to take Caroline's suggestion. Have two modelling windows on your screen at the same time, which will normally be a front view and side view. (Go to the toolbar and open a new window, then click "tile vertically.") Then you will at least be looking at two 2D views from different angles. You don't have to remake your model to get it to look better, although by the time you're done you will want to do another one from scratch. You need to take the features in the center of the face and pull them forward, and take the features toward the edges and pull them back, until you don't have anything that's a forward-facing plane. By the way, I mentioned having models - and forgot to mention the most obvious one. You should keep a mirror next to your monitor; I do. There's a reason so many artists paint self-portraits, and it isn't vanity. It's because the best, most cooperative and cheapest model is the artist him/herself. Interesting note - at least I think so - People have always wondered what the Mona Lisa's smile is all about. Some have suggested that DaVinci found that his own face was similar to that of the lady he was painting, so when she wasn't sitting for him he was able to work on the painting using a mirror. The smile is supposed to be his way of acknowledging the inside joke. Quote Link to comment Share on other sites More sharing options...
Hisako 100112 Posted August 4, 2008 Author Share Posted August 4, 2008 okay i changed a portion of the face. i still have some splines to move and some wrinkles to fix, but is this face deeper? is the depth a little better? i looked at caroline's top view photo and tried to make the shape from my top view. maybe too i should tell you that the characters i'm trying to model aren't really realistic human looking, but they are humanoid (they are cat people; they look slightly human but with big cat eyes ). even still i want the face proportioned human like (am i explaining this right?). how's the depth on this one? Quote Link to comment Share on other sites More sharing options...
StormedFX Posted August 4, 2008 Share Posted August 4, 2008 Do not forget the side view as everyone have suggested, and work your splines from the noes toward the back, so you can get the depth that way. Open front view and side view side-by-side. Rotate either view to 3D view to push and pull certain vertices, this will give that same feeling as sculpting. You are almost there. CHEERS! Quote Link to comment Share on other sites More sharing options...
Hisako 100112 Posted August 4, 2008 Author Share Posted August 4, 2008 Open front view and side view side-by-side. how do you open two windows of the same project side by side? Quote Link to comment Share on other sites More sharing options...
Caroline Posted August 4, 2008 Share Posted August 4, 2008 Window Menu > Tile Vertically That will tile all the windows you currently have open - you can click Window Menu > New Window to open a second window of your current view. Then when you have the two windows you want, click Window Menu > Tile Vertically again. The great thing about that, is that when you select a CP in one window, it is highlighted in the other window. Another thing you might want to try, is View Menu > Workbook - this gives you tabs at the bottom of your screen, so you can easily see how many windows you have open, and easily pick one. Quote Link to comment Share on other sites More sharing options...
Hisako 100112 Posted August 5, 2008 Author Share Posted August 5, 2008 thank you for the tips. which splines on the nose do i need to pullback though? Quote Link to comment Share on other sites More sharing options...
StormedFX Posted August 5, 2008 Share Posted August 5, 2008 thank you for the tips. which splines on the nose do i need to pullback though? How about the "Cooper Face" exercise? Try to follow it, and you will learn a lot from it. I will keep my word for it. No!!! The push-and-pull is just what I call for fine tunning the contour of certain vertices, and someone else might call it differently. That reason I call it push-pull, so you can get the same feeling as working with sculpting but not just pushing-and-pulling those vertices. You start with a spline that contour the shape from the side view, you then extrude and move it either in or out using LEFT or Right arrow as show in the picture. extrude.bmp push_pull.bmp Quote Link to comment Share on other sites More sharing options...
Hisako 100112 Posted August 6, 2008 Author Share Posted August 6, 2008 How about the "Cooper Face" exercise? Try to follow it, and you will learn a lot from it. I will keep my word for it. i can't do the cooper face exercise; my rotoscope doesn't work (see my other forum BIG PROBLEM WITH ROTOSCOPE) in other news i finished the face (the white spaces are where the eyelash image will be placed). How does it look this time? also how to you export/save a project into a model (.mdl)? Quote Link to comment Share on other sites More sharing options...
StormedFX Posted August 6, 2008 Share Posted August 6, 2008 Well! How abot the pictures that DarkLimit have posted? Can you use those as the reference? You are making progress, but it will be much better for you if you follow the Cooper but use different picture as I mentioned above. CHEERS! Quote Link to comment Share on other sites More sharing options...
StormedFX Posted August 6, 2008 Share Posted August 6, 2008 Sorry! Forgot to tell you how to save it. In the PWS, expand the "Objects" tab, then RIGHT CLICK on the "Model1" (which you can rename it to whatever you want) and select either "Save As" or "Create Shortcut in Library". Quote Link to comment Share on other sites More sharing options...
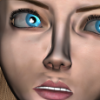
Caroline Posted August 6, 2008 Share Posted August 6, 2008 That's actually very good, Hisako - the nose being pinched makes it look 'odd' to us, and she has a funny lower lip - I don't think lower lips go in in the middle. The cheek maybe could be a bit higher, and more pushed out - feel your eye socket, and the cheekbone below it - the cheekbone comes out quite a bit to protect the eye from damage. But some people's faces are flatter than others. Smooth out your splines a bit, especially the ones crossing the spline circling the face. I am working with a model (Gala) that has 'incorrect' splines in the face that cause creases. When she is decalled, you don't notice it at all. The three point patch at the top of the head will be covered by hair. I can't tell from that resolution what other splines may be problems. Check with the comma , key that your splines are all continuous. As an experiment, you could put a decal on temporarily just to see how she looks - save the model first (keep saving models under different version names): 1. Right click the model in the PWS, choose New > Decal 2. Choose a front facing photo - it will go into the model. 3. Resize the photo to fit the face (it probably won't, but don't be too fussy) 4. Right click the photo and choose Apply, then Stop Positioning. Check it out, but don't save the model. Quote Link to comment Share on other sites More sharing options...
phatso Posted August 6, 2008 Share Posted August 6, 2008 AHA! Now you've got it looking three-dimensional. Next step, smooth out the creases. This is another area where having two views is handy, because you're going to be pushing and pulling control points by small amounts. To push a CP in or out, without moving it sideways along the surface, you need to be viewing it at right angles - but to see the effect of what you're doing, you need to be viewing it head-on or obliquely. Thus the need for two windows. When nothing else works to smooth out a crease, you can twist or resize the bias handles. There is a material called Porcelean which uses rendering tricks to smooth out a surface, but I don't like using it to substitute for manually smoothing the geometry. Porcelean should be used as a finishing touch. Quote Link to comment Share on other sites More sharing options...
Recommended Posts
Join the conversation
You can post now and register later. If you have an account, sign in now to post with your account.
Note: Your post will require moderator approval before it will be visible.