Search the Community
Showing results for 'project'.
-
Hi guys! I post my first dialogue with expression,what will be in my Aikido Basics project! I mind about it, that I have some mistake! Please check it and write me your opinions! Dialogue This movie is rendered REAL_Time, not final,and low-quality! It is required Divx 5.03! I'm waiting your opinion! Sharky
-

So many thing to do, and so little time
clarion replied to clarion's topic in Work In Progress / Sweatbox
Thank you john3d , I should have dedicated this to you . I've received so mutch help from you, and your project files Cheers Tor-Bjarne -
Hello! I am very new to a:m. I'm using A:M 2001, 8.5p+ and i'm trying to create spheres. i understand the concept and everything is going ok, except my half-circle, that i'm going to lathe into the sphere looks a bit jagged, not perfectly curved. the odd thing is, if i close the project & reopen it, it then looks fine. so, i create my sphere. so far so good. if i look at it in shaded mode, it no longer looks perfect, nor does it in wireframe any longer either, unless i save, close, and reopen the project. anyone know why this is happening or how to get around it? thanks!
-
Parlo, Watching your work makes me wonder.... Do you animate with the full model for your whole project? What about during real-time preview and during the process of creating your scenes? Just curious.
-
Hi Parlo! It's very nice work! I'm happy,that I would see your project,because I'm working now a similar dialogue. I would like to ask you,please write me how can I do this,because I want to will be my project very nice,good position movement with voice too. Can you help me? I'm waiting your answer! Sharky
-
Thank you! No disrespect, but are you sure you haven't got me mixed up with robcat? I've only done a few of these... This is a generic character that I modeled myself for a different project. He's very low-patch, which is what I needed at the time. Zach
-
Awwright! I've been waiting for you to fire up that project again. I remember you originally posting your demo reel stuff and being interested in that short film project. I'm looking forward to seeing it develop
-
Thanks all! Ja, the butt is a bit flat. I was just told there's on rush to finish this project, so I'll revisit this sequence and fixt that, among other things. Greg, thanks a lot for the pointers. I was wondering what to do with the back legs. I'll work on the drop a bit, too.
-
Hi, I've learned this from working on my first short, which has completely changed story ideas three times. When you say "short", I presume that includes everything from modeling and texturing to sound effects and music. First, keep it simple, one or two characters at the most. Also limit your locations to one or two areas. Going in, have a clear idea of what is happening in the short. Just as you would for a feature length film, storyboard from start to finish. The storyboards don't have to be works of art, they could be stick figures or whatever, as long as the camera location and movement and the actions within the scene are clear to you. Be patient with yourself. Know that animation takes time, maybe longer than you realize. Be persistent. Be organized. What I've done is created a folder for my short. In that folder, I've created several folders for models, textures, etc... And in all the projects that I've done, I've saved everything externally into those folders. Initially, it's best to do each shot as a separate project file. Each project file should have only one choreography, this helps keep things uncluttered because you have only the files you're working with for that choreography. Later, if you need to, you can combine projects easily by simply bringing in the other choreographies. Take the time to really LEARN from what you're doing. Take the short all the way to final render. Don't use the beta versions if you're on a deadline. Good luck with it, if you need help as you're working on it, this forum's the best place to turn. And SHOW IT OFF when you're done. Just my two cents, Steve P.
-
Here's two more: Options Settings: The options in the tools menu in the titlebar are saved in AM rather than each individual project. By that I mean if you change the render settings there, they will be the same in the next project you open. In the next project, if you change them again, they will take on those settings when you go back to the original project. Spherical Mapping: I always wondered how to put a spherical map onto a sphere. AM uses a very different technique to other programs....decals. This allows you to project an image onto an object. Very powerful. Yet that was all I could do on a sphere. Only recently I found a way to do it: Drag your image onto the model and create a decal. Don't apply it yet. Go into the decal folder and change its application method to "Spherical" in its properties. Now right click on the decal and select "Position". Apply the decal. It will now be spherically wrapped round the sphere.
-
I really like your furtature. I am in pre-production on a film school portfolio project and all the planned animation takes place in an architects office. Your furniture would look good in my project. Are you planning to market your furniture collection. AD
-
Yeah, this is a toughy. Personally I have done it both ways. I used the dopesheet technique for a project from last year a group from the list put together (still in progress?). Fractured Film Project It is the very first part with Thom and that bear guy from the CD. For me in that situation it worked great and it seemed to go pretty quickly (time was an issue). I was able to rough it in and then tweak it. I really liked using the dopesheet, especially when I could just type in the dialogue to get the first rough keyframes for all of the words. The tricky part that was actually kind of fun was coming up with wierd alternate words to match the dialogue. But as you have already found the best technique is the one that works for you. Vernon "Sheet! You dope!" Zehr
-
That rig is not available for download. The tutorial applies to any rig--just use orient like constraints on the control bones of whatever rig you are using. Unless you have motion capture files of Aikido techniques, or the expensive equipment to record them, you aren't going to be able to use that tutorial for this project.
-
Dalemation Forgive me for not replying sooner I feel a bit clapped out at the moment, the four-day week went out of the window last week cos I had to go in on my day off and work on a mad rush project - typical clients! Anyway, I just wanted to say thanks for the kind comments you made and I do have the book you suggested, but I ain't read it yet! I have done a few more frames on me project but I will have alot more done THIS Friday - I will most definately NOT be working no matter how IMPORTANT it is, my project is FAR MORE IMPORTANT!!! Did I sound grunty? Well I must be GRUNTY BEAR! Wait till I get to GROWLY BEAR!!! Oh god this projects going to my head... anyway sneek peak at another character who will appear in the next episode.

-
Hi Guys! First I thank Rodney's opinion,because it is very instructive for me! I promise Rodney, that I will post more screen captures and shots in my project! Thanks , one more times! Mr. William Sutton, You gave me a good Idea, because I have Jeff Lew's DVD package, and I remember the rotoscope lesson! Maybe it will be good for me! But I have some new question: -First: Where can I download ZANDORIA_SKELETON for BVH tutorial? -Second: I have a big problem in the animation, well I try to descript it! If I animate my model's hands, for example, he extends his hands forward,then the hands go cross each other the half of way, Why? I used the IKarms!I was meeting it more motions! (For example : in the kotageashi sample,so I used motion blur, that You don't see these mistakes!) What did you make wrong? I'm waiting your answer or anybody! Thanks before, Sharky!
-
Thank you Rodney and Vern for the help!! Vern, on a Monday morning before I went to work, that example image had me in stitches! Made my Monday much more bearable, thank you! I tried your techniques. In the past I steered away from cam rotos because for some reason I had troubles getting the alpha out... it never seemed to work. Trying your technique though just in the last hour, I had no troubles at all -- it just makes me pick a key color instead, and I didn't have any trouble with this -- fact now I can forgo the Eyebatch program making a key color alpha for all the frames at once. Another reason was because the popcan has reflection and the rotos don't reflect anything off the model. Just a nitpick though, and fixable, I think I will plaster a decal of the DV on the inside 'dome' of a sphere and have it just behind the camera and lit right should reflect back on the can just fine. I really like your idea too of stand in model hands that put in a realistic shadow. It doesn't even have to be perfect since they are never seen! Sure your technique might be more memory consuming, but I think it would work better for my needs as I don't have to make the alpha channel of the prop can just perfect and do all the finessing that filling in the prop entails. I can make the cg can slightly larger than the prop to cover it up. It also solves a problem for a later scene where the can is going to warp out in her hands (using the cookie cutter, the warps that bulge out would have gone beyond the prop and it would have gone behind the dv image). All this too renders FAST! I am SOOO glad I consulted here before going ahead with this, as this REALLY helps!!! THANK YOU! BTW: this project was inspired by a scene from television's Enterprise, a series that I think is underrated for it's CG work. There was a scene where a character holds a cup by the handle and is about to take a sip, then lets go and the cup wanders off weightless away from him. I had always wanted to try to get something like that to work with it's problems on how the fingers cover the cup, lighting it right, etc., in AM. I hope at some time to have the finished project posted in the 'completed' forum. A ways to go, but I have a method now!!! Thanks again!! Rob Milliken
-
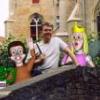
Eeeek. Sorry for the delay... I sometimes miss a post here and there. If you need response from anyone in particular it might be advised to email them as well as post... that way it won't see that you are being ingnored. Which is DEFINITELY NOT the case. Having said THAT...How can I resist to offer my 2 cents on your excellent project! I like it! I love your whole project! I need to stare some more at the screenshot to do the 'ol travelin' home to Japan thing... A few thoughts First on the animation fight: As Steve suggested the action is REALLY fast... wow! Fast may be the effect you are going for... but on it's own outside of a 'frame' scene or "Click to see a demonstration of the move" it appears too fast. Question: At the end of the move should the character still be in the same stance... or does the 'official' move allow for a step back. Some form of action as the end would help 'finish' the shot. Concerning the screenshot: Hmmmm... I've had a bit of trouble myself geting good still shots with samuai and swords... It can be a trick to get a good shot every so many frames... but... this is important. Thinking about still frames can help tell your stories in powerful ways when you animate all those frames together. A very valuable tip that makes for some of the best shots in animation is silhouetting. If you can color your model black and 'see' the character at important frames (critical moments) in the scene you have mastered the art of silhouetting in animation. While your screenshot may not be designed to show us that 'moment' in that particular scene I'll take a moment to elaborate a little more on the subject. (Hope you don't mind). In particular I want to comment on what I see that looks 'right' to my eye! Location Toshisan is set in the scene in a perfect stance beneath the torii gates...He is postioned directed in the path of any threat to the way that is kept by those inside. He is their protector. I note that the foward foot extends outward from the torii threshold indicating on offensive nature... guarding the sanctity of the area within the gate. The rear foot is inside... showing that Toshisan has freedom to move in and out of the gates... while denying entry to others where necessary. The imagery sends important messages that deliver the story to the viewer on more than just one level... Bravo! There are a few things that catch my eye... and make me wonder what might be the message (if any) behind the image... The torii gate itelf appears just a I remember some of the modern metal gates in Japan. It feels somehow out of place though... especially with the color yellow/gold(?). The color makes my ask... why gold? You may have the answer to that question.... We for now do not know.... Most of the gates I've seen are red... and built of wood. Although they vary greatly as I'm sure you know. It might be interesting to know why this particular clan has a gold gate. Hmmmmm.... I don't know much about Aikido... my ignorance might be now on view for all to see! Enough from me for now. Keep up the great work Sharky! Most impressive!
-
I've been working on this metal flake material, in v8.5, in my spare time. I really wanted to capture the sparkling quality as the perspective changed. I rememberd a tuturial by Charles Babbage: "Diffraction Grating 101", where he used a multi-gradient tree for specular accents. I figured I could do the same thing for a whole material by adjusting the "edge surface" property, by rotating you see the same material slightly offset with some colors attributes switched, giving it a twinkling appearance. Still needs a little work. Metal Flake Test .MOV If someone would like to repost, please do so. (low, low bandwidth) And incase your wondering "Why did he need to use metal flake?" I've been working on my stick-puppet coverband, "The Rinds". This is going to be an ever changing project, always growing...Growing...GROWING!!!
-
Update! Got the eyes working fine. Noel, your advice was great. Just had to scale a parent bone in relationship mode and the rest is taken care of. Who'd'a thunk? I've got the color scheme just about how I want it. I haven't rigged him, except a little for the eyes, and two eye poses (lower the upper eyelid and dialate the pupil). Comments welcome. Front Back Face 1 Face 2 Face, WF P.S. Yes, I know the resemblance to the M&M/Grimace/Killer Bean... I am charging forward regardless. Jeff Lew can consider himself flattered, if anything. He lacks hands, but that's the next project.
-
Hi Guys! I arrived in my project, that I animate lipsync! But I need help, that I can make a good dialogue with expression! Can anybody offer a good reference stuff or tutorial, what gives good illustrations about dialogue animation! Please help me! Thanks,Sharky
-
It looks to me like you're not really doing anything wrong with your eyestalks. Maybe you could trim up each of those hooks in it though? If that makes sense... I think you could probably get the same effect with less geometry there. Same with the ears. I think there's a few lines in the middle of each ear that aren't really adding anything to the character itself, and will probably just make it a pain to animate. Are you using the porcelain material from the CD? If not, that could really help to smooth everything out more. I finally started using it for my second project and it makes a BIG difference. Looks like a funny character! Keep it up! -Andrew
-
Hi guys! First I thank your answers! J. Baker: I used the divx instead of .mov,because part 1 is too big, but if You can offer a good setup for .mov,then I will post part 1 again! Originally these parts are attached and this choreography has one more part! I would like to be post this movie fully, but this is too big! My project: lenght: 1 minute size: 32 Mb format: mpeg VeridisQuo567: The clap is slowly originally too, and I'm sure in it ,because I'm going Aikido!!! I thank your opinion! Rodney: I will post more screen capture and movie clip,but I ask a few time,and after I will wait your opinion,that it remember you for The Japan Culture, until I'm waiting your "animation lesson" Here is a sample in my project :Kotageashi I'm waiting your opinion! Sharky
-
Looks like a neat project. The only adice I have about the cape is to consider not using cloth. I have tried several times to get cloth to work as a cape and never suceeded. The advice I got at the time was to animate by hand. Maybe dynamic constraints could do it, but you would need v10.5 for that. Good luck.
-
Well, here it is, took me 2 days total to make, it's a FFA project, but i'll work on it some more
-
Okay I promise this is the last one...was playing with AE today and got this neat cell effect working so I added it to some layers in AM added the creature and got this. I turned off the volmetric light was getting extended render time too much for a fun project johnl comptreezcreature.mov