jason1025
-
Posts
1,855 -
Joined
-
Last visited
-
Days Won
4
Content Type
Profiles
Forums
Events
Everything posted by jason1025
-
eye_SSS_01.mov eye0000.prj J_eye_bal_02.mdl

-
I might donate the model when it is finished, but I have not decided yet Thanks George! No problem
-
Could I get a copy of that model? I just want to study the modeling techniques. It would be much apreciated.
-
Shoot me a personal email and I will find a way to get it to you. jason@hdjibguy.com YOUTUBE I wouldnt waste my time. The resolution on Youtube is to low
-
Shoot me a personal email and I will find a way to get it to you. jason@hdjibguy.com
-
Try this ftp://jason:jason123@ftp.postgroup.com/TS...2_Tutorials.zip
-
Thats strange. it works for me on two machines using firefox and win explorer. When using windows explorer drag and drop the file to your desktop but do not double click. In Fire fox right click and save link as to your desktop. If the file name changes just make sure it has the .zip extension when you save it to your desktop.
-
You get the Program (AM 15) for $50.00 the only catch is its for one year and it only works on one computer which is a pain if you need to render on multiple machines. Alternatively if you purchase the program for $300.00, you get a CD that lasts for ever and you can install it on multiple computers which can speed up render times significantly.
-
Hello Folks I was able to talk Raf into giving us his pro TSM2 Training videos. Also Cristin Mckees Animation Training, and the entire Anzovin Training I payed for all of it. My thanks again to Raf and Cristin for donating his discontinued products to us. Here's the deal. You have 3 choices. 1. do nothing and get nothing. 2. Create a 5 minute video tutorial or longer with audio on something, anything related to AM, even if its been done b4 because you may have more insight or a new take on the subject. Then donate it to the community. Email me the link jason@jasonhampton.us and I will send you the data DVD's of all my training for hash that I can legally give away. 3. Option 3 click on the link below and buy me something by clicking on the link below.
-
Caroline I have to say it again, the work you are doing here is so helpful. Thank you.
-

WIP... she is a beautiful Thai moview star.
jason1025 replied to StormedFX's topic in Work In Progress / Sweatbox
looks good so far -
Check this out http://www.pluginz.com/product/10614?g=3152#gallery
-
Caroline After you completely rig the model are you going to go over smart skinning?
-
Hi Caroline So let me get this straight you have achieved the same quality of movement as with the 4 fans but in less time because you used 1 fan bone in conjunction with cp weights?
-
3 First I want to say your work here is great, I have been fallowing along side you and I feel that TSM2 and your notes are the best way for people who have trouble rigging to get a decent rig into their model and start animating. I have a question about the 4 fans in the shoulder. It appears to be flawless in the animation, so is there any problem with this method? what are the downsides to 4 fans in the shoulder? aside from extra time rigging? thanks again Caroline please keep up the great work!
-
Great work, have you tried a toon render?
-
Hi Jay Where are you located? I agree with Rodney and also recommend Barry's training. I was just like you and bought the software back in 2001, I didnt do much with it until a client wanted me to create a virtual set motion track an actor on a green screen Starwars style. You can view some of my work here http://www.hdjibguy.com/vwd.htm I was frustrated with the software because the guy who sold it made it look so easy. He said it was easy. After I purchased the software I didnt think it was so easy. Later I learned that the program was much easier to learn than Maya or the other packages out there. I Highly recommend getting barry's DVD's it took me a few weeks to get passed rigging. I try to use AM at least once a day for an hour or two. There are a lot of Tutorials out there on the forum but you have to dig. If you "consistently invest your time using AM" for at least a month or two then you see the light at the end of the tunnel. Best regards www.hdjibguy.com
-
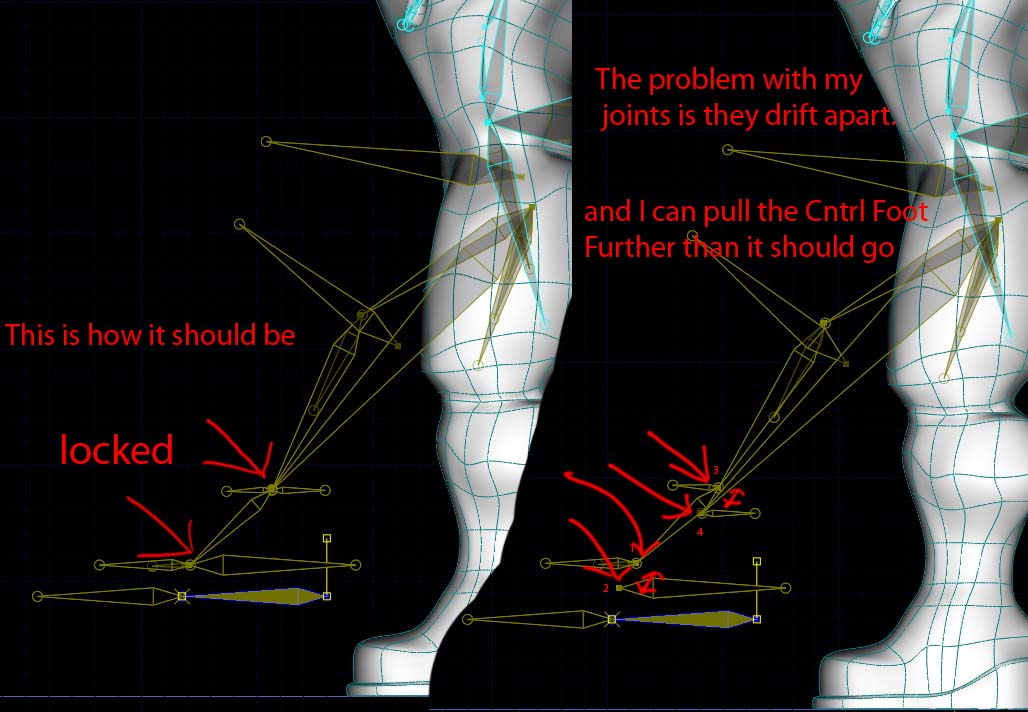
I am using Barry Zundel's training. He teaches you how to create a rig from scratch but as you know rigs are complicated. If you dont have the parent switch set to on on the correct child, or dont have lock IK set to on on the correct bone, if the hierarchy is off or if you set up a relationship constraint to aim at when you should of hit orient like well you get problems like this. I wanted to get some opinions on rigging. Do most people just use a preset rig, like the 2001 am rig or the set up machine or do they build the rigs themselves from scratch? I want to build my first rig myself to get an understanding, but after that I think I want to use the set up machine now that its free. Do you basically just assign points to Tsum2 rig? Thanks for the feed back folks Best regards jason www.hdjibguy.com
-
I cant seem to figure it out. best regards Jason Hampton www.hdjibguy.com
-
Hey guys it looks like we have 3 people. We can meet at my place, I have a lot of free time so you guys say when. Jason www.hdjibguy.com
-
check this out
-
Thanks
-
I just got AM 15 and I want to transfer my settings and prefs from AM 14. In the passed when I went from 13 to 14, tech support told me how to do it via reg edit, but I dont remember how to do it. Is there a better way now? Best regards Jason Hampton www.hdjibguy.com