oakchas
-
Posts
1,342 -
Joined
-
Last visited
Content Type
Profiles
Forums
Events
Everything posted by oakchas
-
Ed, Yes, props seem to be a problem for many... Are you aware of the thread about MUFOOF by Xtaz? Therein lies the key perhaps for spinning a prop... and even showing the Nyquist rate of revolution.... Pretty cool stuff, that may help... take a look, click on the underlined link above
-
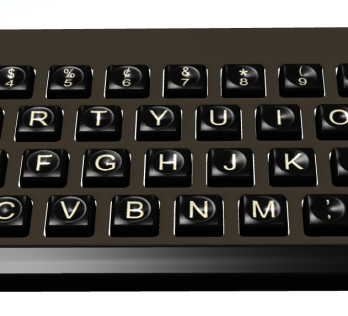
Dan, it's an integral part of a larger work... the fedora I modeled will be a small part of that work as well. I'm a loooong ways off from finishing... I've only just begun. The typewriter, though, is center stage; and must be useable in close up... Thanks for the tips on the aging.... I'm making a new one first and will add the age as soon as the mechanical is done. Here's an update, in panavision, extreme closeup of keyboard. The dustplate has been tilted to the correct angle, and the bottoms of the keys now go thru the plate. [attachmentid=14255]

-
Yeah, but at least a little. Sheesh...
-
Thanks trajce, (I still want to call you doctor!... but, I know you're not) I think I can keep using all the decals... Helimox did have to decal his helicopter dash in much the same way.. only more so! So, i should be okay.
-
I've been working on this for a few days in spare moments. Thanks to Agep for his help with the modeling. Here's a wire and render screenshot [attachmentid=14224] Here's a closeup in panavision resolution (cropped) [attachmentid=14225] I've had some difficulty with decaling >> look here Right now I have a bit too much specularity in the keys but it is a "new" typewriter, and I haven't aged it yet. Other critiques appreciated... though I am just beginning on this, so I know quite a bit more needs to be done... and help on the decaling issues at the link above would be helpful too.
-
Well... Sigh. Things are not going so well. I have a keyboard model. An old typewriter to be more precise. I have decaled the keys ~45, I never kept count. It looks beautiful so far (take my word)... but the problem is those 45 + decals at 600 X600 pixels, one for each key. Okay, don't take my word... here's a screenshot of the beginning, and the end result [attachmentid=14221][attachmentid=14223] And, a closeup (nonwire) in panavision res (cropped) [attachmentid=14222] I have tried hiding all but the tops of all the keys and making a large decal of all the letters and numbers. It is not working because the model then will not stand up to scrutiny. The letters are fuzzy up close and this keyboard will be used in a close up. I can always use a proxy of the typewriter and use the keyboard portion of the model with the hi res decals for up close work, I guess... but I was hoping not to. Here is another solution I tried: Render to 35MM or Panavision or any of the large formats (wireframe only) from either the modeling window or from chor. I get an error msg. There is an asterisk next to these large format options in the rendering dialogue... Why? Can't find anything in the tech manual... or the other usual places (I'm trying to do my duty to check available resources first before firing off these questions). This solution might give me a big enough file to use as a template for the decaling that won't make the letters blur on close up. Currently the targa (decals) I am saving @ 600X600 with unaliased letters in a PS like product, with an alpha channel are giving great fantastic results on the keys. When I do render as large as I can 1280X1064 and make the letters fit the area to be decaled... the letters are jagged like an old .pcx file.... I can up the actual dpi resolution of the targa... that might do it.... but can you see anything in the description above that might be wrong? For example ... why I can't render wireframe to the large format files? Any thoughts appreciated.... I ought to ask helimox about his 'copter cockpit and all the decals that surely MUST be there....
-
SL. I can't see what's missing...Your screen caps are too small and don't enlarge. But, I'm having trouble decaling as well. but I am not losing any decals as yet. I just have a lot of them and need to add more.
-
SL, I've tried the method I described above... It does not work well enough... the labels come out fuzzy on close up.
-
Where (in A:M) are you doing the render from? Modeling window? Choreography window? If in the choreography window, and you press 1 on the numeric keypad, you will have a camera's eye view of your model. if it's tiny in the window, click on your model, and move it toward the camera. Press 5 on the num pad, and then you will be in top view. Drag your object toward the small part of the purple cone. Switch back to camera view (num pad 1). is it bigger? Does that help? If not, post a pic... press print scrn on your keyboard when you are looking at the model. open a program that can edit pics. press Ctrl V to paste it into the graphics prog. Save it as a jpg post it here. I'm just guessing at what you are trying to tell us. I hope I guessed right. I'm trying to discern whether you have an amazingly small, detailed model or a larger model with a small, yet amazing detail.
-
Front tire looks a bit underinflated.... you will get wear on the outside treads that way... Also looks kinda funky where the windshield (particularly the pillar) meets the roof. You are doing a bang up job on this... very nice (all my smart a## coments aside). Modeling that motor.... yikes!
-
Since I was doing sorta the same thing... And couldn't think of a reasonable solution to all those decals on all those buttons... What would happen if you did this: 1. in model window, hide all unnecessary cp's/splines 2. render to file Wireframe only to however big a targa file you need (to match Illustrator)... 3. use it as a layer in Illustrator as template to place the switch labels, etc. either delete the spline/cp layer and save layer with labels as a targa with alpha... Back in A:M load the model with all the same Cps visible as you renderd. apply decal. Maybe this won't work... I won't be able to try it til tomorrow... there may be another step between 1&2 If you copy all of the unhidden cps/splines and paste just them to a new model window, that would be all there was to render.... wireframe or no.... Iduuno.... I'm just thinking out loud...
-
Marc, Of course! Simple isn't it? I can even just hide everything but the tops of the keys... Sheesh! It HAS been a long week. I just wasn't thinking. Thanks, and by the way, I really like your self portrait (on your profile page)... very expressive!
-
Rusty, Thanks... It just seemed to make sense to me.... and I just noted the change in "feel" from the home page... not a thumbs up or down... I look forward to seeing more... keep it up, and thanks for the kinks...
-
Okay, I made the statement that I am modeling a keyboard type device. I have decals for each key.. there are 45 some keys. I have a seperate graphic for each key. Currrently, my method is as follows: Here are 3 keys: [attachmentid=14144] I select one of them. and hide the rest. With the one key zoomed in, I load a decal, something like this: [attachmentid=14145] The checkerboard area is transparent. the letter graphic is centered on the key and applied. Assuming the next letter is "B," I would select the next key and apply the graphic as before. And so on, thru the complete keyboard layout... this is a lot of decals, on a lot of seperate keys. The question is this... if I have a graphic that has A B C on it (... not just C); how do I apply just the C on the third key? Does this require the UV editor? Or that I flatten the keys? Well, I've gotten confugled. Please note... where I am writing this, I have no A:M nor PS.... so the jpgs above are rough representations of the real things.
-
I am currently building a keyboard type object with ~43 decals and more to go... each is currently a separate graphic file... I am not running into this problem... But, I do intend to combine them into one (or at least just a few) graphic file(s) to save space in the PWS if nothing else. now I have to try to look at tutes to try to figure out how to combine the files and stamp just the portion I need onto each distinct key.
-
That could be it.... Vern Zehr has alot of experience with decaling and the seams that can show up... can't look at the file here... but maybe that IS the problem.... Are you using Photoshop or equivalent? Alpha layer might help eliminate your problem.
-
just quick thoughts here... I'm sure you did this right... It's just that well, sometimes... You right click applied the decals, right? You applied them in the proper mode... planar, spherical, cylindrical.... they are high resolution pictures.. not blown up little ones.... stretched to fit? otherwise I can't understand what would be happening...
-
Rusty, Like the site alot.... Though it seems to change "feel" from home page to the rest... and, I wish you had links to the "tools" you use... voice changer and such.... Looks like a promising project... I'll check back for more!
-
Troll, faerie fly-fishing...
oakchas replied to zandoriastudios's topic in Work In Progress / Sweatbox
Will, Your troll looks like some bikers I've seen... at least in movies... hard to believe he's on foot. I'd be rollin on the floor laughin' if he was on a vintage Sting Ray that was waaaay too small fer 'im. His bucket o'fairies hangin on the handle bars... and the rod bungee corded to the back of the banana seat (or held on to with fingers, across the handle bars)... But that's prolly a different story.... and it only just came to mind studying the sketch! Love the pencil rendering concept! -
okay... any photo was an exaggeration... But, properly lit ones should work fairly well... especially for a bas relief in stone... There is a sub program for the shop bot that does this (shop bot is a CNC router that can do these reliefs in wood and marble) on up to 4X8' sheets of ply, or stone, or corian...
-
Lookin' forward to it, Dan! Keep it up...Submit it to Chrysler... They'd build it! John or you or both might just get a great job!
-
Character makes me smile... Jay Leno/Bill Clinton hair... love it! I look forward to seein him move!
-
Hey, It's lookin great! And it's a Flinstones mobile! Foot power beats those high gas prices! Good job on the dash so far...
-
Rodger, That looks great... You'll save soooo much time and memory with V13's pixel displacement! Of course, it won't be modeled, but pixel level displacement is working with one patch! And, better yet, any photo of anybody could be used!