John Keates
-
Posts
1,244 -
Joined
-
Last visited
Content Type
Profiles
Forums
Events
Everything posted by John Keates
-
Kanga: Thanks for the description. I probably wouldn't have thought of doing it that way. I will give it a go next time. Iham Wrong: Nice idea! In fact, I may well be able to use it. The owner of the car is a yuppy who loves his office toys. A toy version of his car on his desk will go well with his personality.
-
Thanks people Zaryn: Yes, I agree with you about the door. I will fix that. Mike Lium: I looked on the site. Most of the weels there are fairly basic. I am not sure how much detail I will go into yet. I will have to work those storyboards out before deciding. kanga: I have learned a lot making this car and one of my first mistakes was in making the thing in one lump. I only detached the door near the end when I realised that it had to open at some point. It is looking rubbery as you say. It is like it was vacuum formed or something. Maybe if I add more splines I could sharpen things up a little.
-
Thanks for the replys guys. I wasn't given email notification of them for some reason so I thought nobody was responding. Mike: Yes, it isn't too bad now that I look at it. It is when you get closer up that it starts to loose focus but I am not sure if that will show in animation. Dearmad: Yes the wheels are seperate. That is one thing that I need to improve. Does anyone know of a good free wheel model? robcat2075: He he :) I do often go for the realy whacky designs. I did mean to go further than I ended up doing so maybe a few more flash details are in order. I am not sure about the rocket engine though. R_Reynolds: Thanks for the tutorials. I should have had a good look through those before I started. One thing that I should have done was to use a rotoscope. I had a drawing but was to impatient to get it into the computer. This realy back-fired when I realised that I had dont the whole thing out of proportion and had to squich it about a lot. Those blueprints will be realy handy.
-
Yes, It is the roundedness of the shoulders that I was looking at in both cases (the ones that you mention). Maybe look at some anatomy drawings. There should be a slight pointedness to the shoulder where the bone is. Maybe they are a little large also. It is hard to say as females were often done in a rounded and "big boned" kind of way. If you look at the woman with the hourses, her arm is maybe a little far from her body. It is difficult to say exactly what it is that I am seing here. It is pretty subtle, but I guess that you are going for perfection.
-
Here is another pic. I am not to happy about it so far, it is a little lumpy and ill-defined. Are there any car experts here who could point me in the right direction for some car reference that would suit?

-
Here is a car that I made to go with one of my characters. I am no expert on cars but I thought that I would just do a quick sketch and then start modelling. The idea is that is supposed to look kind of flashy and impractical.
-
Wow! these are realy impresive! I havn't seen such detail on an AM model before. The displacement map feature is getting quite an outing recently. It is hard to give you a crit without the origionals. If I am going to be realy picky though, there is something perhaps not quite right about the shoulders on the last two, but then they might be like that on the statues. Congrats on a job well done though, I am blown away!
-
Wow! I never saw such good displacement mapping come out of AM! Have they changed the way it works or something? Are you using v11?
-
She looks realy nice. I think that you could run into problems animating her if she is going to smile though. There are no smile lines. Maybe this could be done with bump maps?
-
I like no. 2 but it is to similar to spider man. No. 1 is good because it gets the "dark" thing accros well. Maybe the eyes should be a little lwer though?
-
Realy nice work there! You have done a great job making un-usual features that still look right. I particularly like the mouth area. What is he for? He would animate well.
-
After fixing the 5 point patches, if you find that the shading is still off, add some geometry and then get rid of it (just add a spline in the middle of space and right click to undo the operation). Iether do this or save and re-load the model. The artifacts shoud be gone.
-
Biased normals are just like normal splines only you don't get ridges (as long as the patches are quite even and square). If you go to the customise tab in v10.5 then you will be able to add some icons to your modelling menue (it is a while since I did this so I can't remember exactly how to do it and I don't have acces to AM at time of writing). Anyways, once you have added the biased normal icon (a slanty red line) you can select all of your geometry then click it and you will hopefully see ridges dissapear. Biased normals also can have a more rounded appearence. They do have the dissadvantage that they can be sensitive as to what is going on around them so they sometimes flip about but I have yet to find this a problem. Porcelain is a good finishing touch and you can get a realy smooth result with it. Make sure all of your normals are facing the right way though. Porcilain is a material that you can find in the geometry folder in materials in your cd.
-
looking realy good there. If I were you, I wouldn't worry too much about smoothing until you upgrade. v10.5 and later treat geometry differently and a lot of the creases that are there will go if you use biased normals. (you will have to find the icon in the customise options and drag it into a toolbox). Porcilain can also help.
-
Don't worry, I am sure that she will accepy you before you die (Just my enterpretation)
-
I have used a similar method. You have to forward-plan a bit but it is great fun. I could get all manner of expressions out of the eyebrows without worrying about how the pose sliders add up.
-
Wow, I can't believe that I missed this one! Amazing work as usual Jim. Glad to see that she is maintaining her demeanour and looking lovely as ever. This photo.. err I mean render shows of her stylized features more. If only there was a way to get faster and smoother soft-shadows.
-
I wanted to work out how to make a body deform when it hit itself. For example if a hand went into a belly. I have attached my test project if anyone is interested. Open the action and move the last bone in the "arm" chain or just play the animation. When it touches the "belly", it deforms so that there is no intersection. How it was done: There is a bone rooted to the belly area that points towards a null which is a child of the hand. "aim to reach" is set to "on". I made a realtionship for the z scale of that bone then moved a pose slider which deforms the belly and pressed the button to stop making a relationship. I then opened up the channel for the relationship and started editing it so that the belly moved in such a way that there is no intersection. This is the best way that I could come up with for doing this and doesn't take too long to set up. It isn't perfect as it relies on a sphericle area of influence. I guess that it would be possible to set up a system of several compression devices to get more detailed movement. If anyone can think of a better way then It would be interesting to hear it. Body_Collision_tests.prj
-
Very generouse of you to upload that model. Downloading now.... Oh, by the way, Hash HAS improved 5p patches. If you use 10.5 then you will see a diffference. They can still cause slight problems under some circumstances though.
-
The problem here is that you are using to many of those hooks in one little area. Hooks rely on there being lots of information as to how they should look without you telling them. If you have a whole load of hooks together, then each one of them is looking about to see the lye of the land but all it can see is other hooks asking the same question. Hooks are realy handy but it is best to find ways around them. A nice even mesh of square patches will allways look best. Gary, in your exmple there are two hooks both sort of "facing" each other. By re-adjusting things a bit you could easily have it so that you have one spline running through them rather than two hooks: Take the spline that is running from the crotch and allong the bottom of the 5point patch and make that the same spline as the one that hooks on below it. You will have to detach it from its current position to do this. Then you will be left with a spline waiting to be told what to do above it. You can make this run into the spline that is currently hooked above it. Two birds, one stone - now you have just one hook. Hope that was clear and usefull.
-
Well you are certainly doing about as well as could be expected anyway. Sterling job! One thing that might help is another spline at the top of the boot near the back edge. You see where you have all those splines running up towards the rear window? they could do with another spline to hook onto before going all the way up. Just a little suggestion. I am sure that you don't need it though. My mechanical modelling sucks compared to this. Can't wait to see more.
-
Looking at that back area, I am seeing a few places where a hook would work well. Is there a reason why you are avoiding this?
-
Wow, that is looking pretty spectacular. I havn't seen much of this kind of work come out of AM. It will be nice to see it finished and rendered.
-
Oooops!! foegot the image
-
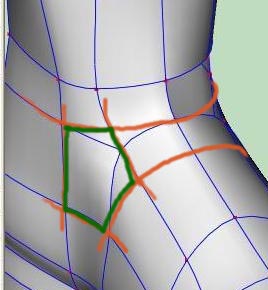
Here is your shoe with lines drawn where I would put splines. The five point patch is in green. Keep at it.